TLDR; Weak CAPTCHA services utilized on the internet can be programmatically solved with a fairly high success rate.
Problem
A lot of firms, including mine, have begun to recommended CAPTCHA’s be used on all web forms which feed into existing business processes (registration pages, contact pages, etc). This recommendation can be a double edged sword, because there are still several CAPTCHA services that utilize weak CAPTCHA’s, which can be readily decoded with modern image analysis techniques. That being said several individuals have asked if there is a systematic way to test the strength of a given CAPTCHA, to determine weather it’s weak or not.
Solution
There are two major methodologies currently being widely used to decode weak CAPTCHA’s. The first technique is to remove the noise from CAPTCHA images by reversing the programmatic functions, used to add visual abstractions. Then simply comparing each character to a set of known sample characters. This method relays heavily on evaluating each weak CAPTCHA service offering and creating reliable function sets to solve individual CAPTCHA’s. The best tool for using this technique to test for known weak CAPTCHA types is pwntcha.
The second methodology uses vector based image analysis to compare each pixels location to the expected location given, each possible character. After consolidating all of these pixel location checks, each possible character is ranked based on its probability of being correct. The success of this method relays heavily on the use of a reference font, thus if the reference font and the CAPTCHA’s font are distantly different the analysis won’t go well. The best freely available tool I’ve found using this technique to test the strength of CAPTCHA’s is captcha-decoder.
How to use
Unfortunately almost every implementation of CAPTCHA’s is going to be different enough to make web scrapping a sample set of CAPTCHA images difficult. Thus the first step is always going to be downloading three to five CAPTCHA images for testing.
Then we can run each image through pwntcha and see if it can identify the image as a known weak CAPTCHA type.
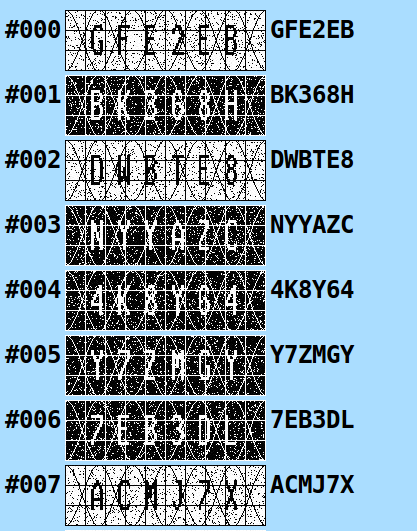
Pwntcha <img>
Test run using Paypal’s known weak CAPTCHA samples 100/100
Test run of vBullentin’s known weak CAPTCHA samples 100/100
Last we can run captcha-decoder on each of the sample images to try and get an idea if vector based analysis is going to be successful. You will have to use your best judgment once you receive the results to determine if the risk is high enough to create an issue. Generally if all the correct letters are guessed with over 70% confidence the CAPTCHA should be considered weak. However an organization may believe 70% is too high and may only have a much lower tolerance.
How to Install Arduino Backdoors within Modern Keyboards
TLDR; It is very possible to place a Teensy Arduino within modern keyboards and mice as a hardware backdoors in order to implant a Trojan on a targets computer.
Warning #1: Please understand that working with electrical equipment and components is inherently dangerous. Burns, shocks, and electrical fires are fairly common when attempting to manipulate commercial/consumer grade electronics.
Warning #2: The author of this article claims no responsibility for personal harm or damage to personal property. This information is provided as is and without merit or warranty.
Problem
Some of our tougher targets have gotten very good at detecting and shutting down our normal social engineering attack vectors. In fact several are now able to systematically detect and shutdown our classic, emails, phone calls, and media drops Trojans. Once a client has established a strong defense against our standard attack vectors we are at somewhat of a loss as to how to approach social engineering. This has forced our team to come up with new and innovative ways to get in and get access.
Solution
My innovative idea is a new twist on an older poly idea, the hardware backdoor. Where one actually solders malicious hardware into another hardware system to gain access. This is normally done to subvert security controls such as drive encryption or to maintain access to a computing system.
However I’m not the NSA, nor am I am electrical engineering, so instead of attempting to compromise an entire computing system, I set out to simply place a hardware device within a keyboard. The idea being that I could purchase a few higher end keyboards, backdoor them, and send them out as gifts to targeted individuals. I quickly discovered a cheap Arduino based keyboard controller called Teensy and set out on my quest.
After conducting some further research, I quickly realized why we don’t see this attack vector being used in the wild. I won’t go into complete detail on every discovered issue, but a brief list is as follows.
Most keyboards are now soft-key using two sheets of conductive plastic and a rubber boot to trigger a key-press.
Space is normally very limited and many keyboard types such as soft-key don’t handle added pressure well.
Creating a custom keyboard or even a DYI 60% (uses a modern PCB with built in controller), is very time consuming and expensive.
Keyboards now use proprietary layouts and controllers which make tampering with them difficult.
Almost all mechanical and soft-touch keyboards are now made with a dual or triple layer PCB, adding literally layers of complexity.
Simply splicing a device in the middle of the USB connection creates added complexity by requiring the handling of serial timing, errors, and interrupters.
Needless to say, I had to simplify my plan even further. So I narrowed my focus to Cherry MX mechanical keyboards with built in USB hub ports. Since the Cherry MX keys are extremely sought after and conveniently take up quite a bit of space, it should be fairly easy to tuck the quarter sized Teensy into some free space. Additionally, if there is already a USB hub built into the keyboard controller, I can simply add the device inside by soldering the Teensy directly to the internal leads.
Note: Using this method is quick and dirty. It will take over said USB ports communication path and power channel. If another USB is plugged into the target port, best case scenario one of the two devices doesn’t power up, worst case you have yourself a nice little electrical fire. As such I would recommend clipping the pins or putting a plastic cover over the original USB hole.
The last step is simply programing the Teensy, which is somewhat out of the scope of this article, due to complexity and lack of one size fits all payload. However the Social Engineering Toolkit (SET) contains a great of code to use as a starting point (linked bellow in references).
Note: Creating payloads requires the Arduino IDE with the Teensy library’s, modules, and extensions installed. You also require direct access to the Teensy via a micro-USB cable. Meaning VMware and the aforementioned hub setup should be avoided when compiling and uploading your payload.
Blackwidow Photos
Unfortunately the project for which I backdoored the Razer Blackwidow Ultimate had a fairly tight time table and did not allow for me to get very good photos. Nonetheless, I’ve included two of the better photos I have of the Blackwidow, to show that the same techniques can be successfully applied to modern keyboards as well.
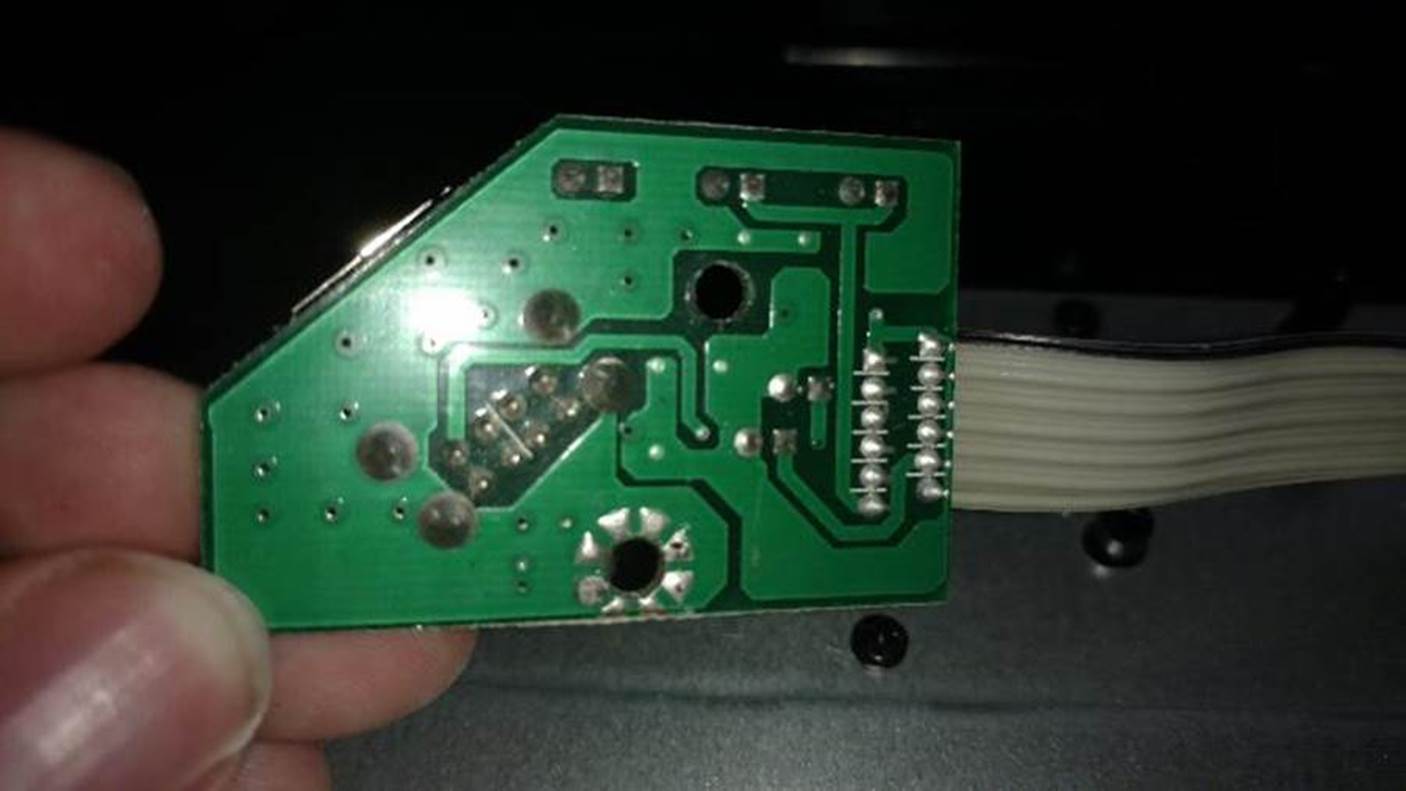
Showing the completed build out of the Blackwidow with the Micro-USB attached to the single set of USB leads on the builtin controller.
This photo shows the limited space within the Blackwidow shell. In fact the cable as to be flush with the PCB corner in order to get the case to close. Then the Teensy itself has to be firmly placed in an angle between the row of F-keys and the back wall of the lower plastic frame. In future builds I’ll likely just shave/grind down the plastic frame and or PCB to make things fit more precisely.
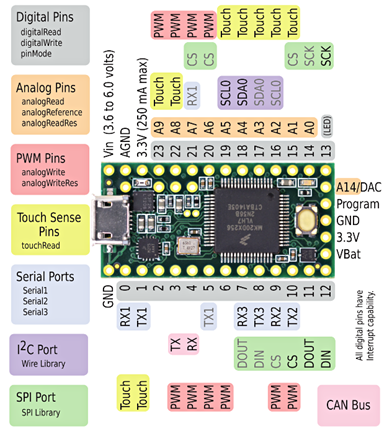
About the Teensy Arduino
The Teensy is a quarter sized fully programmable keyboard controller based on the open Arduino hardware standards. The Teensy allows for complete control over the keyboard, mouse, and touch screen via pseudo C code. It allows for roughly 30,000 lines of compiled code and roughly 60MB of on board storage, so we can accomplish quite a bit. It also is designed and built in such a way to allow for it to be easily extensible by offering 54 leads/pins for project flexibility. The Teensy also operates at as low as 3.3 volts with .25 amps and as high as 6 volts with 1 amp, making it robust enough to be connected directly to a powered or unpowered USB hub/port within a keyboard or mouse.
A Simplified How To Guide
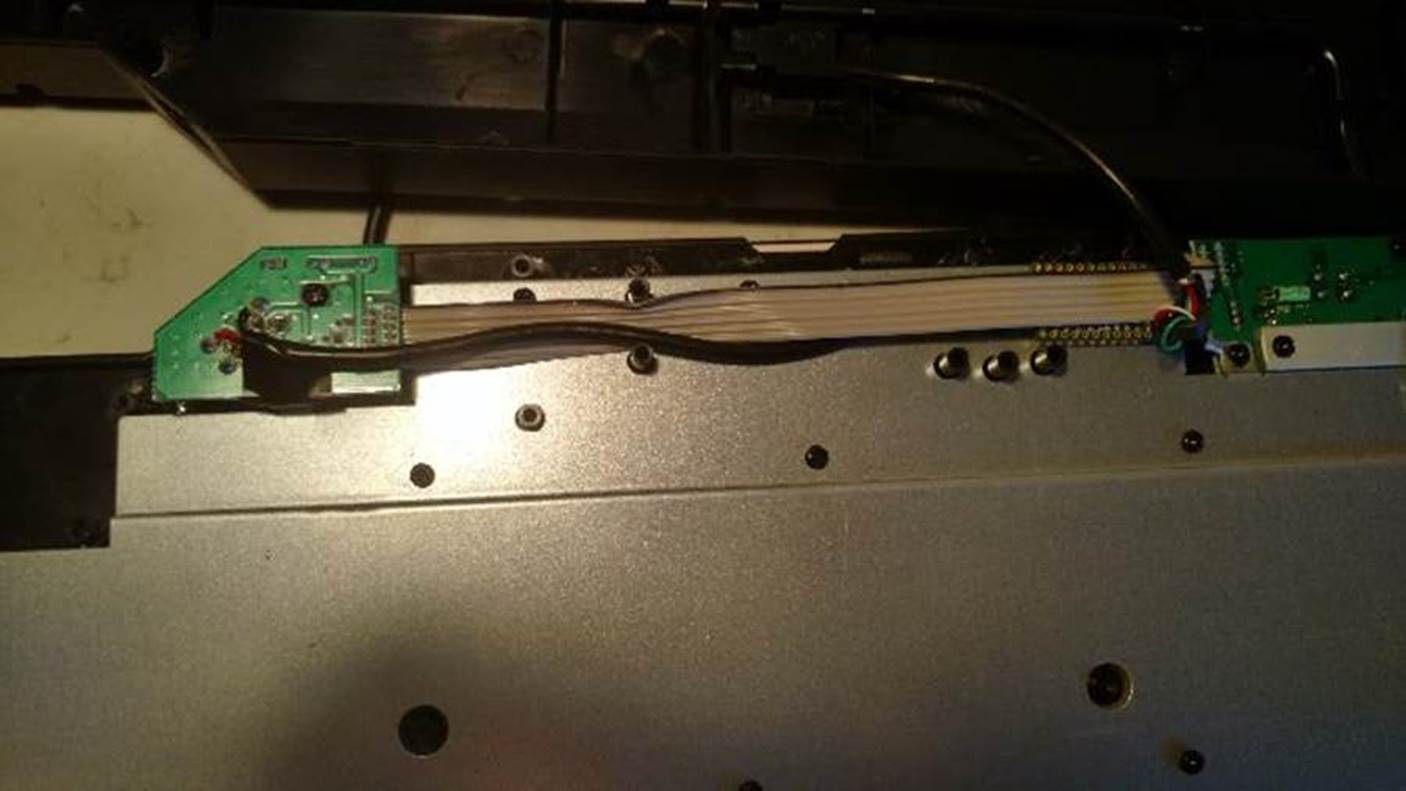
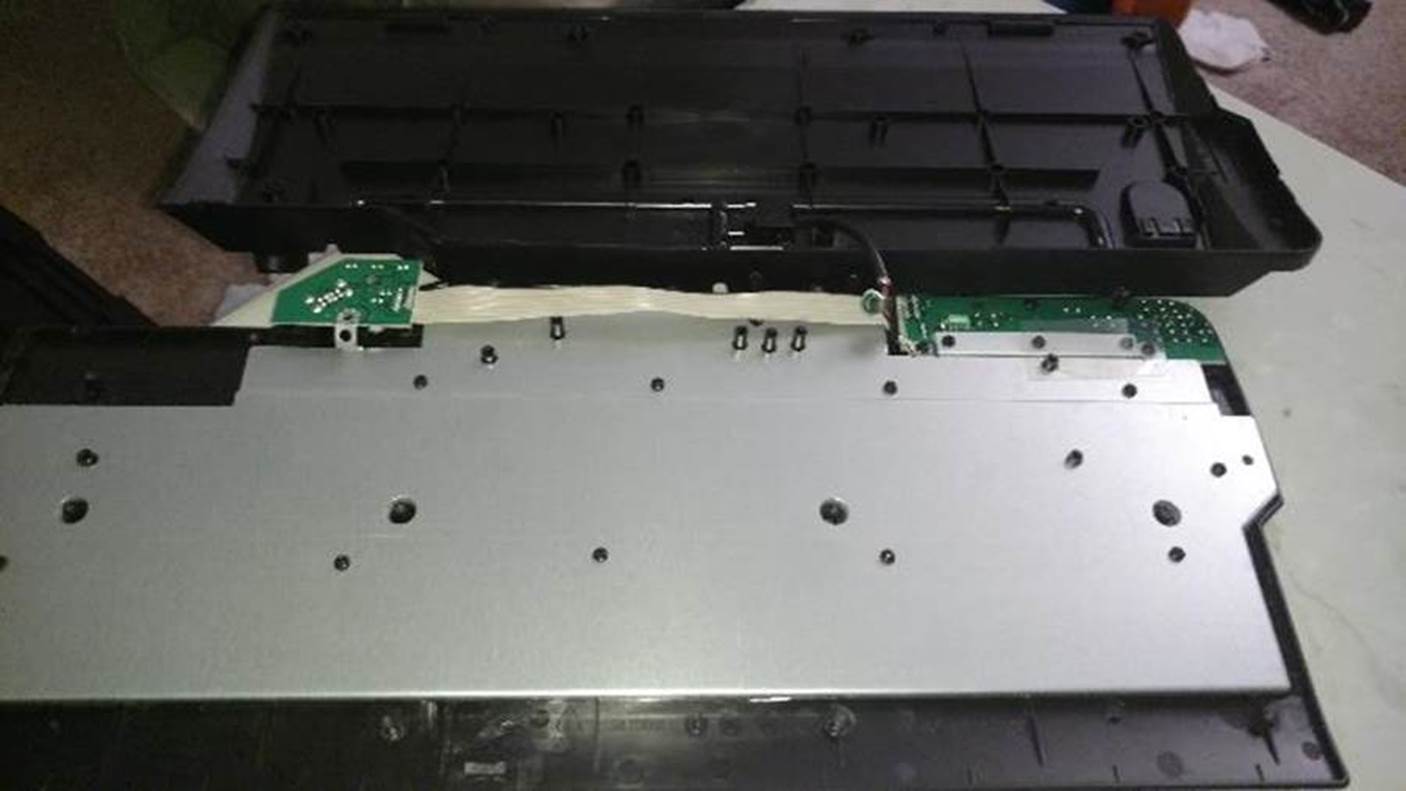
The photos below are of a generic HP console keyboard being backdoored. This is simply because I happened to have it laying around and it awarded me the time and error tolerance required to provide detailed photos and guidance. As stated, they same steps can generally be followed on a Blackwidow, however the components are quite a bit smaller and space is more limited, making it much harder to work with and display.
The first step is fairly simple, just take all the screws out of the back of the keyboard and pop the back cover off. Just be very careful to not damage any of the components or parts, including the tiny plastic tabs that normally seal the edges.
Next identify the USB port to target by considering surrounding space and ease of access. Here I’ve chosen to use the forward set of pins since there is more space and avoids the lower screw hole/ground
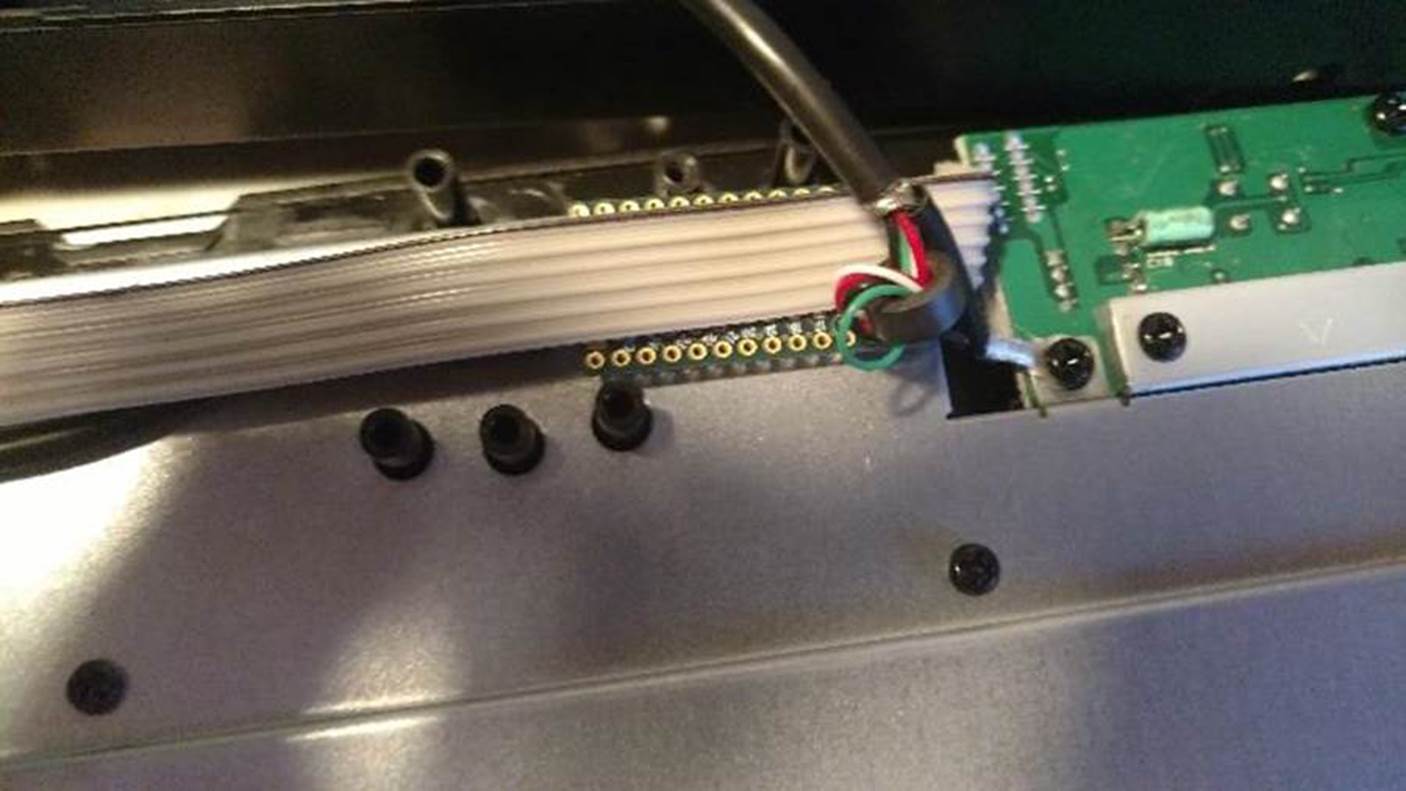
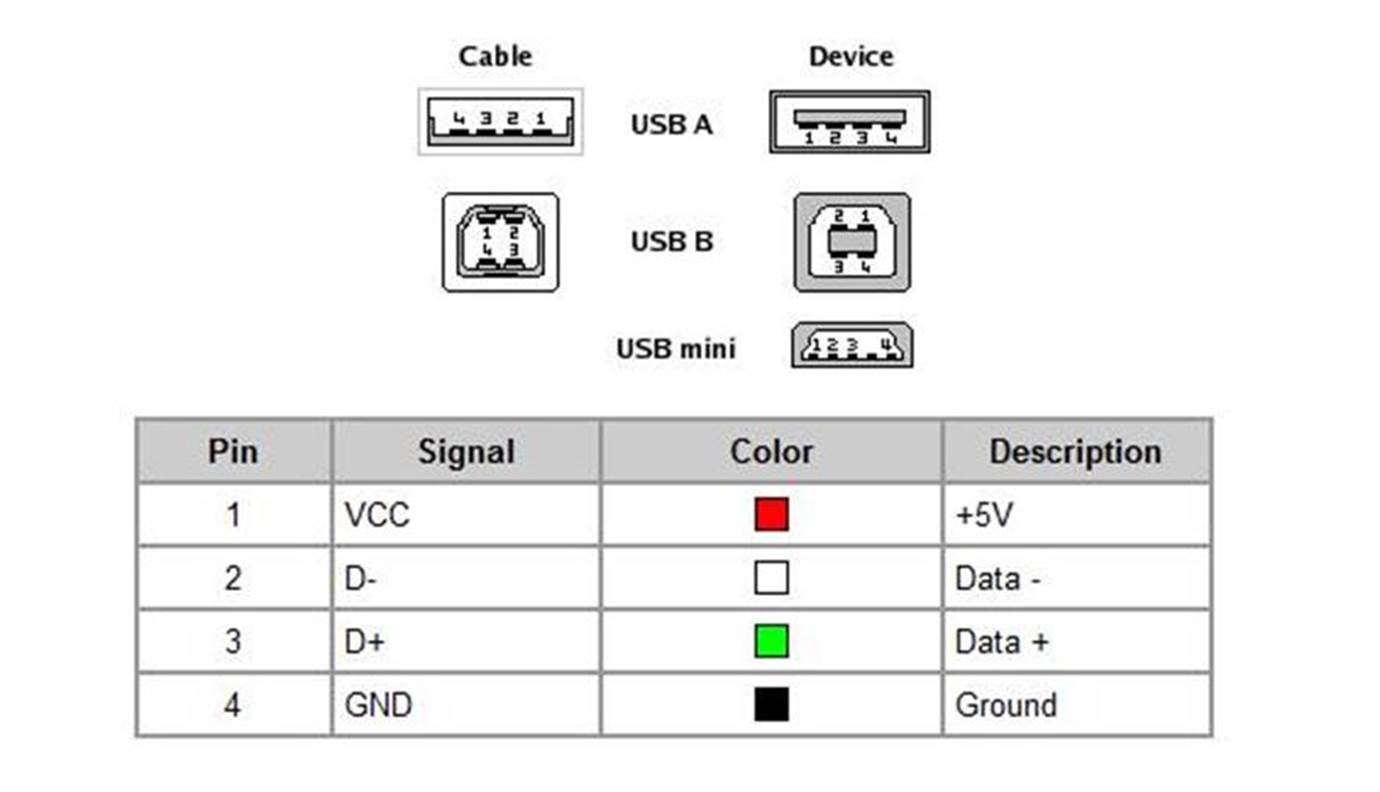
Next review the orientation and contacts of the female USB port to identify each lead against the USB standard. In this case the leads were on the lower portion of separator within the female USB port.These leads are just copper or aluminum that normally just have a 90 degree bend and connects straight down on the bottom of the board. In my case the leads simply passed straight through to the bottom USB port and were arranged in order from 1 to 4.
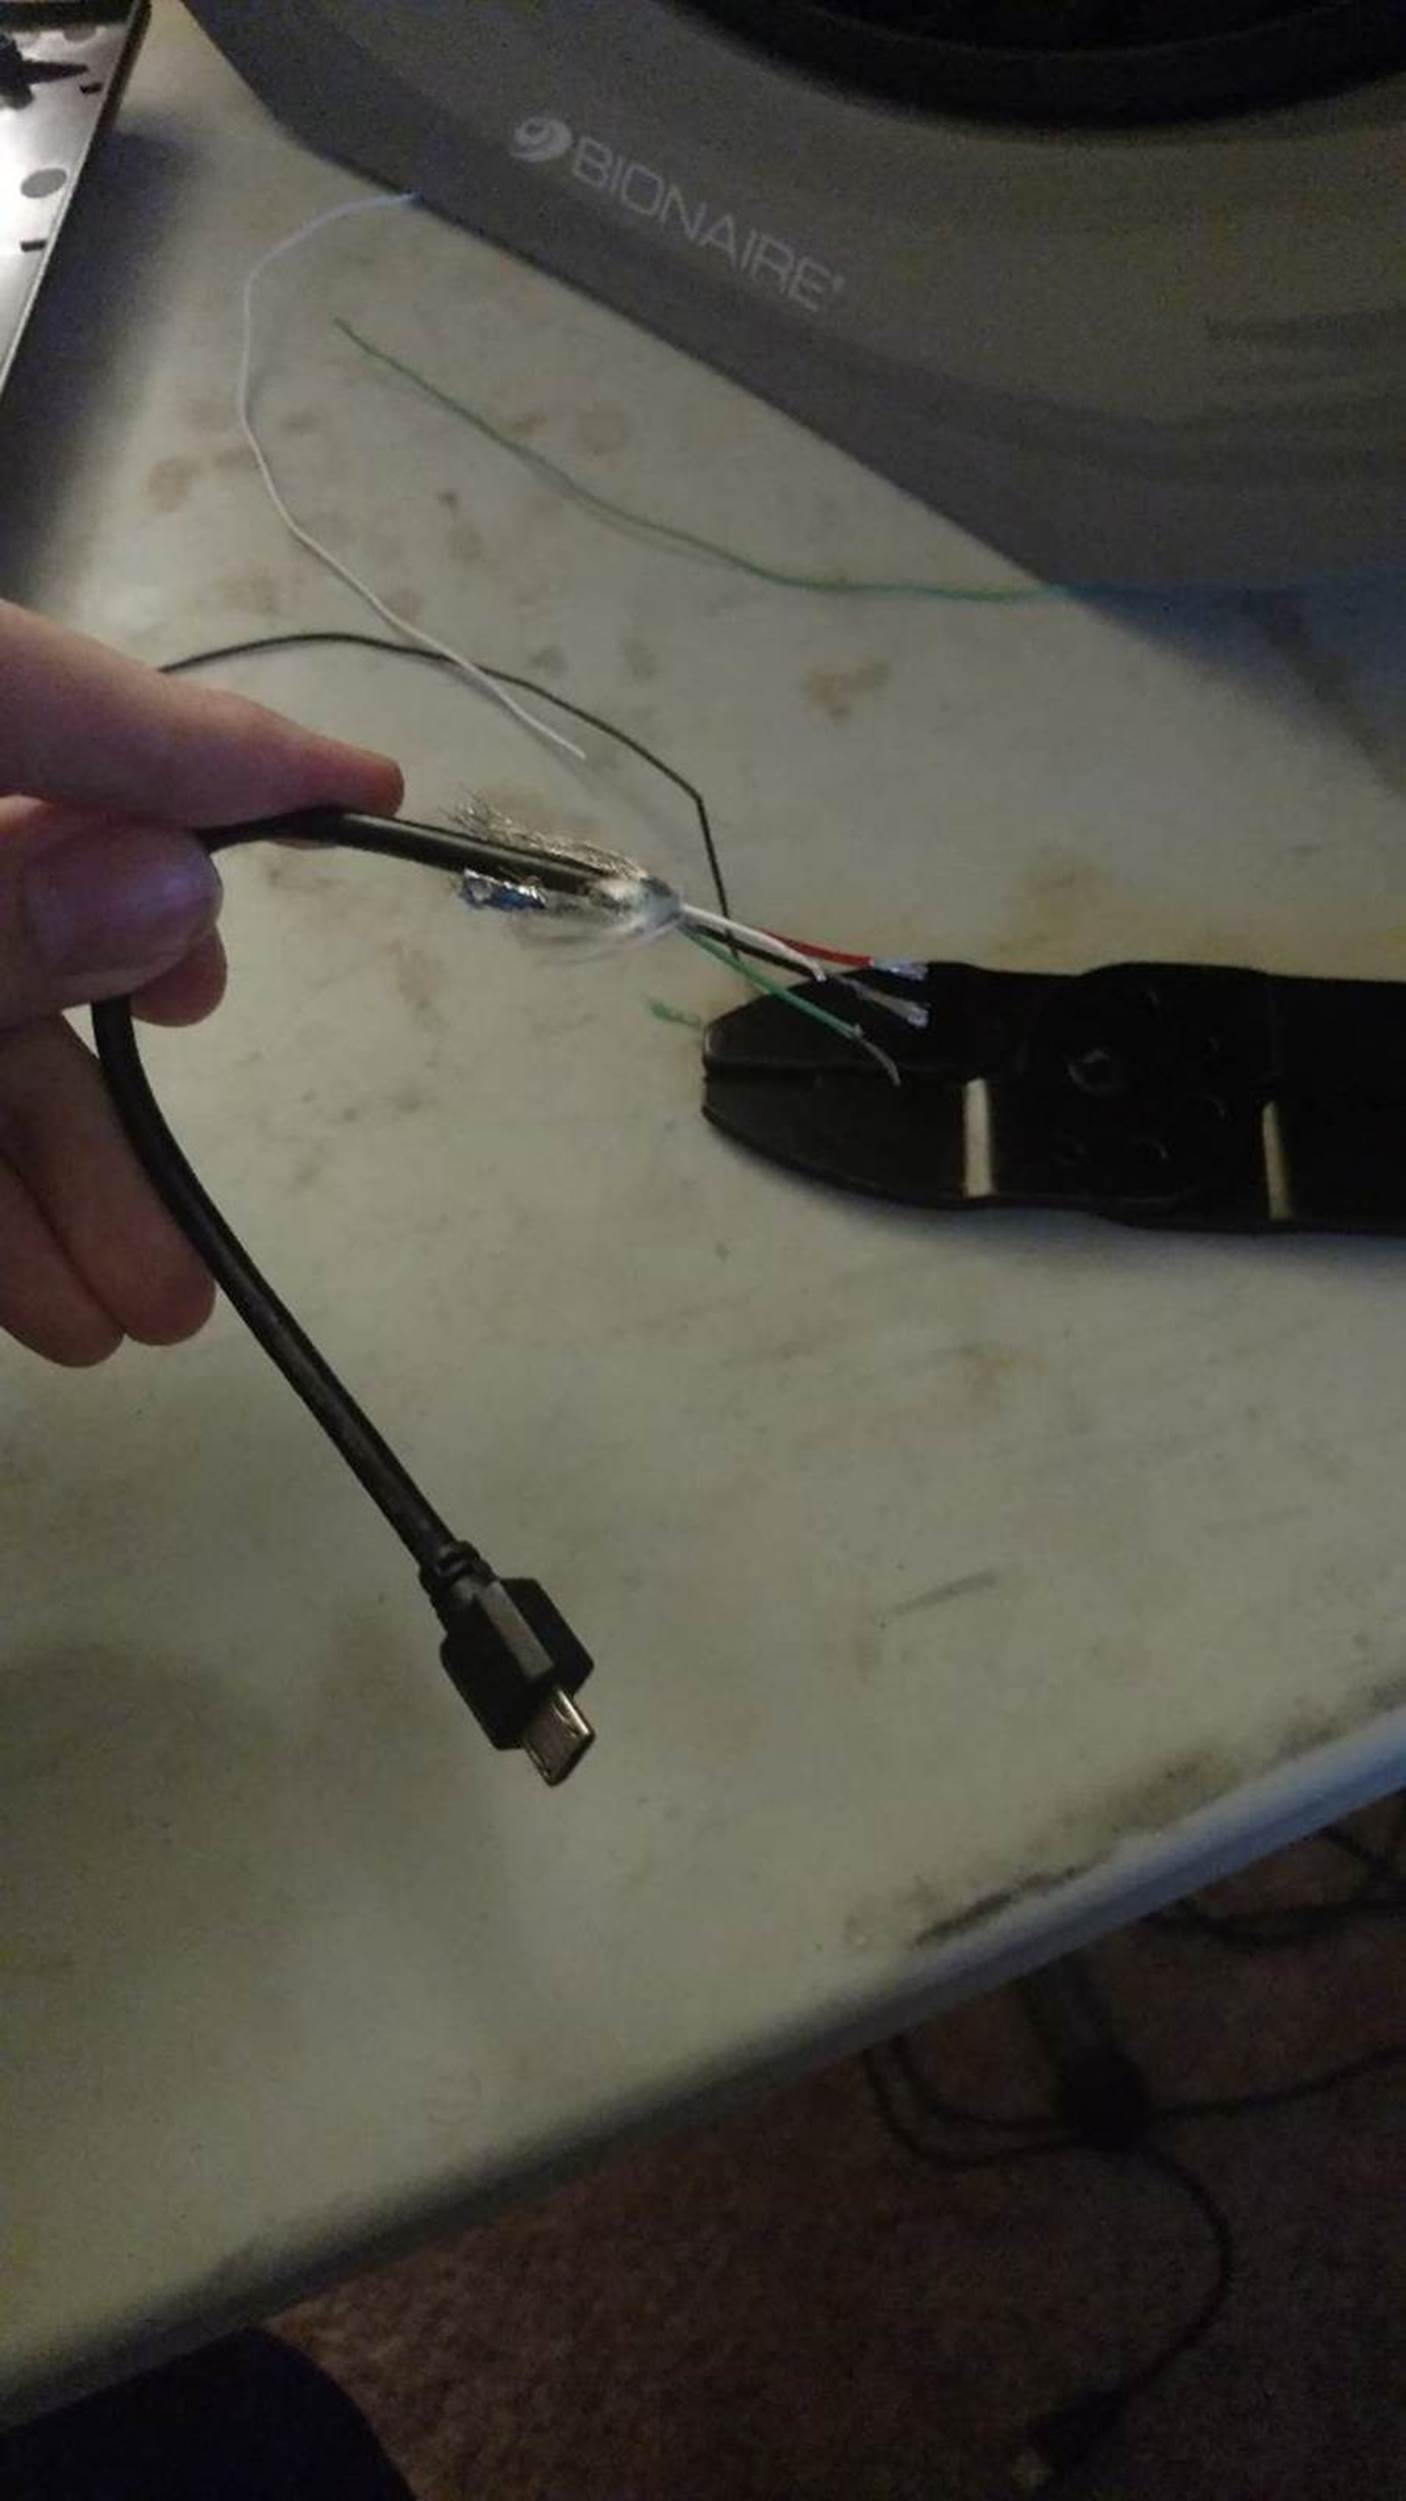
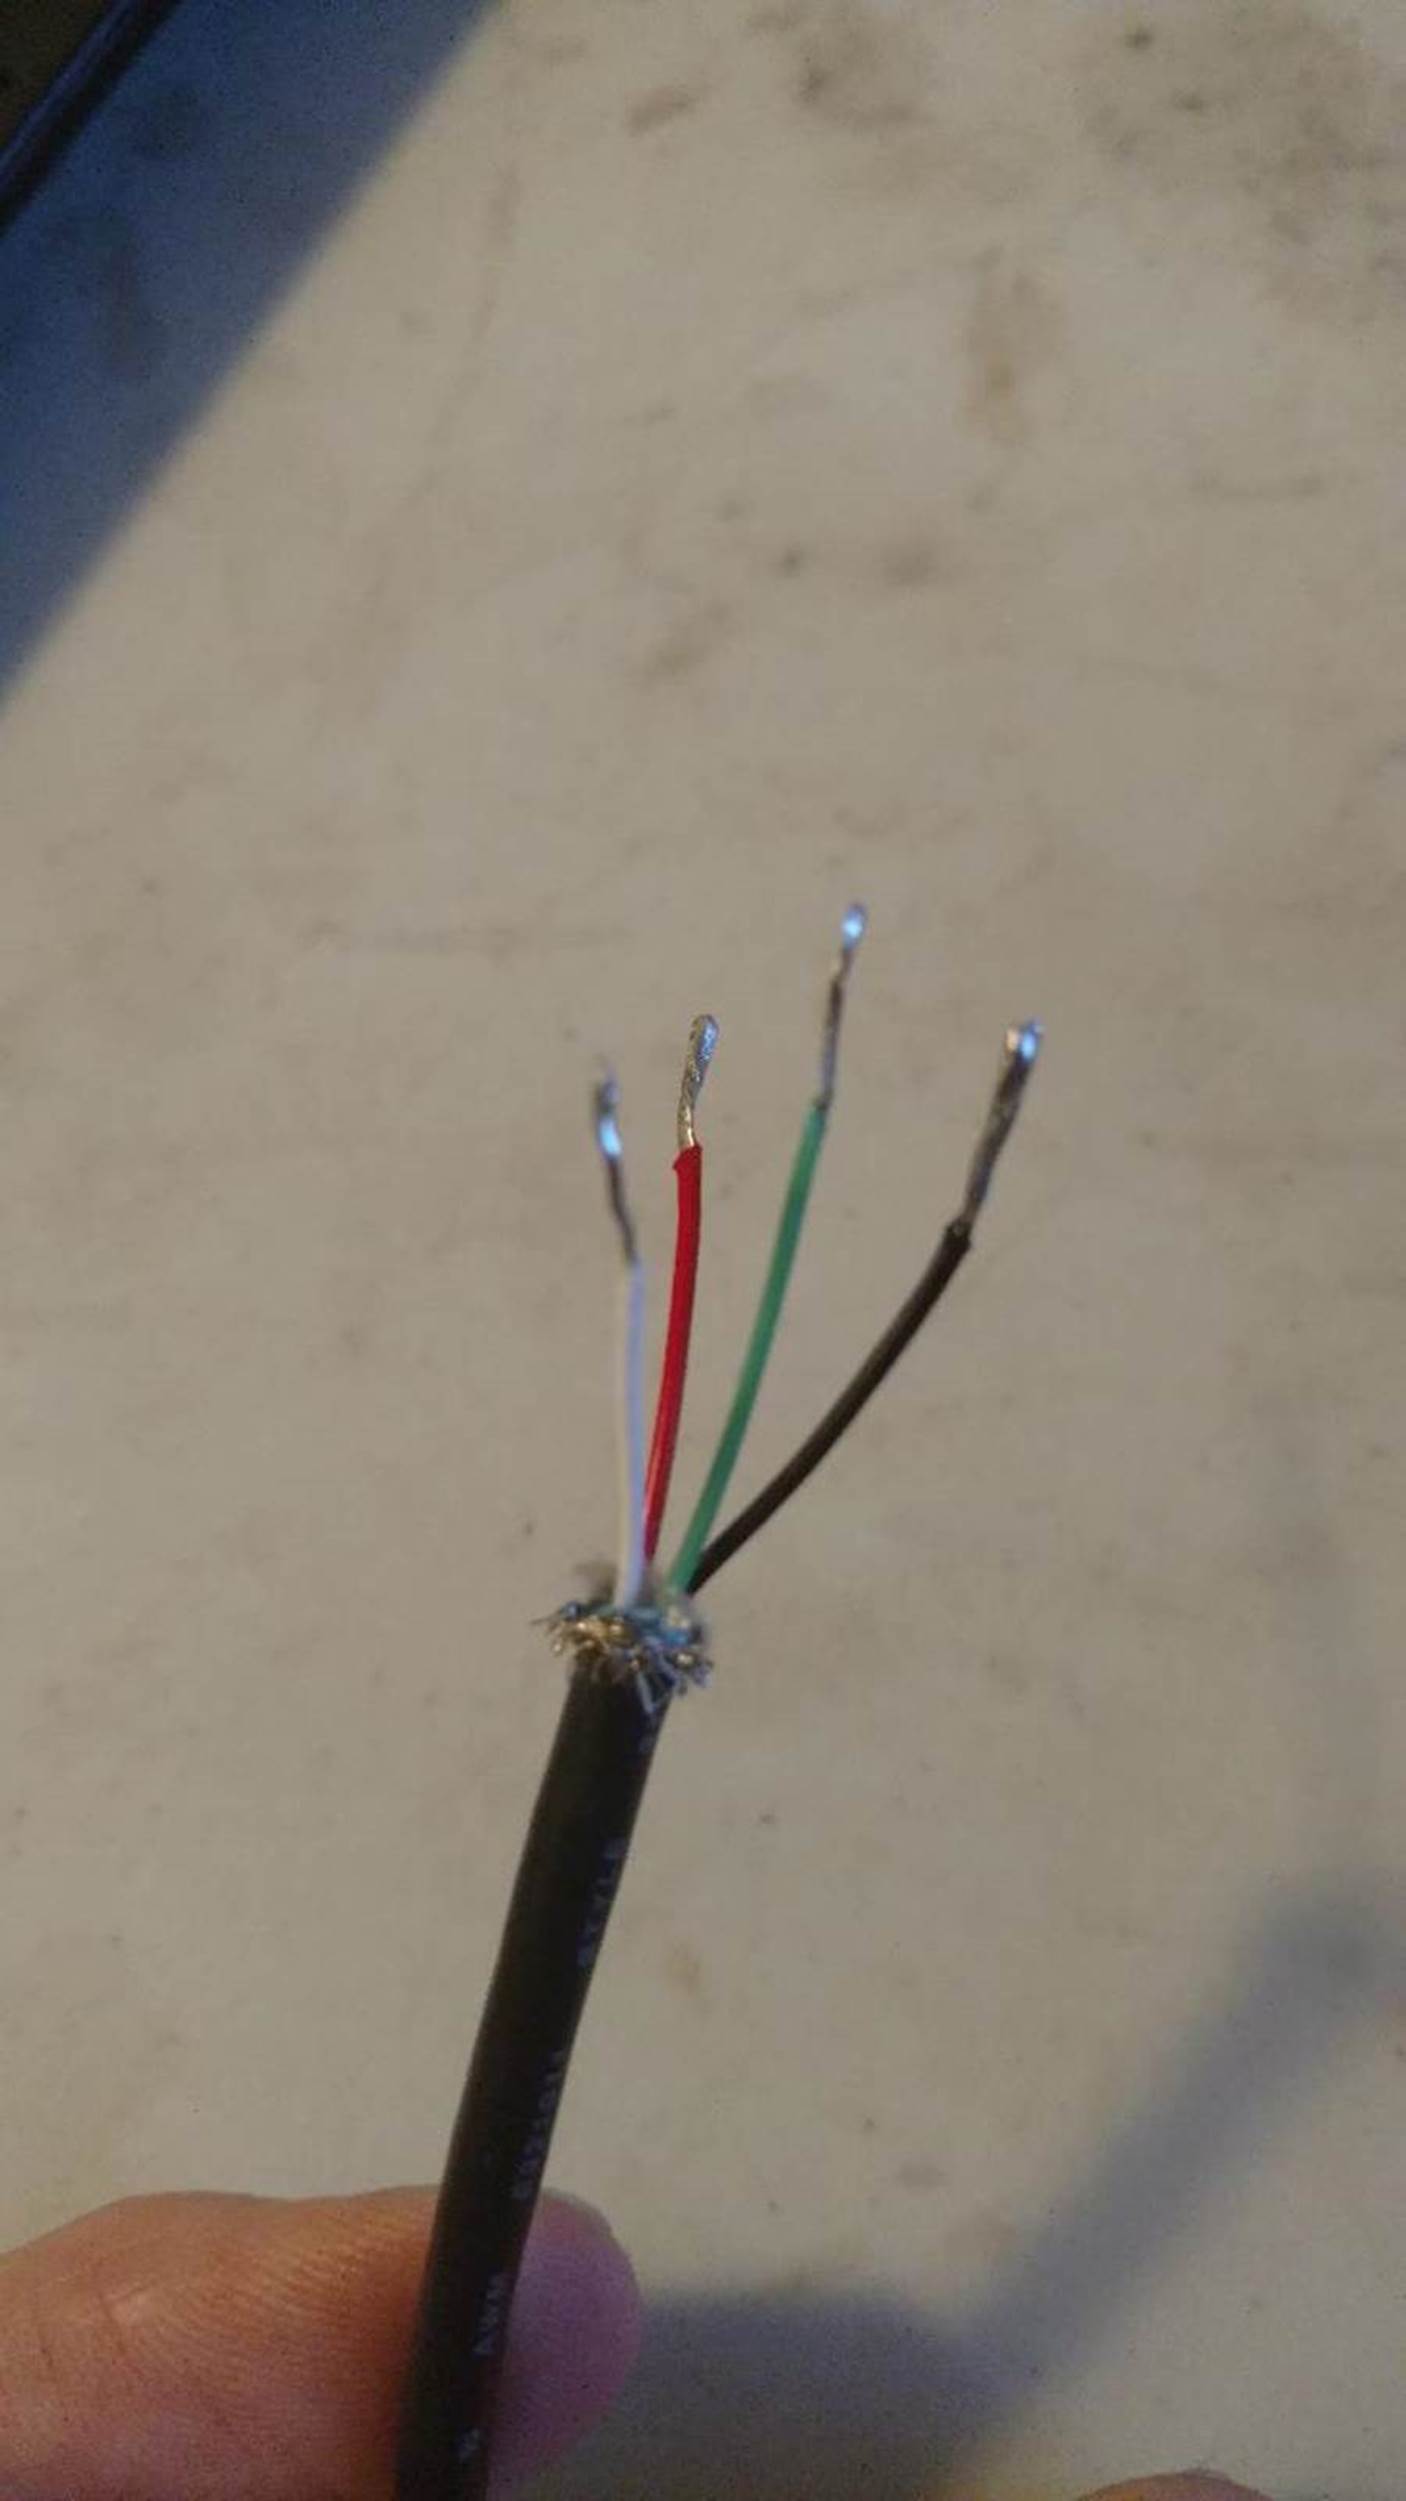
Next cut a micro USB cable to the needed length, remove the shielding, remove the netting, untwist the wires, and strip the ends of each of the four wires. Then be sure to cut away all of the excess shielding and netting, so it doesn’t get in the way going forward.
In my case, each of the striped wires had dozens of tiny aluminum wires within them, instead of a single copper core. This can make keeping these wires together while soldering really annoying, but can also be used to your advantage by soldering the smaller wires together into a nice single bundle. The bundle makes soldering easier and the excess solder soaked up by the wires, normal removed to need to add additional solder when connecting the wires.
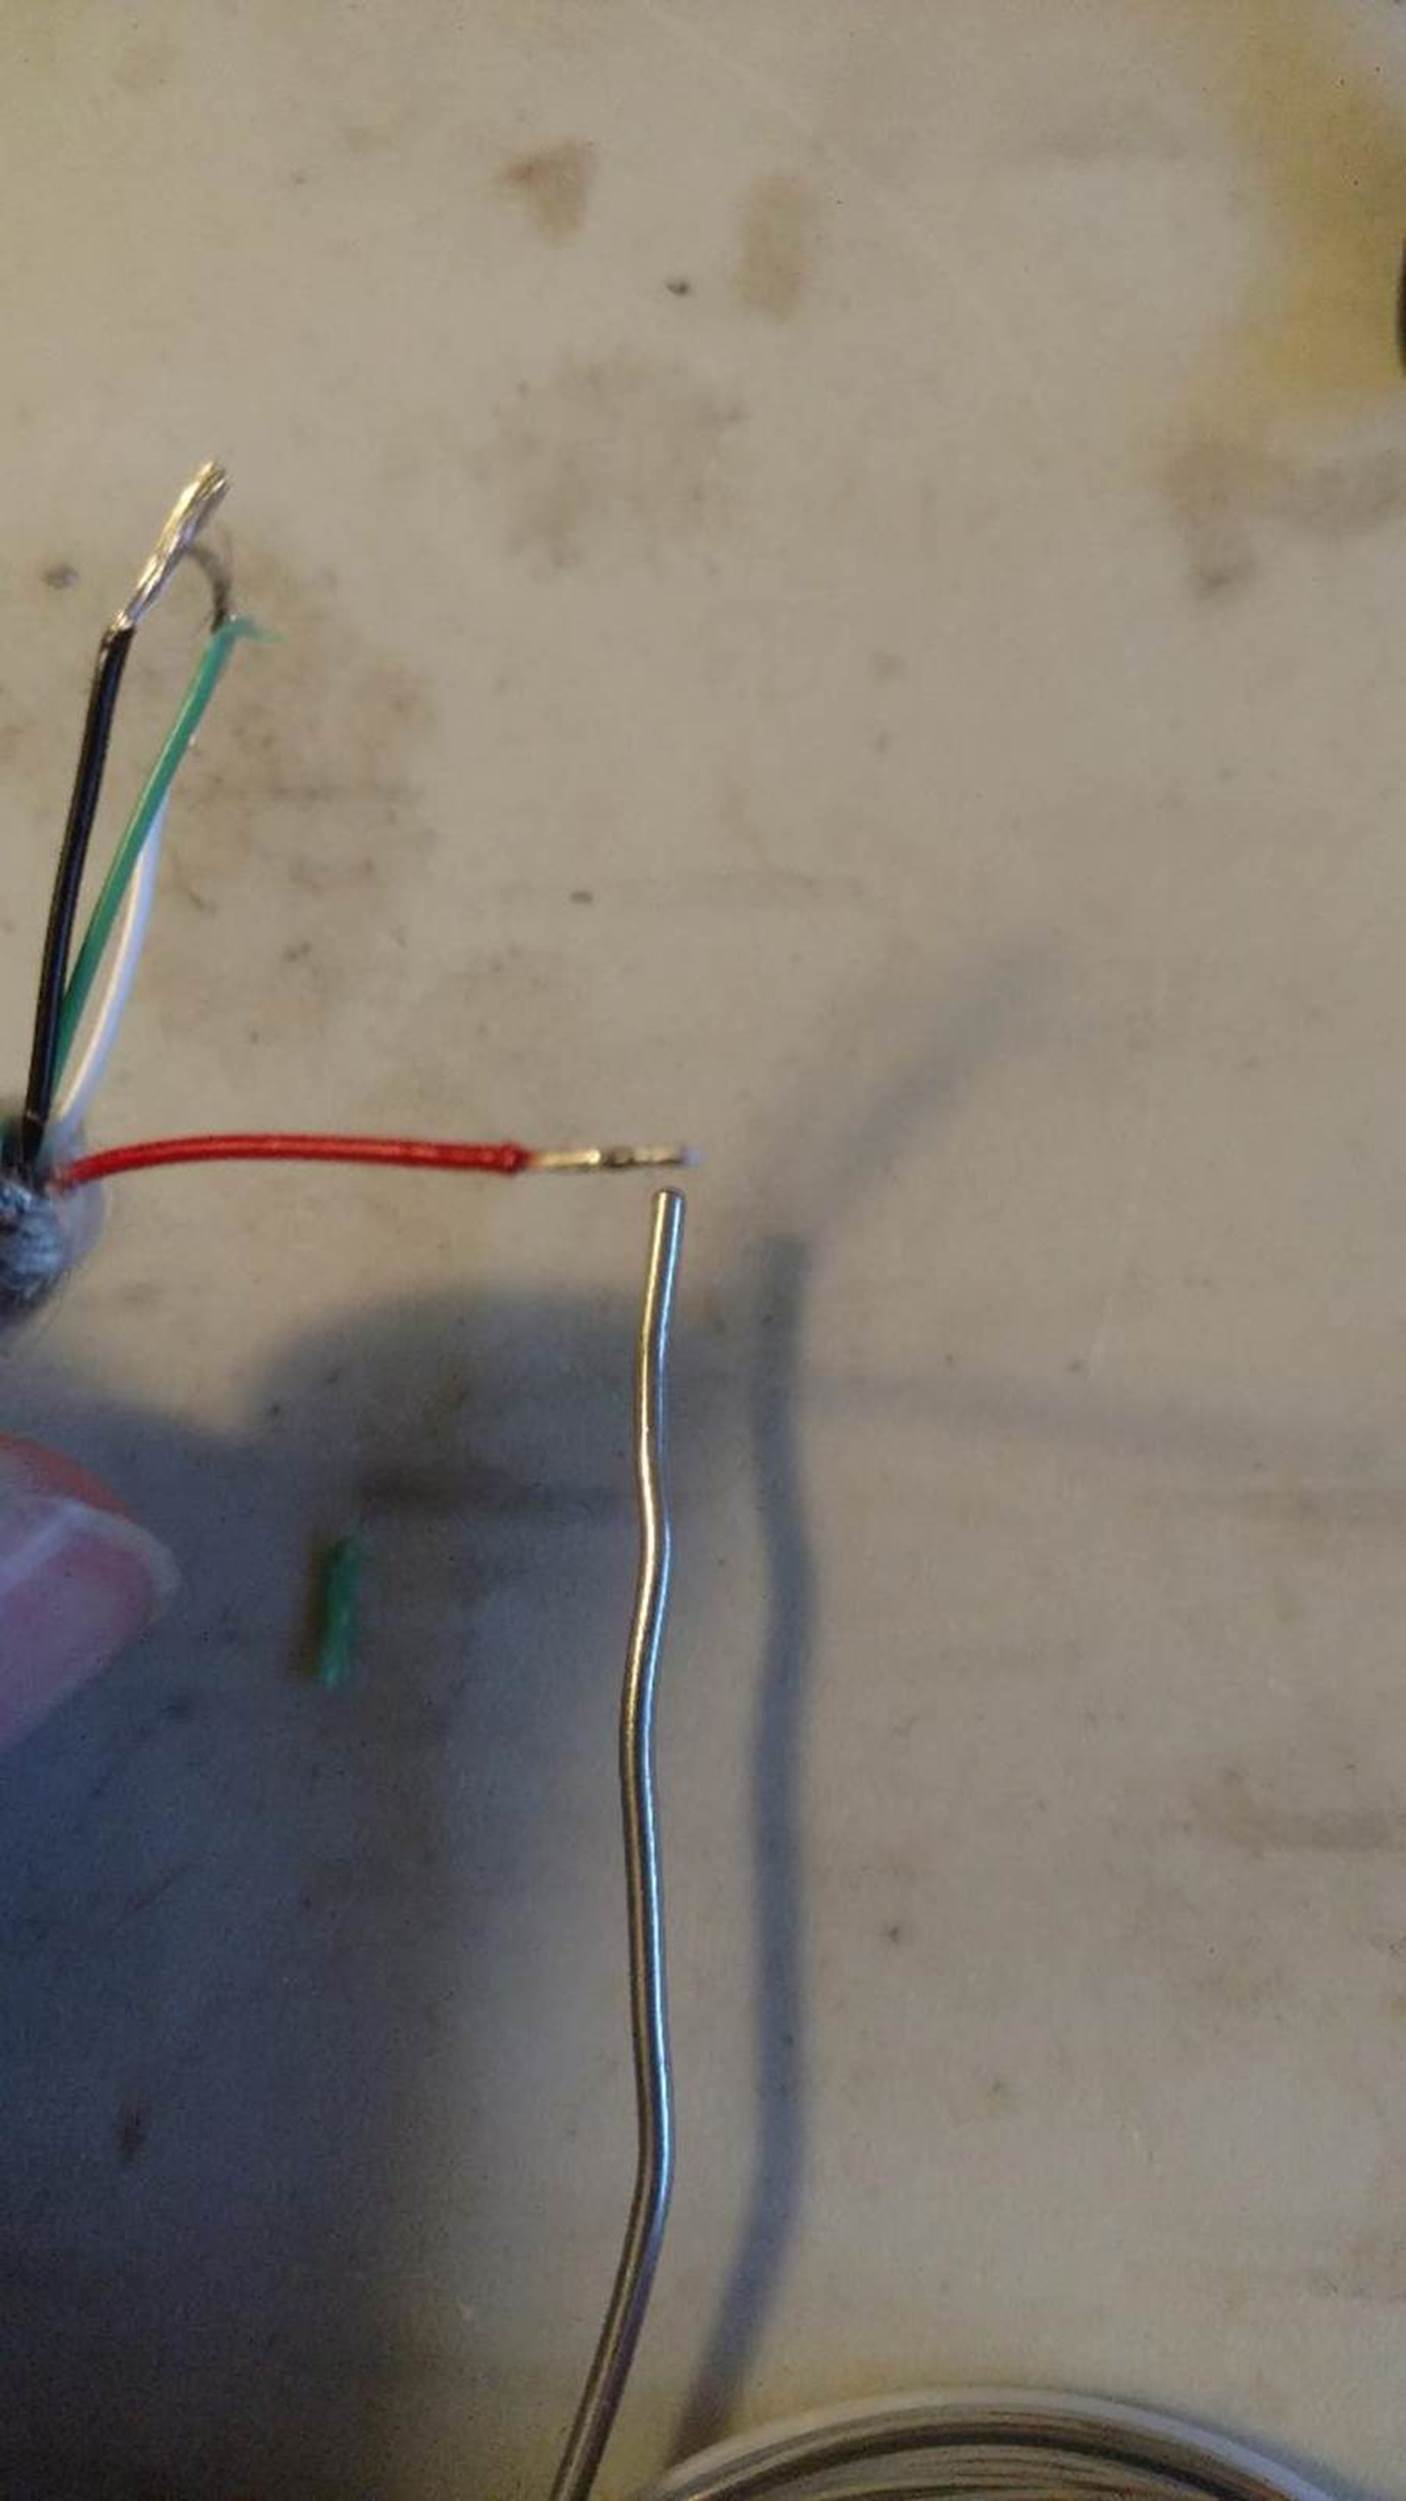
Once all the bundles are complete, they should all be soldered together and have a small ball on the ends. The ball on the end is used to quickly heat up each joint with the soldering iron and to quickly set the wire on the lead by holding it in place for a few seconds. If you are sensitive to heat, you may want to use some metal clips or helping hands.
Be sure to double and triple check your solders against the USB wiring standard before testing, to avoid electrical fires.
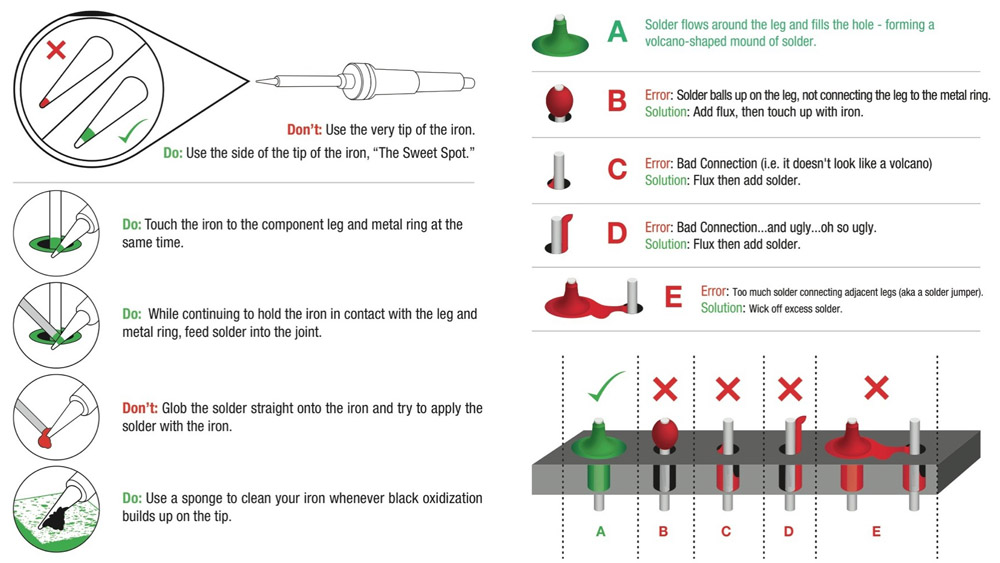
Note: For those who may not know how to solder or need a refresher, I’ve included a info-graphic bellow that I think provides enough information to hit the group running.
Once all the wires are soldered into place, simply make sure none of the surrounding leads are jumped or damaged and then run some tests to verify the system works as intended. In my case I had an issue with the ground initially and the Teensy was not receiving power, so always test thoroughly.
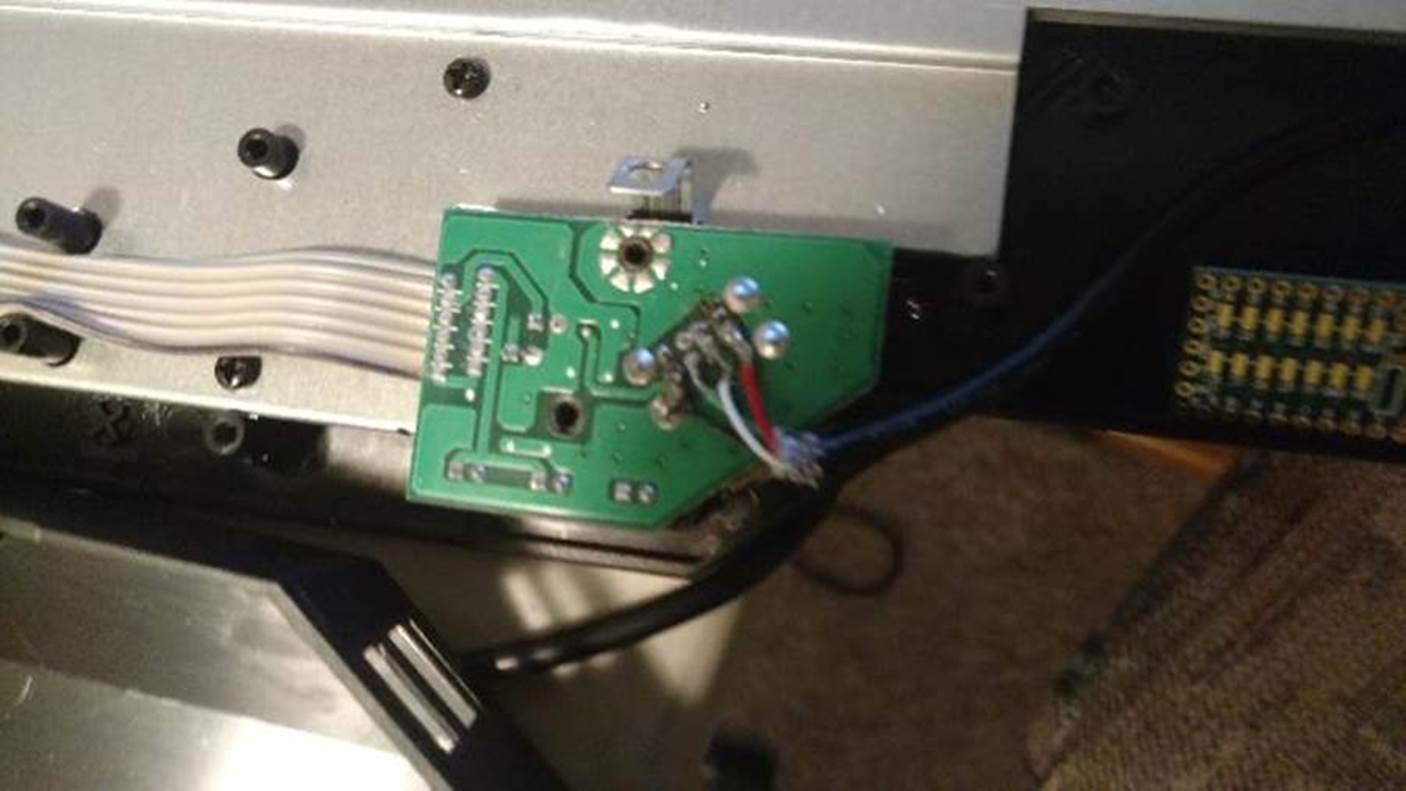
Once everything tests okay, find the best placement for the Teensy and secure the cable, Teensy, and solders with hot glue and/or electrical tape. In my case I had originally wanted to place my Teensy on the left side of the USB but the cable was too large for the sharp corner. Instead I carefully adjusted the cable over to the right under the USB hub cable.
Once the Teensy and cable are secured in place, run some additional tests, to ensure nothing was damage then button everything up. Just note as stated earlier, you will need to remove the Teensy in order to properly connect it directly for development of your payload.
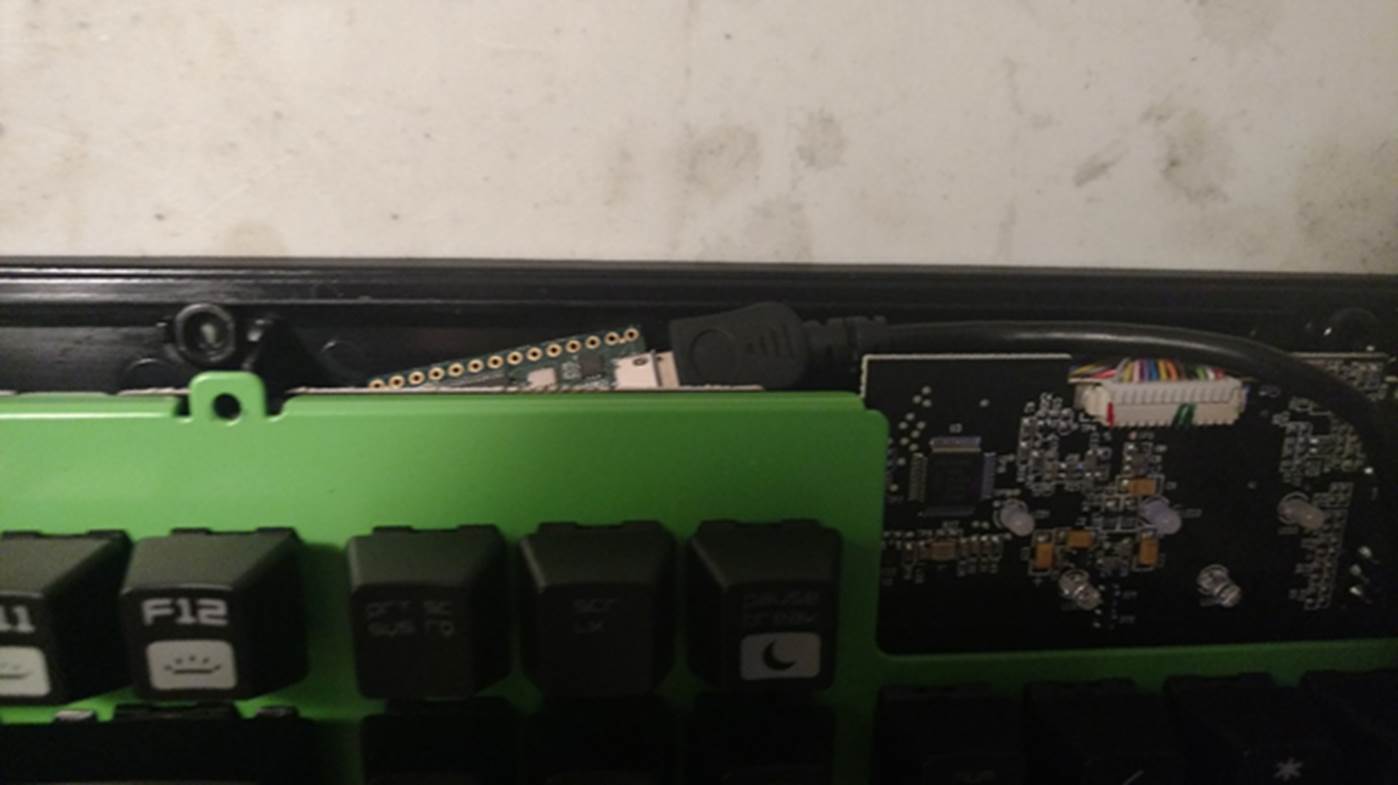
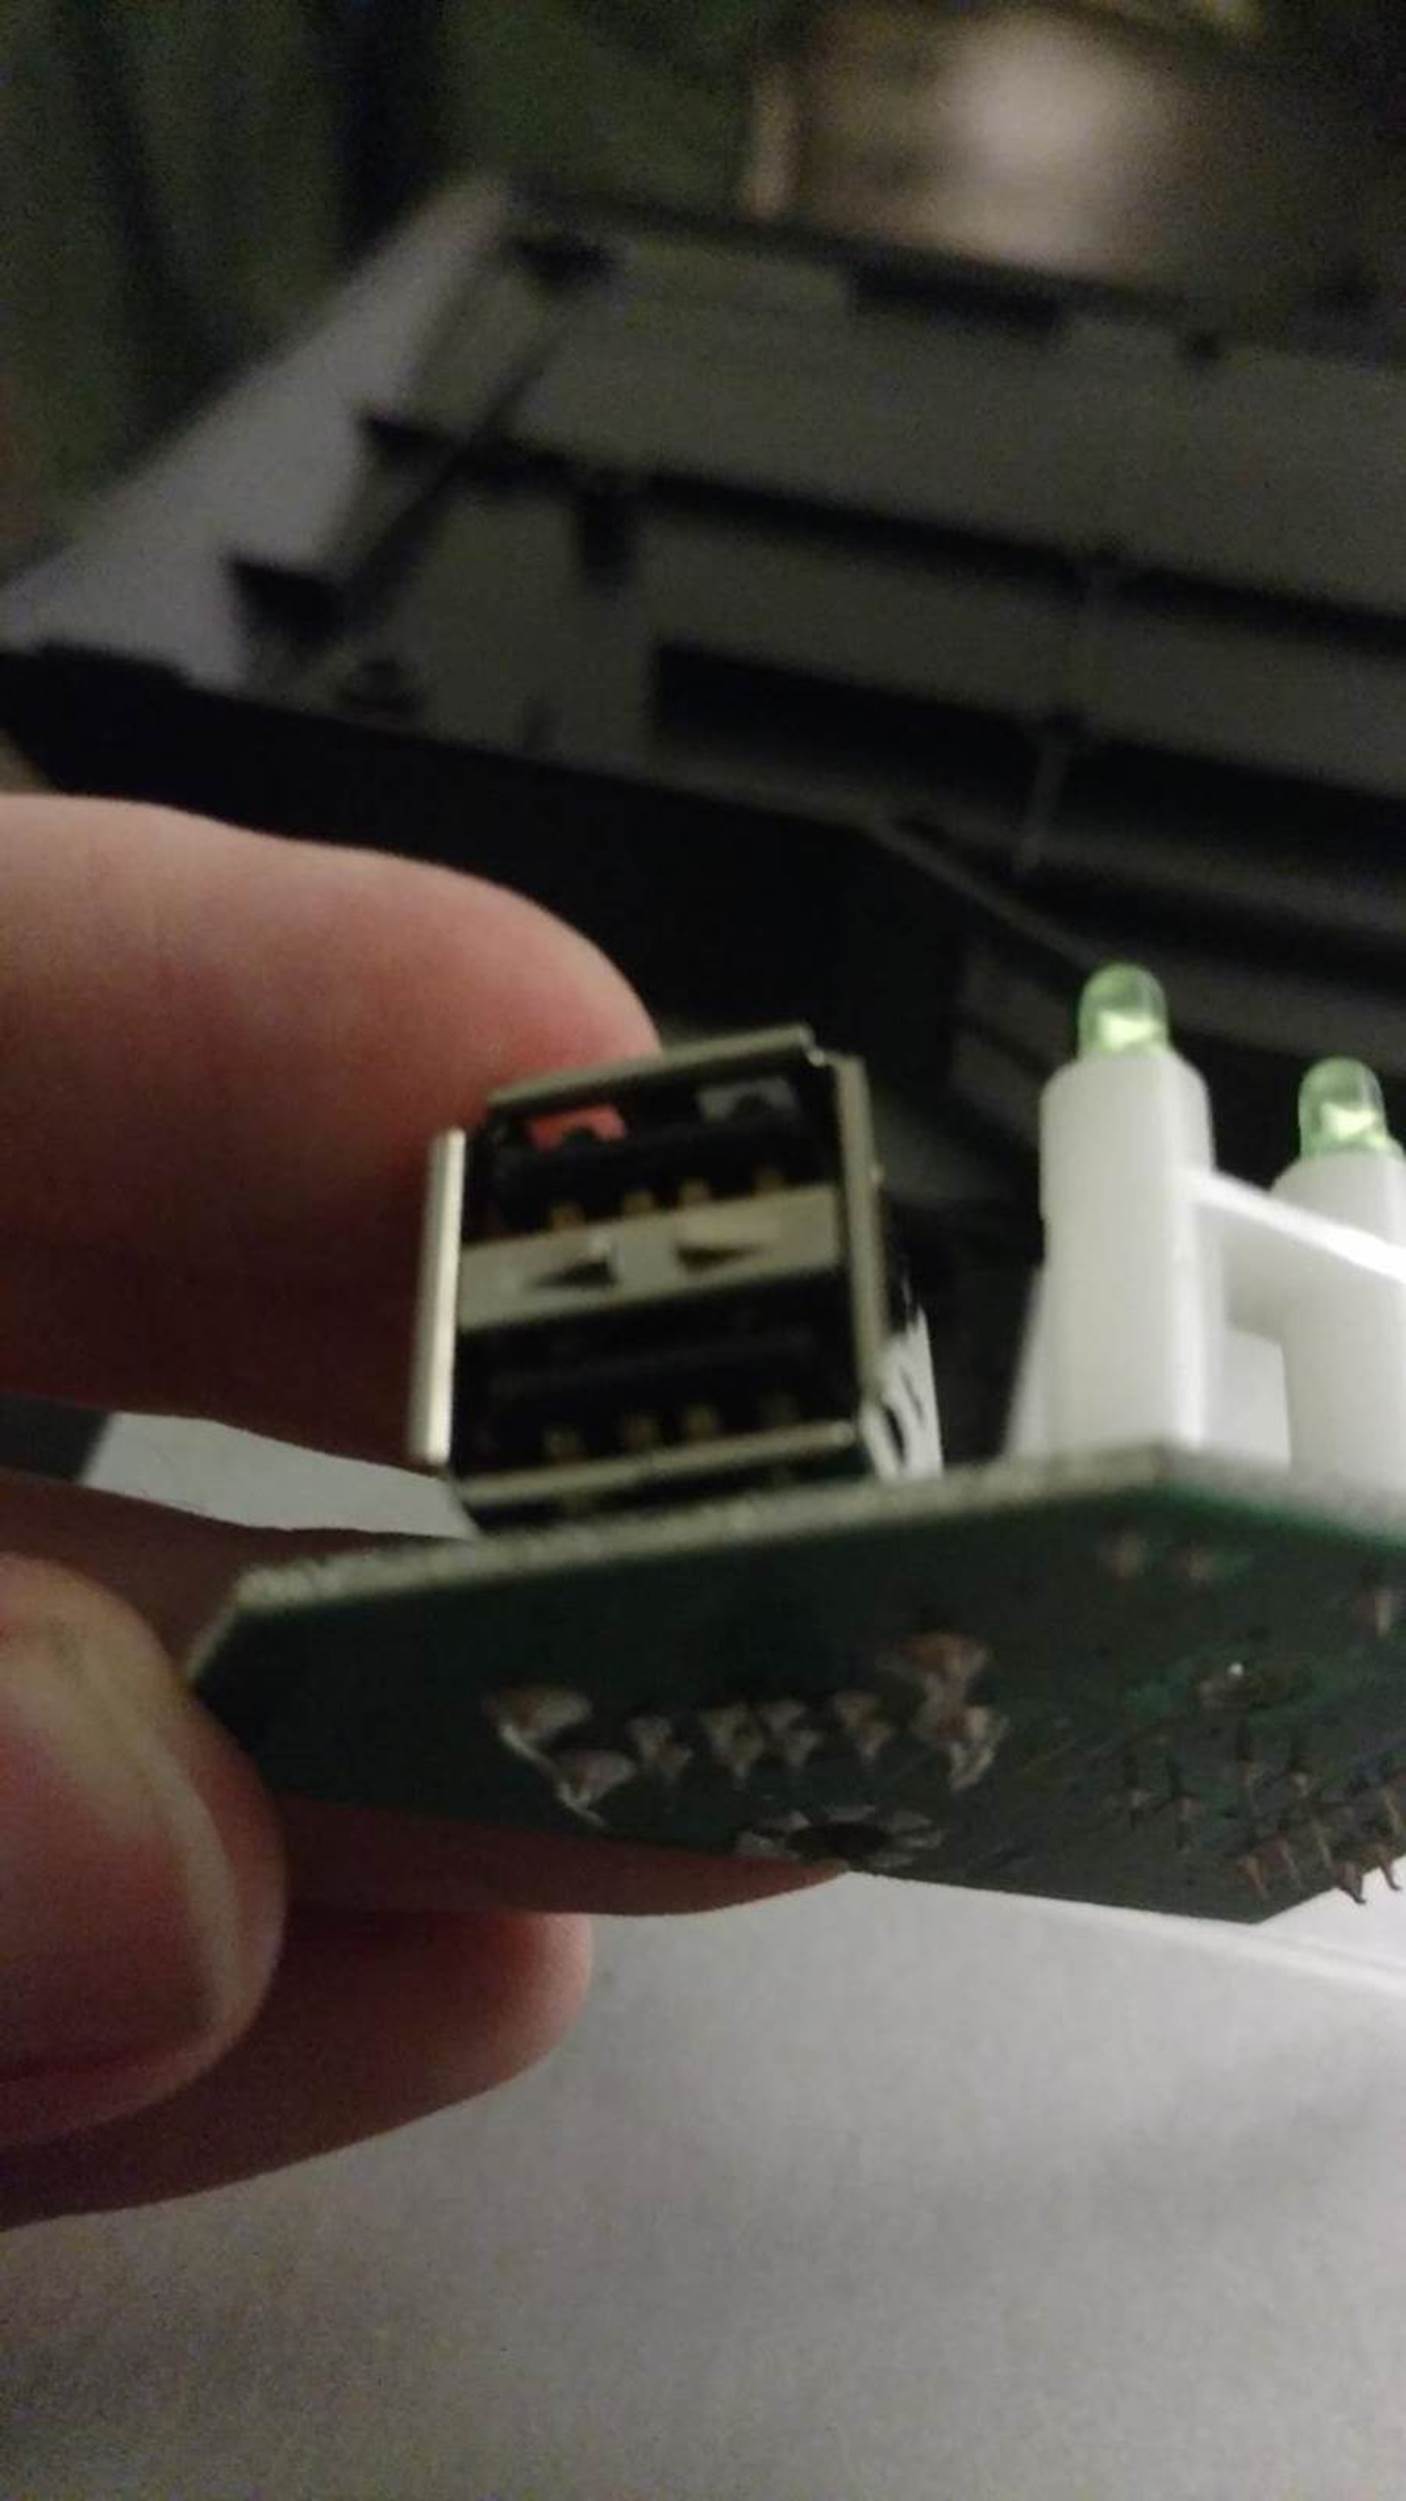
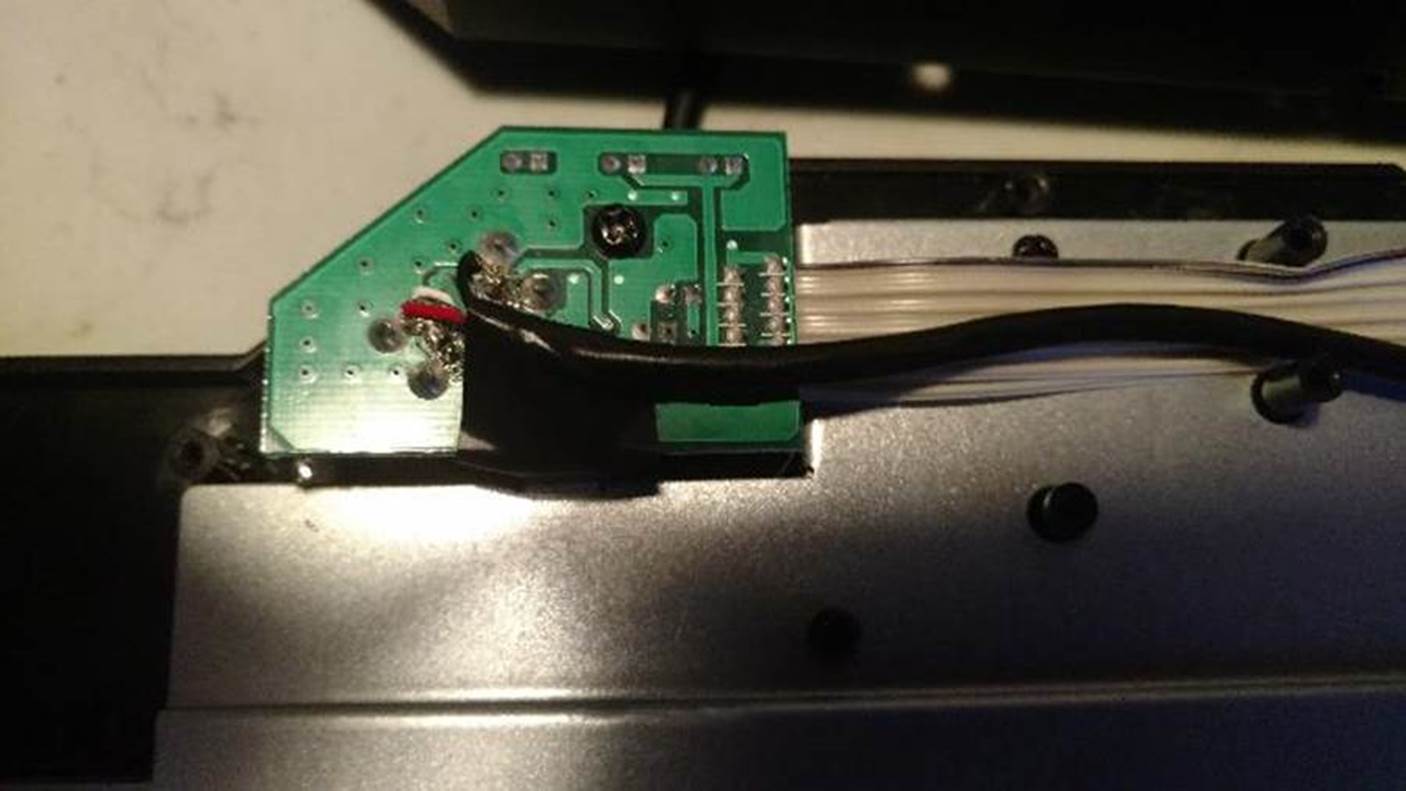
The next image shows the Teensy hidden away under the USB hub cable. Just be careful about placing the Teensy on its face, as seen here, due to the payload launch button on the face. If its compressed it will continuously fire the payload until power is removed or all of the Teensy’s resources are locked up.
References
As always I want to include references as a massive thank you to the community at large. I couldn’t have done this without their help, support, and knowledge.
TL;DR: mRemoteNG uses insecure methods for password storage and can provide droves of valid credentials during an assessment or competition.
Level Set
mRemoteNG (mremote) is an open source project (https://github.com/rmcardle/mRemoteNG) that provides a full-featured, multi-tab remote connections manager. It currently supports RDP, SSH, Telnet, VNC, ICA, HTTP/S, rlogin, and raw socket connections. Additionally, It also provides the means to save connection settings such as hostnames, IP addresses, protocol, port, and user credentials, in a password protected and encrypted connections file.
Problem
During a recent pentest, I was struggling to gain additional administrative access to key systems ,even with standard user authentication. However, during some share pillaging I found a backup of an old mRemote connections file. The connections file houses all the information needed to gain remote access to a given system (IP/Hostname, Protocol, Port, Username, and Password). However, the credentials are encrypted, by default, and the connections file was protected by a master password.
Solution
It turns out, the master password is just used by the program to determine whether or not to load in the selected connections file. The stored credentials are actually encrypted with a static string, not the master password. This creates a scenario wherein the master password hash can simply be replaced with a blank password hash, to bypass the master password prompt. Once the connections file is loaded, the program even has the ability to add additional “External tools”, which allow for access to the programs variables and memory space. This allows for simple echo commands to be added to reveal hidden details about each connection, such as the clear text password.
How to Access The Clear Text Credentials
Method 1: Using the Program itself
To start ensure that mRemoteNG is closed or download the portable version of the application.
Second navigate to the default mRemoteNG data folder (C:\Users\\AppData\Roaming\mRemoteNG) or acquire the connections configuration file. Alternatively, enter the path %appdata%/mRemoteNG into Start/Run, to go directly to the default installation location. Or use the portable version of the application, for any backup files you may have discovered while pillaging.
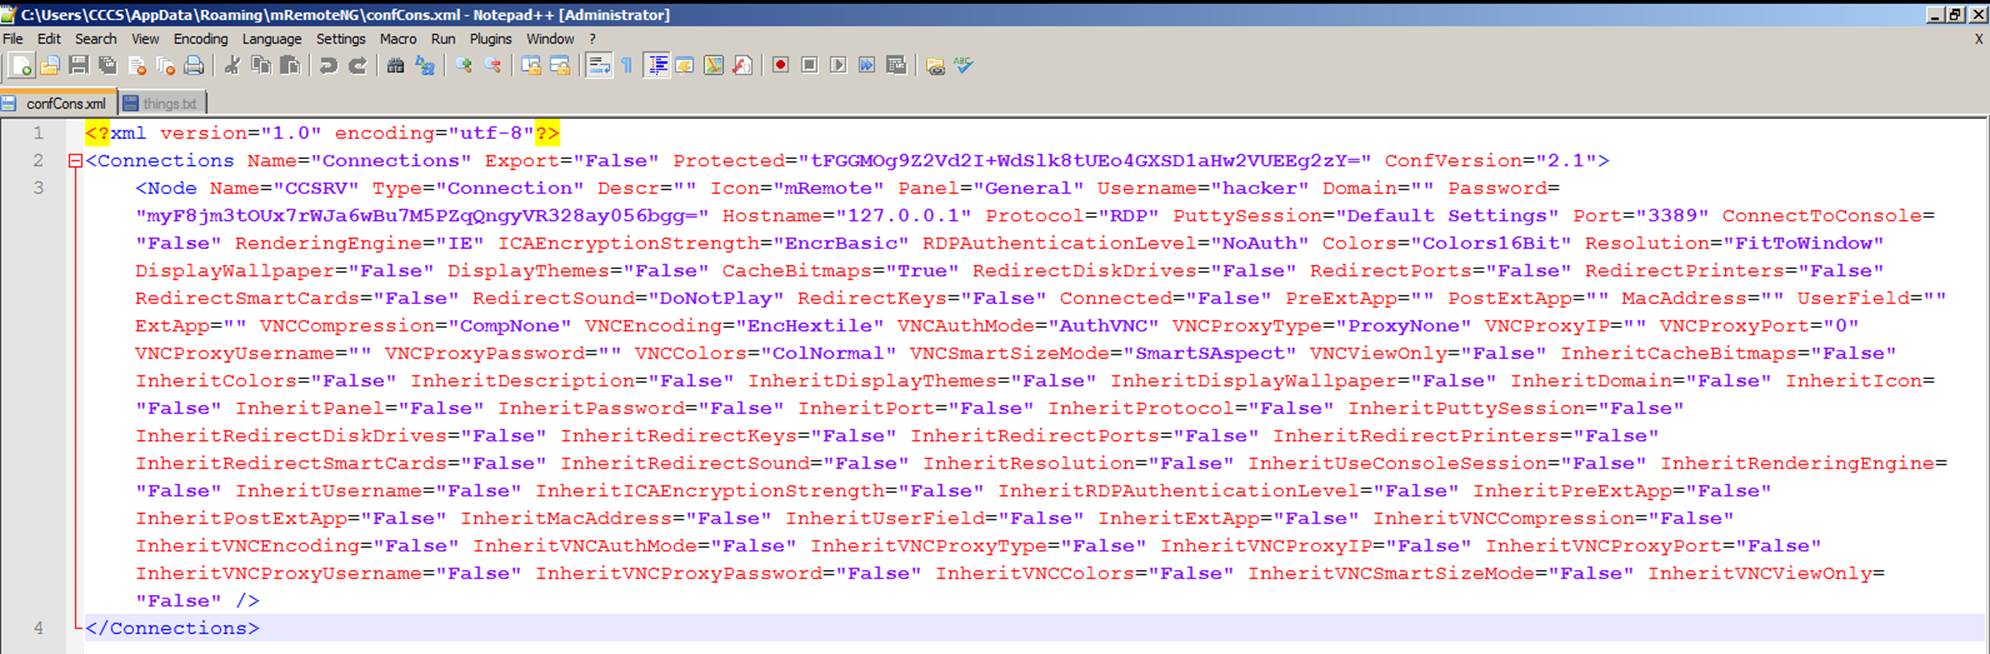
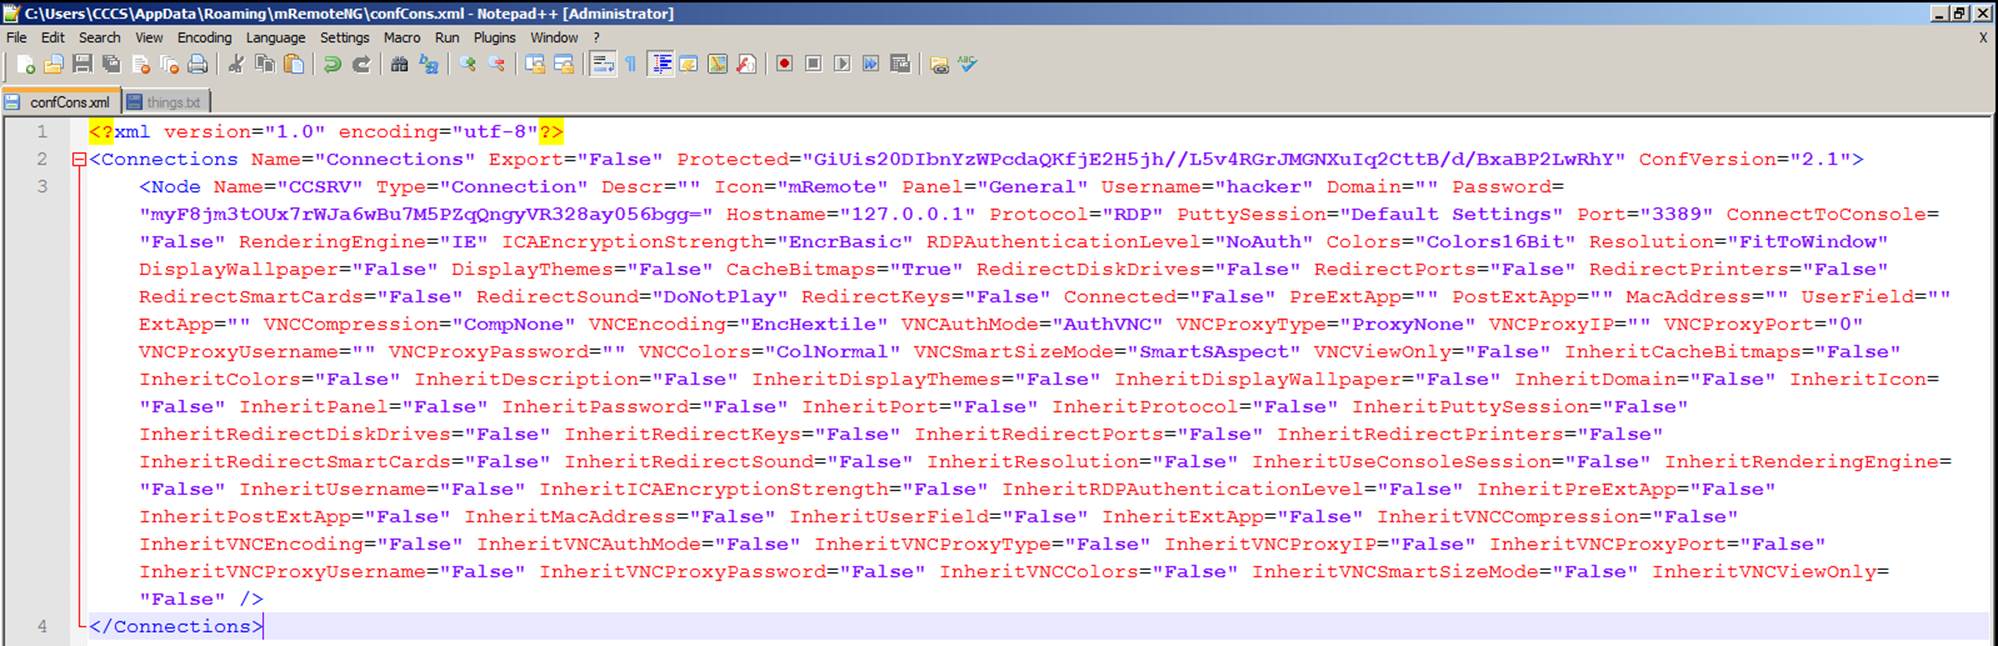
Third open the connections configuration file (by default called confCons.xml) in your favorite text editor.
Then, on the second line, locate the Protected=”a bunch of numbers/letters” string and replace it with the value below. Protected=”GiUis20DIbnYzWPcdaQKfjE2H5jh//L5v4RGrJMGNXuIq2CttB/d/BxaBP2LwRhY” Note: This is just a master password hash of blank, to allow for the connections file to be loaded.
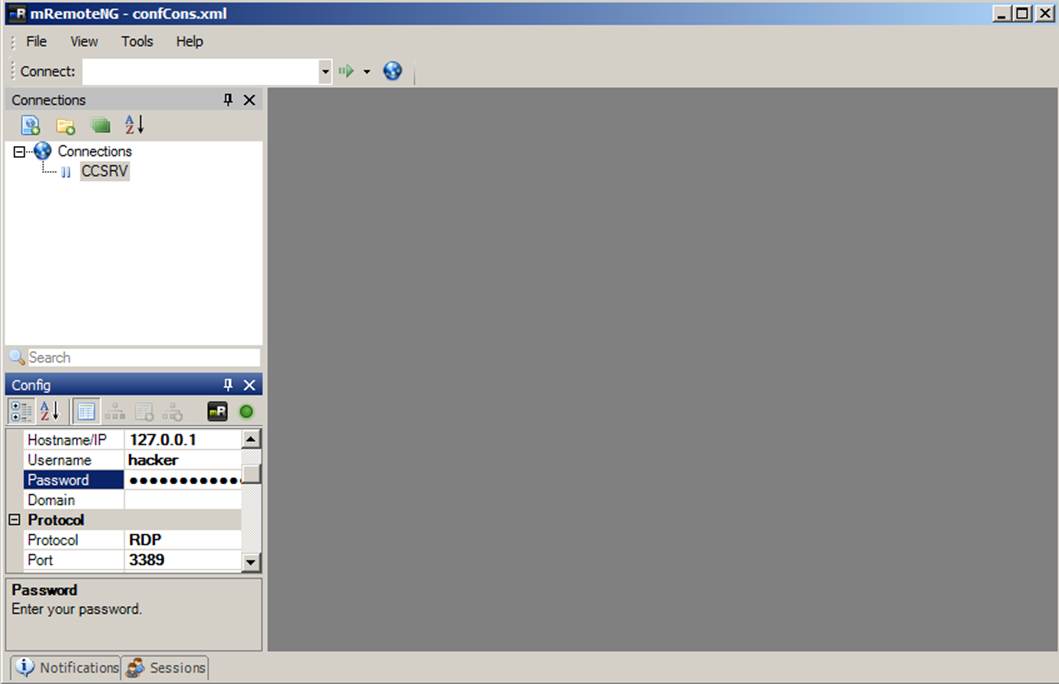
Next, just re-open mRemoteNG and load the connections file, by simply submitting a blank password to the master password prompt.
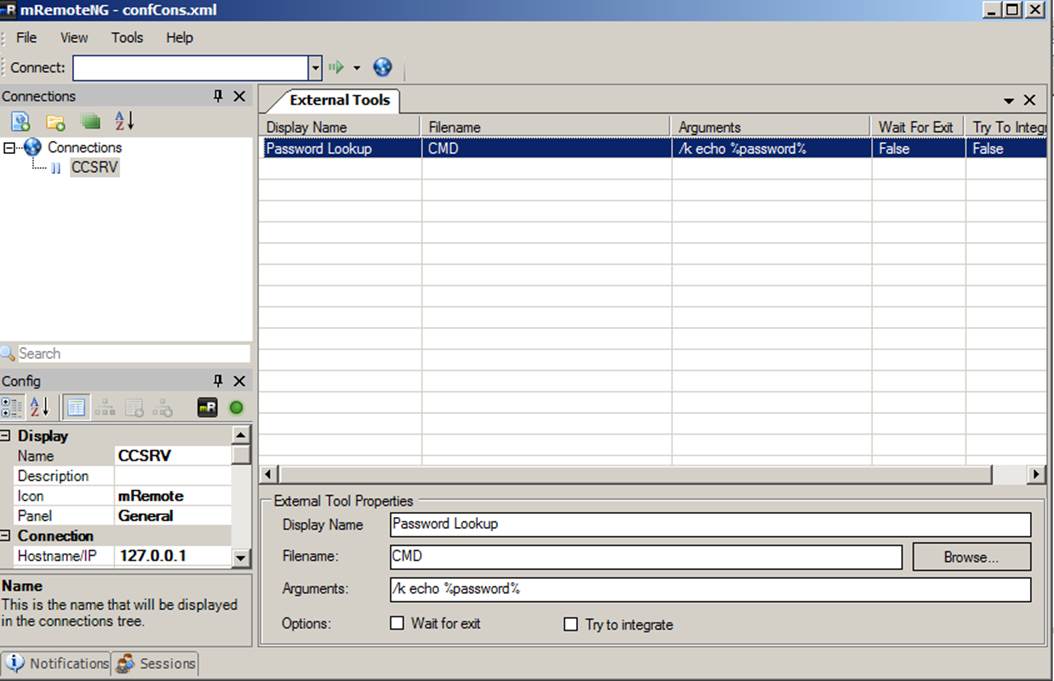
To see the clear text of a given password, go to “Tools” > “External Tools”. Then right-click in the white space and choose “New External Tool”. Next, in the External Tools Properties, fill in a “Display Name”, “Filename” and some “arguments”, with “Password lookup”, CMD and “/k echo %password%” respectively.
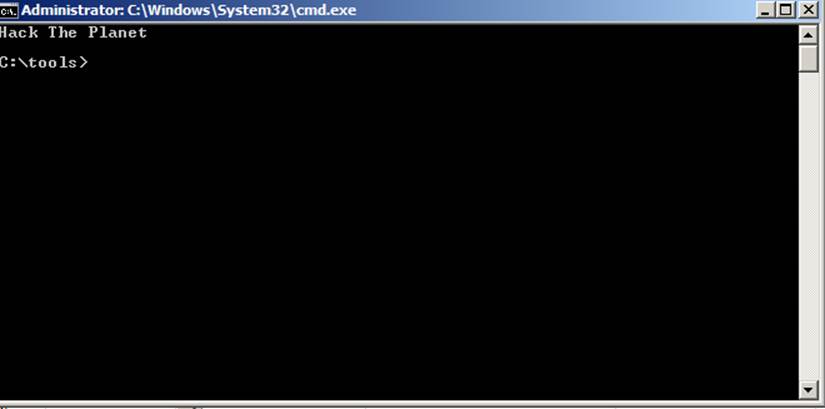
Finally, go to the connection where you would like to reveal the connection and right-click on it and choose “External tools” > “Password lookup”.
Method 2: Using an Offline Decoder
A modified version of the Metasploit module Ruby code, can be used to get the clear text passwords from within a protected connections file.
Once you have a meterpreter shell on an administrators system that has mRemoteNG installed, simply run the post module with the following command and enjoy clear text. run post/windows/gather/credentials/mremote
Note: mRemoteNG is a platform agnostic program, however the post module only works on Windows and will only parse the default connections file (confCons.xml) and location (%appdata%/mRemoteNG).


