From Pool Party Chaos to Life‑Saving Automation
Last summer marked our first season enjoying an inground pool at our new home. It quickly became the gathering spot for family and friends – filled with laughter, sunshine, and music. However, the joy was slightly dampened by a persistent technological hurdle. Controlling our smart speakers from within the pool proved frustratingly difficult. The combination of ambient noise, distance, and interference meant constant shouting or having to interrupt the fun to physically make adjustments.
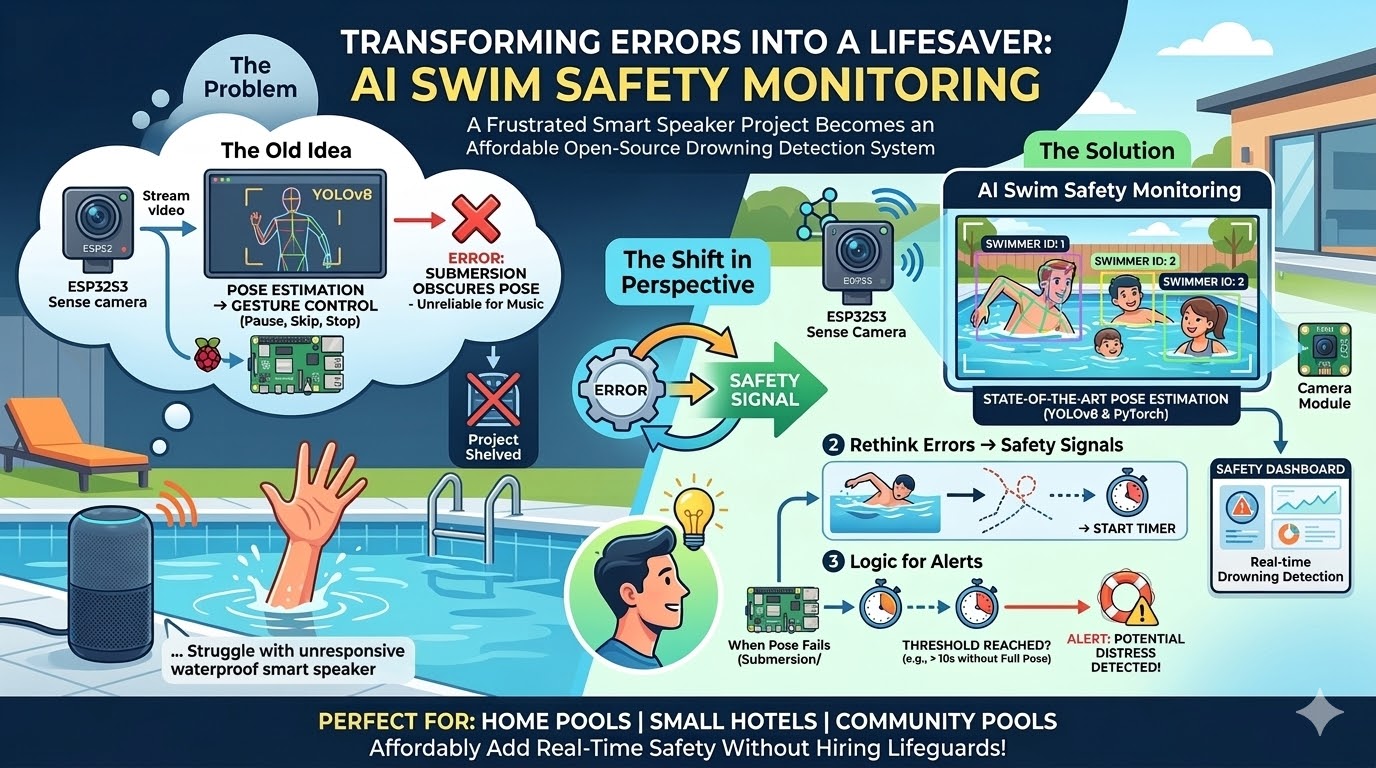
I initially embarked on a project to solve this using a Raspberry Pi 5 and Halio 8L AI chip. My vision was simple: stream video from an inexpensive camera like the XIAO ESP32S3 Sense, leverage pose estimation with YOLOv8, and use PyTorch to trigger music controls based on detected gestures – pause, skip, stop, etc. I managed a rudimentary proof-of-concept, but quickly hit a roadblock. The pose estimation model struggled when large portions of a person’s body were obscured (like within water), leading to frequent errors and rendering the system unreliable. Disheartened, I shelved the project.
But as I began yard work preparing for another warm season, a new perspective emerged. What if, instead of viewing those errors as failures, I could leverage them? Instead of focusing on non-verbal music control, I could pivot and concentrate on AI swim safety monitoring. The idea was deceptively elegant: use the same wireframing process, assign unique IDs to each swimmer, and initiate a timer when the pose estimation failed due to submersion. This would effectively create a logic system for alerting based on potential distress or drowning situations.
High‑Level Architecture
Below is the end‑to‑end flow of our AI Swim Safety Monitoring system:
┌───────────────────────┐
│  XIAO ESP32S3 Camera  │
├───────────────┬───────┤
│ Capture frames│→ RTSP stream
└───────▲───────┘   ▲
        │           │
        ▼           │
   ┌───────────────────────┐
   │    Frigate NVR (CPU)  │
   │  (object detection)   │
   ├───────┬───────────────┤
   │       │               │
   │  RTSP │  YOLOv8 Pose  │
   │ Stream│ inference API │
   ▼       ▼               ▼
┌─────────────────────┐   ┌─────────────────────┐
│  Pose Estimation    │   │  Tracking & ID      │
│  (YOLOv8 on GPU/NPU)│   │  (Kalman, SORT)     │
└──────────▲──────────┘   └───────▲─────────────┘
           │                      │
           ▼                      ▼
   ┌─────────────────────┐   ┌─────────────────────┐
   │  Error Detector     │   │  Alert Manager      │
   │ (Missing keypoints) │   │ (Email, SMS, Siren) │
   └──────────▲──────────┘   └───────▲─────────────┘
              │                       │
              ▼                       ▼
        ┌───────────────────────┐  ┌───────────────────────┐
        │  Log & Storage (S3)   │  │  Dashboard (Grafana)  │
        └───────────────────────┘  └───────────────────────┘
- Capture – The ESP32S3 streams MJPEG/RTSP to Frigate.
- Detection – Frigate runs YOLOv8‑pose on each frame (GPU or NPU).
- Tracking – Each person gets a persistent ID via SORT/Kalman.
- Error Detection – When the pose model outputs
Nonefor keypoints, we start a timer per ID. - Alerting – If the timer exceeds a configurable threshold (e.g., 60 s), an alert is fired.
Component Deep‑Dive
1. Camera Layer – XIAO ESP32S3 Sense
The ESP32S3 has a built‑in OV2640 sensor and Wi‑Fi, making it perfect for low‑cost streaming. Below is a minimal MicroPython script that captures JPEG frames and serves them via an HTTP endpoint.
# esp_camera.py (MicroPython on XIAO ESP32S3)
import camera
import network
import socket

# Connect to Wi‑Fi
sta = network.WLAN(network.STA_IF)
sta.active(True)
sta.connect('YOUR_SSID', 'YOUR_PASS')
while not sta.isconnected():
    pass

print('IP:', sta.ifconfig()[0])

camera.init(0, format=camera.JPEG, framesize=camera.FRAME_QVGA)
s = socket.socket()
s.bind(('0.0.0.0', 80))
s.listen(1)

def handle_client(cl):
    data = cl.recv(1024)      # HTTP request
    img = camera.capture()    # JPEG bytes
    header = ('HTTP/1.0 200 OK\r\n'
              'Content-Type: image/jpeg\r\n'
              f'Content-Length: {len(img)}\r\n\r\n')
    cl.send(header.encode() + img)
    cl.close()

while True:
    conn, addr = s.accept()
    handle_client(conn)
Upload this to the ESP32S3 and point Frigate’s RTSP source at http://<esp_ip>/. For a production build you’d switch to an MJPEG or H.264 stream, but this proof‑of‑concept is enough to get started.
For more details: ESP32‑CAM Python Stream Example
2. Frigate NVR – Local AI Object Detection
Frigate runs on the Pi’s CPU (aided by the GPU or a NPU Like Halio 8L) and pulls RTSP streams. Its configuration file (frigate.yml) could looks something like this:
mqtt:
  host: mqtt-broker.local
record:
  enabled: true
  retain_days: 7
detectors:
  yolov8_pose:
    type: yolov8
    model: yolov8n-pose.pt
    device: cpu  # or cuda
cameras:
  pool_cam:
    ffmpeg:
      inputs:
        - path: rtsp://esp32s3.local:80/
          roles: [detect]
    objects:
      filters:
        person:
          max_disappeared: 30
          min_area: 2000
Frigate will emit a person event for each detected body and publish the bounding box, confidence and keypoints to MQTT.
Full docs: Frigate Documentation
3. Pose Estimation – YOLOv8 in PyTorch
We use Ultralytics’ YOLOv8‑pose model. The inference script below runs on a GPU (or CPU if you’re on a Pi). It pulls frames from Frigate’s MQTT stream and outputs keypoints.
import torch
from ultralytics import YOLO
import paho.mqtt.client as mqtt

model = YOLO('yolov8n-pose.pt')  # pretrained pose model
client = mqtt.Client()
client.connect("mqtt-broker.local", 1883, 60)
client.subscribe("frigate/events/person")

def on_message(client, userdata, msg):
    payload = json.loads(msg.payload.decode())
    frame_id = payload['frame_id']
    image = load_frame(frame_id)          # helper to pull from local cache
    results = model(image)[0]
    if not results.boxes:                 # no boxes -> error state
        trigger_error(payload['object_id'])
    else:
        keypoints = results.keypoints.xy.cpu().numpy()
        publish_keypoints(payload['object_id'], keypoints)

client.on_message = on_message
client.loop_forever()
How to wireframe with ultralytics: YOLOv8 Pose Docs
4. Tracking & ID Assignment
To maintain a consistent ID across frames, we use the SORT tracker (Kalman + Hungarian). A lightweight Python wrapper (sort.py) keeps a dict of object_id → KalmanFilter. Each time a new detection appears, it’s assigned an ID; if a person disappears for >2000 frames (60s at ~30fps), the tracker forgets them.
from sort import Sort

tracker = Sort(max_age=2000, min_hits=3)
while True:
    detections = get_detections_from_mqtt()
    tracked_objects = tracker.update(detections)  # [[x1,y1,x2,y2,id], ...]
    for obj in tracked_objects:
        publish_to_dashboard(obj)
5. Error Detection & Alert Logic
When YOLO reports no keypoints, we start a timer per object_id. If the timer exceeds a safety threshold (e.g., 60 s), an alert is sent via MQTT to a siren or SMS gateway.
error_timers = {}  # object_id -> timestamp

def trigger_error(object_id):
    if object_id not in error_timers:
        error_timers[object_id] = time.time()
    elif time.time() - error_timers[object_id] > 60:
        send_alert(object_id)

def clear_error(object_id):
    error_timers.pop(object_id, None)
6. Alerting & Logging
Alerts are published to an MQTT topic (swimmonitor/alerts). A simple Node‑RED flow can convert these into SMS (Twilio) or a physical siren. All events are logged to an S3 bucket and visualized in tools like Grafana.
Real‑World Use Cases
| Scenario | Why it works | Deployment notes |
|---|---|---|
| Hotel Pools | An AI system adds a layer of safety without expensive lifeguard staffing. | Install a single Pi per pool, feed Frigate to the hotel’s central monitoring room. |
| Water Parks | High foot traffic and shallow water zones—pose errors are frequent, making this method ideal for continuous surveillance. | Scale by adding more cameras; use edge GPU (Jetson Thor) for higher FPS. |
| Public Beaches | No fixed infrastructure; a battery‑powered ESP32S3 can stream to a remote Frigate instance. | Use solar panels and low‑power Wi‑Fi; alerts via SMS to lifeguard stations. |
| Community Pools | Small budgets—our solution runs on a Raspberry Pi 5 for under $200 total hardware cost. | Pair with existing radio communication setups to provide notifications to life guards. |
Future Enhancements
- Depth Estimation – Combine pose with stereo depth to gauge submersion depth and increase accuracy for certain swim styles.
- Anomaly Detection – Train an LSTM on swimming zone patterns to detect sudden falls before pose loss.
- Edge AI Acceleration – Offload YOLOv8 to a Coral Edge TPU or NVIDIA Jetson/Thor for lower latency.
- Privacy‑Preserving Cloud Sync – Store only anonymized keypoints, not raw video.
- Scheduling and Time-of-Day – Include features to indicate no swim teams and alert on presence alone.
- Evaluate Dedicated Edge Hardware – Condense the models, features, and processing to a single SBC such as Radxa Zero3 or Dragon Q6A with a built NPU for ease of implementation.
Quick Start Checklist
- Hardware – ESP32S3 + Pi 5 + optional NPU (e.g., Hailo).
- Software – Install Frigate (
pip install frigate), Ultralytics YOLOv8 (pip install ultralytics). - Camera Setup – Upload
esp_camera.pyto ESP32, point Frigate to its RTSP URL. - Model Download – Grab
yolov8n-pose.ptfrom Ultralytics or train a custom model. - Run the Tracker & Alert Service – Use the provided Python snippets, adjust thresholds for your environment.
Takeaway
What began as a simple “can’t hear me in the pool” frustration turned into the start of an open‑source swim‑safety platform that leverages cheap edge hardware and state‑of‑the‑art pose estimation. By treating the absence of a farmable pose as a safety signal, we turn YOLO’s error path into a lifesaver.
If you’re a hobbyist, a small hotel, or a community pool manager, a similar stack could give you an affordable way to add real‑time distress detection. Dive in, tweak the thresholds, and keep your swimmers safe; one frame at a time.