Last Year’s Skeleton Had a 27 Billion Parameter Brain and No Crowd Control
If you read my post mortem on last year’s Skelly local VLM experiment, you already know how Halloween night went. The plan was elegant. A webcam grabs a frame, a locally hosted gemma-3-27B vision model describes the costume, Piper turns the greeting into speech, and the skeleton welcomes each trick or treater with a greeting about their costume. Private, offline, a little bit unsettling in exactly the right way.
The reality was waves of ten or more children arriving at once, a model that could not keep up, and me doing manual photo captures while a skeleton with a very large brain stared blankly at a growing crowd. I called it a debacle in the write up and I stand by that word.
The good news is that I wrote down a plan for the next year at the end of that post: a photo booth mode with a dedicated backdrop, motion triggered capture, rate limiting, visual and audio cues, and tighter control over the GPIO pins. It is now October, the plan has aged like a plan does, and the skeleton has been pulled out of storage.
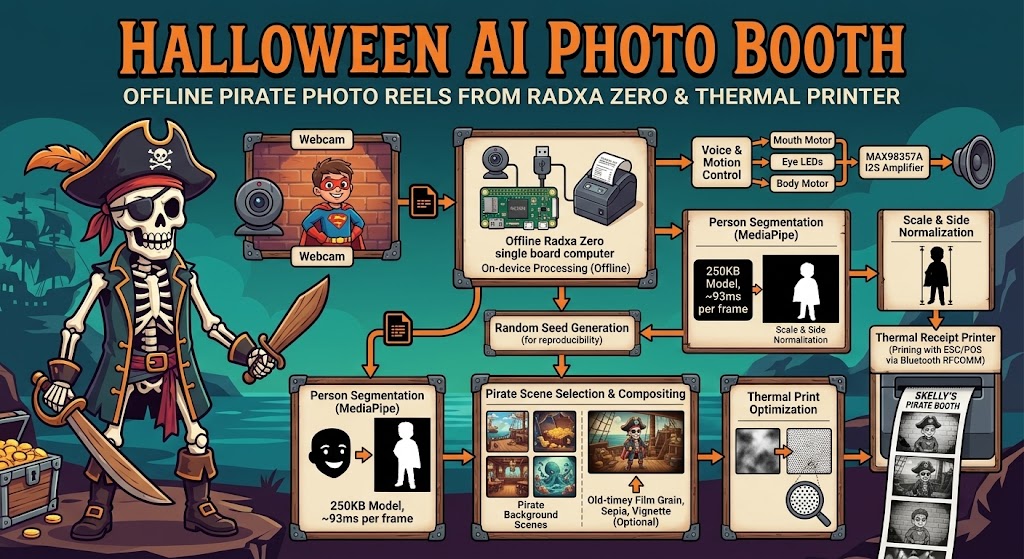
Here is the plot twist that I did not see coming when I wrote that list. The fix for a skeleton that was too slow at understanding children’s costumes turned out to be a skeleton that does not try to understand them at all. This year Skelly runs a vision model that is roughly 250 kilobytes, answers one question, person or not person, and spends the rest of its time transporting the person into the world of pirates.
A Quick Refresher on Skelly
Skelly is a Home Depot animated LED dancing skeleton that I embedded with a Radxa Zero 3W, covered in detail in the original wiring post. The short version of the control side is three relay switched outputs on gpiochip3.
| Header pin | Line | What it does |
|---|---|---|
| Pin 7 | gpiochip3 line 20 | Mouth motor |
| Pin 11 | gpiochip3 line 1 | Eye LEDs |
| Pin 15 | gpiochip3 line 8 | Body motor |
The voice comes from a MAX98357A mono amplifier on the I2S3 pins (12, 40 and 35), which needed a custom device tree overlay, with the overlay documented in the MAX98357A post. The board itself is a Radxa Zero 3W, a Rockchip RK3566 with four Cortex-A55 cores, Wi-Fi 6, Bluetooth 5.4, and a 22 pin camera connector, on a board about the size of a Raspberry Pi Zero 2 W. That is the entire computer. Everything in this post runs on it.
If you want to follow along, the code lives on the Pirate-Photo-Booth branch of the SkellyEyeSpy repository, and the README walks through running the studio.
Last Year Versus This Year, in Two Diagrams
Last year the Zero 3W was basically a webcam and a speaker with legs. The thinking happened on a separate machine.

This year there is no second machine, no network round trip, and no model that has opinions about costumes. Here is the full architecture, including the web studio that sits between the camera and the printer, and the new booth voice layer that talks through the speaker, blinks the eyes, works the jaw and can be started by a button or a motion sensor.
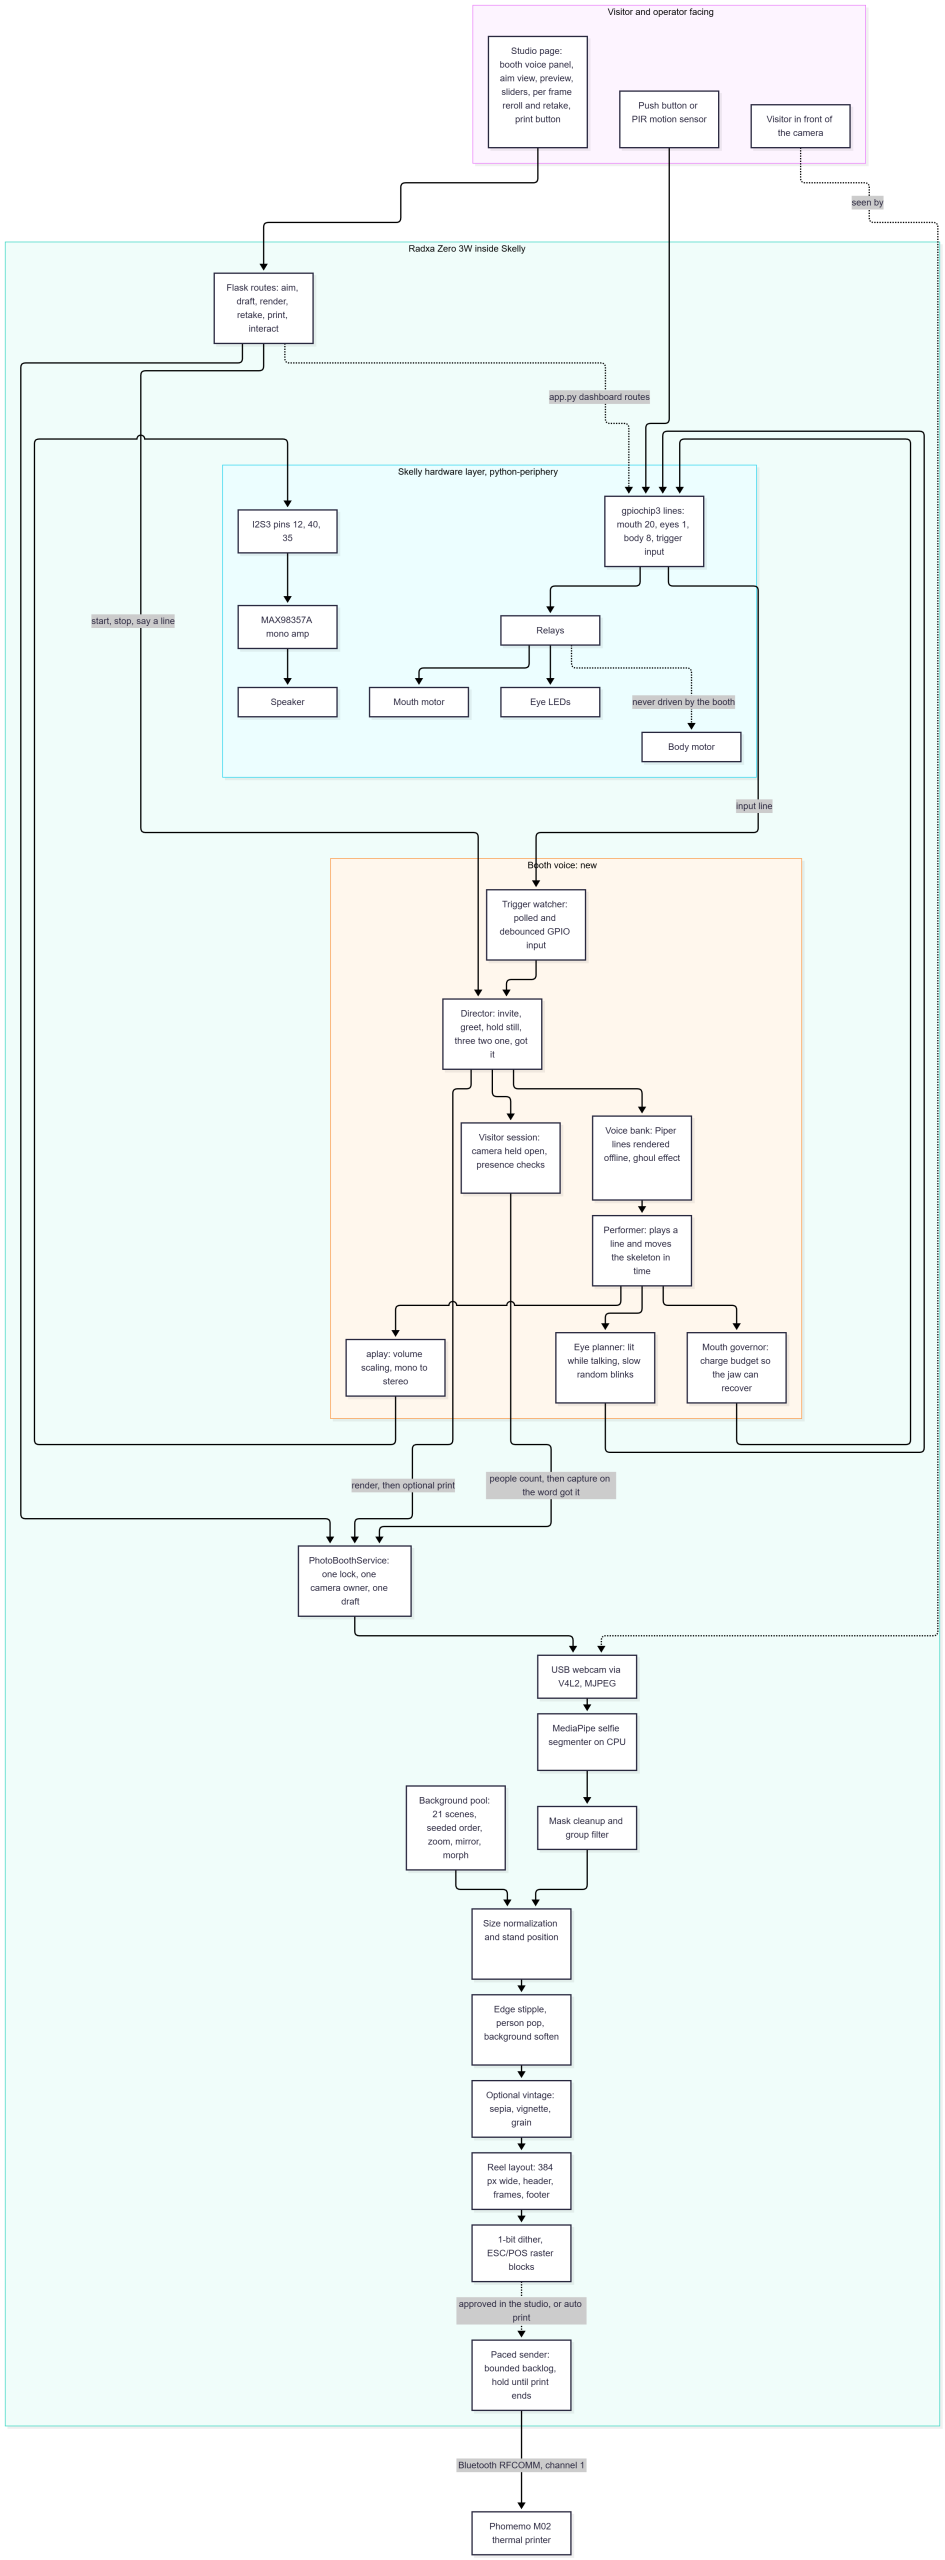
Notice what is missing: any cloud API, any GPU, and any accelerator. The RK3566 has a small NPU and I never needed to touched it.
The Pipeline, Step by Step
There are eight steps. Each one is small, each one failed at least once, and I will tell you where.
Step 1: Capture
Using a simple USB webcam, like an EMEET C950. Plain OpenCV on these boards has a habit of picking a GStreamer backend that intermittently refuses to start, so the camera class forces V4L2 for any device path. It also asks for MJPEG, because this webcam only offers raw video at 640×480 and 640×360 and anything bigger is MJPEG only.
cap = cv2.VideoCapture(path, cv2.CAP_V4L2)
cap.set(cv2.CAP_PROP_FOURCC, cv2.VideoWriter_fourcc(*"MJPG"))
cap.set(cv2.CAP_PROP_FRAME_WIDTH, 1280)
cap.set(cv2.CAP_PROP_FRAME_HEIGHT, 720)
Step 2: Segmentation
This is the part the VLM used to own. The booth uses MediaPipe’s Image Segmenter with the landscape selfie model, whose file is about 250 KB. On the Zero 3W’s CPU it takes about 55 ms at 640×480, 93 ms at 720p, and 179 ms at 1080p. Last year’s model needed a separate machine to think about one frame. This one finishes before the shutter sound would.
result = segmenter.segment(mp_image)
person_probability = np.squeeze(result.confidence_masks[0].numpy_view())
mask = (person_probability > 0.5).astype(np.uint8) * 255
Step 3: Mask cleanup and groups
Models occasionally see people in clutter, and real visitors rarely arrive one at a time. Small specks are dropped and gaps are closed, and then every sizeable blob is kept, so a parent and a child standing together stay together. Anyone much smaller than the biggest person, a tiny figure far in the background, is ignored so that one distant bystander cannot shrink the whole group to fit them in.
areas = stats[1:, cv2.CC_STAT_AREA]
keep = [i + 1 for i, a in enumerate(areas) if a >= 0.12 * areas.max()]   # ignore tiny bystanders
The group is placed as one unit and sized by its tallest member, so a child beside an adult keeps honest proportions. The aim view tells the operator how many people it sees and how many it is ignoring. People who touch merge into one blob, which means the count undercounts a tight huddle. That limit is on the list for the live test.
Step 4: Size normalization
Here is the problem I could not tune my way out of. Put a tall adult close to the camera and they fill the whole frame, and the pirate ship behind them becomes a rumor. Put a small child far away and you get a pirate ship with a smudge in front of it.
So the booth stops caring how big the person is. It measures their visible height and scales them so they occupy a fixed share of every frame, then anchors them to the bottom.
scale = float(np.clip(height_ratio * out_h / person_h, 0.1, 1.8))
scale = min(scale, 0.92 * out_w / person_w)   # a group must still fit
My first guess was that a person should fill about three quarters of the frame. Testing with a real adult said otherwise: the sweet spot against these scenes is 30 to 40 percent.
Where the person stands matters too. Centered, they hide the focal point of the scene, whether that is the ship, the jolly roger or the skull. The alternates sides from frame to frame, with the seed choosing which side goes first, so the scenery gets a turn.
Step 5: Backgrounds, and a seed per reel
The six procedural placeholders I started with have been replaced by a set of generated pirate scenes at 1200×896: ships, coves, a saloon, a treasure hoard, a kraken, etc. A reel does not just pick four of them. Each reel draws a random seed, and the seed decides everything about it: which scenes, in what order with no repeats back to back, how each frame is zoomed and panned, whether it is mirrored, how its tone and hue are nudged, and whether a frame is a morph that melts one scene into another through a soft random mask. Scenes with readable lettering, the two saloon signs and the RUM barrels, are never mirrored, because backwards lettering ruins the illusion.
rng = np.random.default_rng([seed, FRAME_STREAM, index]) # frame i never depends on the reel lengtn
The flow below shows how one seed fans out into independent random streams, which is why frame 2 looks the same whether the reel has four frames or six.
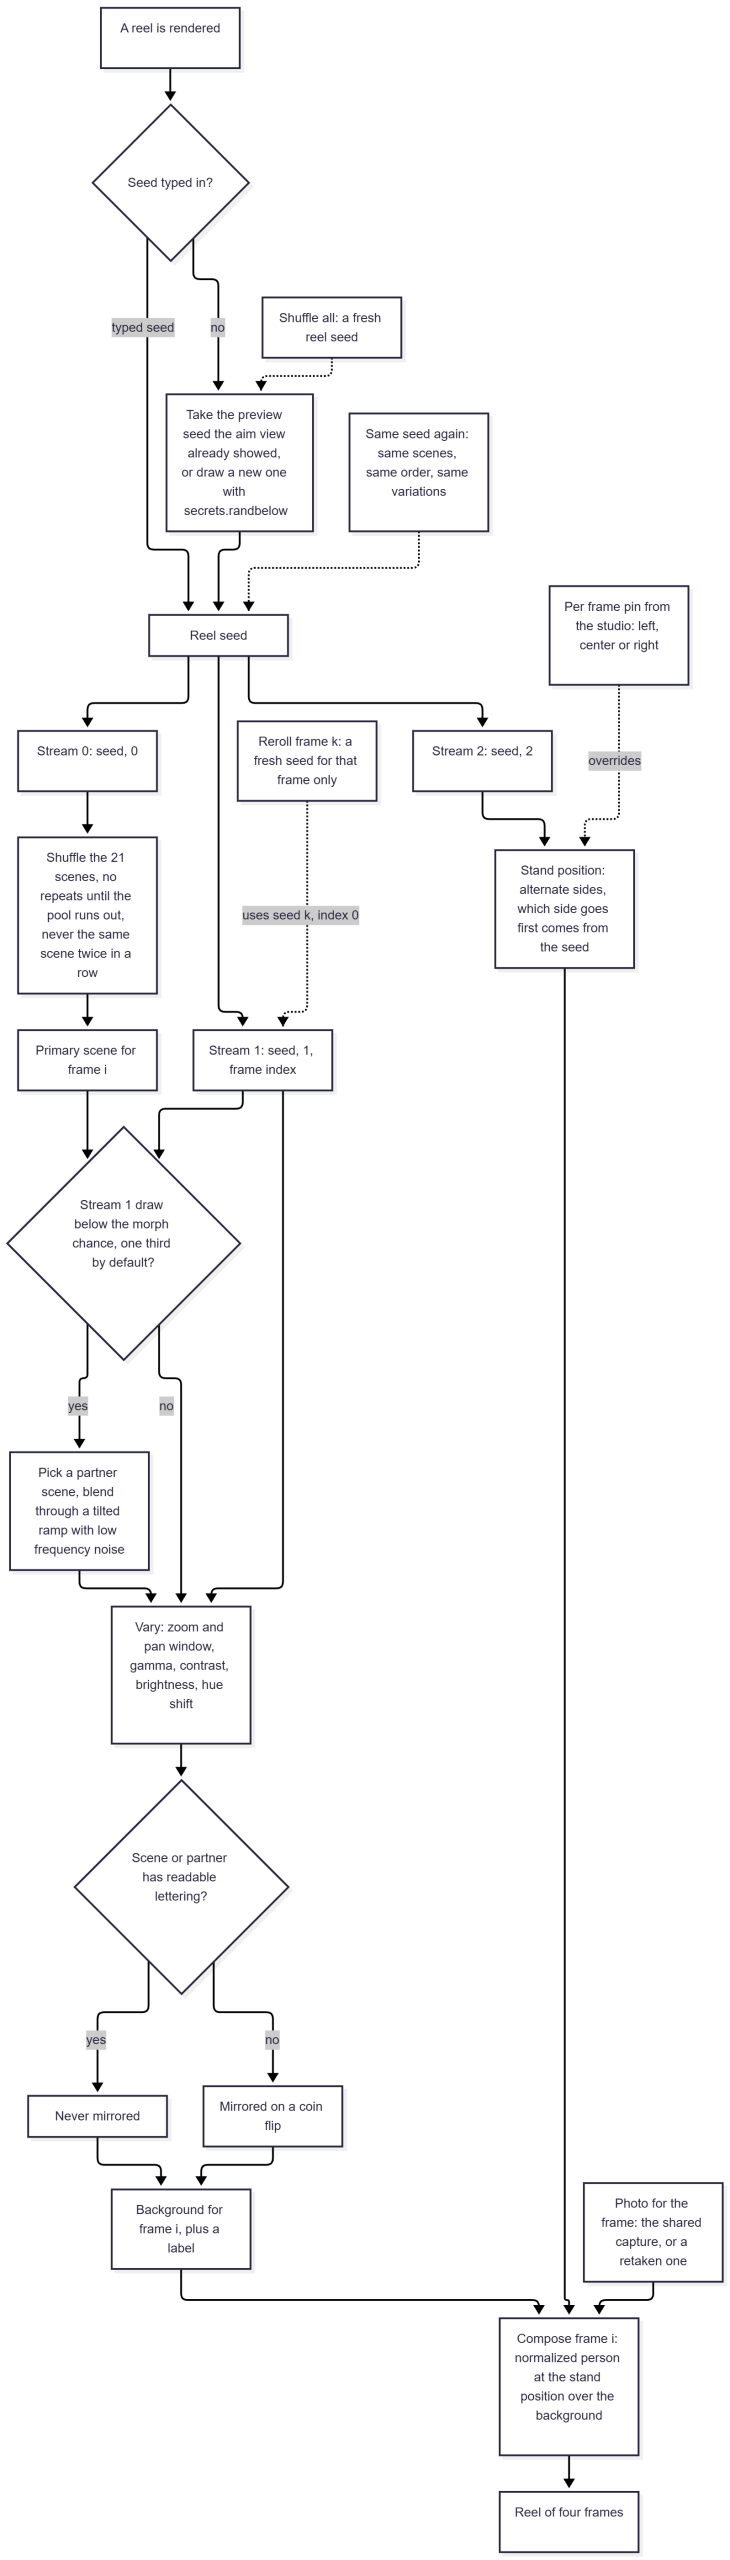
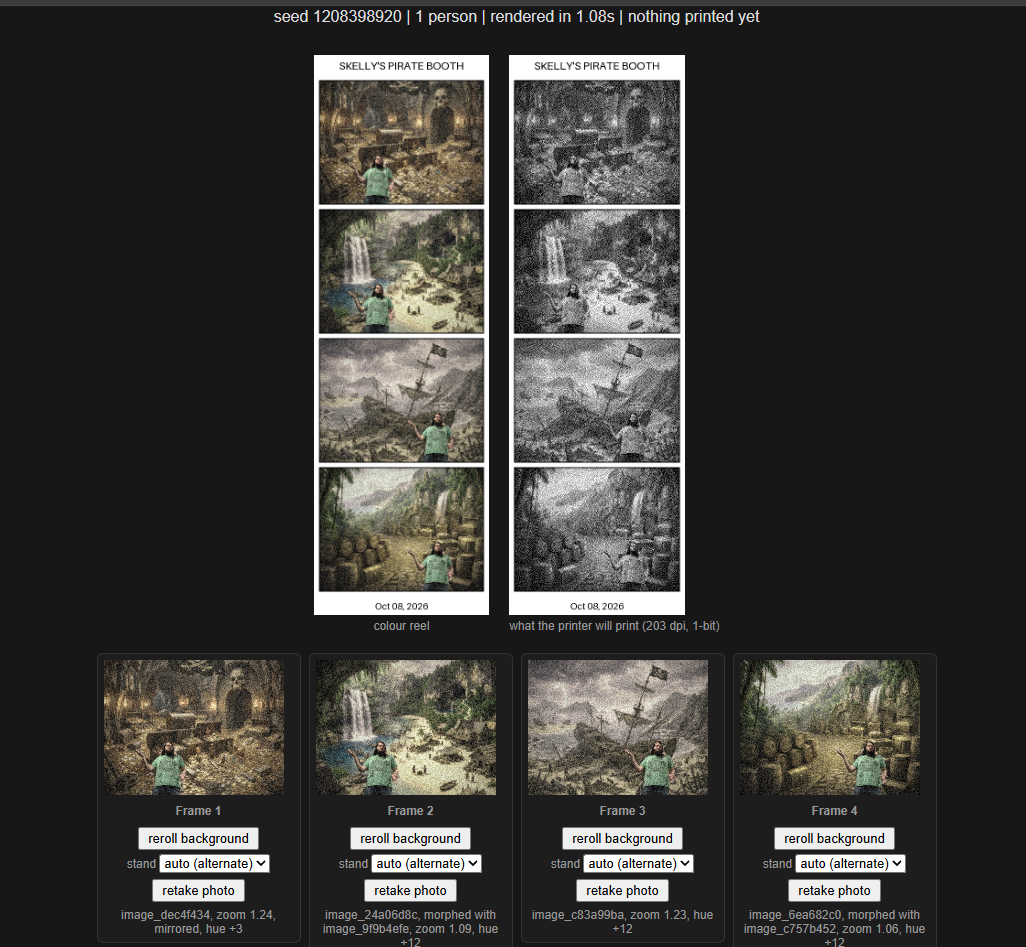
Because everything flows from the seed, a reel can be reproduced, shuffled, or have a single frame rerolled. In my testing that turned out to be one of the best parts of the whole system: it makes the output repeatable and gives the person at the controls something to play with. The seed reproduces the look of a reel rather than exact pixels.
Step 6: Making a person read in a one bit print
A person pasted onto a detailed scene tends to melt into it once the image is reduced to black and white. My first fix was the obvious one, a thin white outline like a die cut sticker. It worked in the sense that you could see the person, and it failed in every other sense. On the printed strip, even one pixel of white read like an angel glow, and it left you feeling less like part of the scene and more like a cutout laid on top of it.
The replacement does not draw a line at all. The default is a stipple: a fading scatter of dots a few pixels wide, dense at the person’s edge and sparser outward, in whichever tone separates them from the scene, white dots on a light background and black on a similar or darker one.
density = strength * falloff                    # 1 at the person's edge, 0 at the band's outer limit
dots = density > BAYER[y % 4, x % 4]            # ordered dither: a fading scatter, no solid line
bg = np.where(dots, 255 if lighten else 0, bg)
The alternative, a soft dodge and burn of the background near the person, is available too, and my first version of it taught me something. It chose one direction from the person’s average brightness, and a pale face against pale sand with a dark shirt got the wrong answer and dissolved. Deciding the direction locally, against the nearest part of the person, fixed it. I only saw the problem when I zoomed into the one bit output, which is where this project keeps hiding its truths. A little extra saturation and contrast on the person, and a softening of the background so dark scenes do not print as black, round it out. All of it is adjustable live, and the values that I settled on by eye are a stipple of 5 pixels at 30 percent strength.
The old timey look is optional as well. Sepia, vignette and film grain are a checkbox now, because the printer’s own dithering already looks like film grain.
Step 7: One bit, and a 1990s receipt printer
The Phomemo M02 prints at 203 dpi on 53 mm paper with 48 mm of that printable, so every image is exactly 384 pixels wide and exactly one bit deep. Floyd-Steinberg dithering turns grays into a stipple of black dots, which happens to look like film grain.
The printer speaks plain ESC/POS, the command language of receipt printers, thanks to the reverse engineering in vivier’s phomemo-tools. The transport is classic Bluetooth RFCOMM on channel 1 rather than BLE, which I confirmed by asking the printer over SDP.
dots = np.array(grayscale.convert("1")) == 0          # True where ink goes
packed = np.packbits(dots, axis=1)                    # 8 pixels per byte, 48 per row
data = GS + b"v0" + b"\x00" + (48).to_bytes(2, "little") + rows.to_bytes(2, "little") + packed.tobytes()
So a Halloween photo booth is printing with the same command set as the machine that prints your grocery receipt. A reel is a tall narrow strip, which is how real photo booths did it, and one capture can be placed on several different scenes so a visitor poses only once.
Step 8: Do not send sixty kilobytes at a small printer
My first full strip stopped at the start of its third frame. The two printed frames came to about 30 KB, and I had pushed the whole 60 KB strip across Bluetooth in well under a second. My working theory is that the M02 has a small receive buffer and no flow control, so it silently drops whatever does not fit. That is a theory, not a measurement.
The fix is to send the job in blocks and keep only a bounded amount of unprinted data in flight, judged against how fast the printer is rated to print. The manufacturer lists 10 to 15 mm per second, which is roughly 80 to 120 lines per second at this resolution.
for block in job.blocks:
    needed = sent_rows + block.rows - max_backlog_lines
    wait_until(started + needed / lines_per_second)
    send(block.data)
    sent_rows += block.rows
wait_until(started + sent_rows / lines_per_second + tail_pad_s)   # do not hang up early
The Studio: Preview, Tweak, Then Print
Thermal sticker paper is cheap, but not free, and my first two live attempts spent two stickers on nobody facing the camera. The answer was to stop treating the printer as the output and start treating it as the last step. The booth now has a web studio. Open the page, stand in view of the live aim view, and press a button. A countdown beeps, the booth takes exactly one photo, and the page shows the reel in color next to the precise one bit image the printer will produce.
From there everything is adjustable on that same photo, and a change shows up in about a second: person size, where they stand, the edge treatment, the tone boost, how soft the background is, how often scenes morph, how many frames. A shuffle button draws a fresh reel, each frame has its own reroll button, and typing a seed brings a favorite back. Nothing touches the printer until the print button is pressed, and that prints exactly what is on screen without taking a new photo.
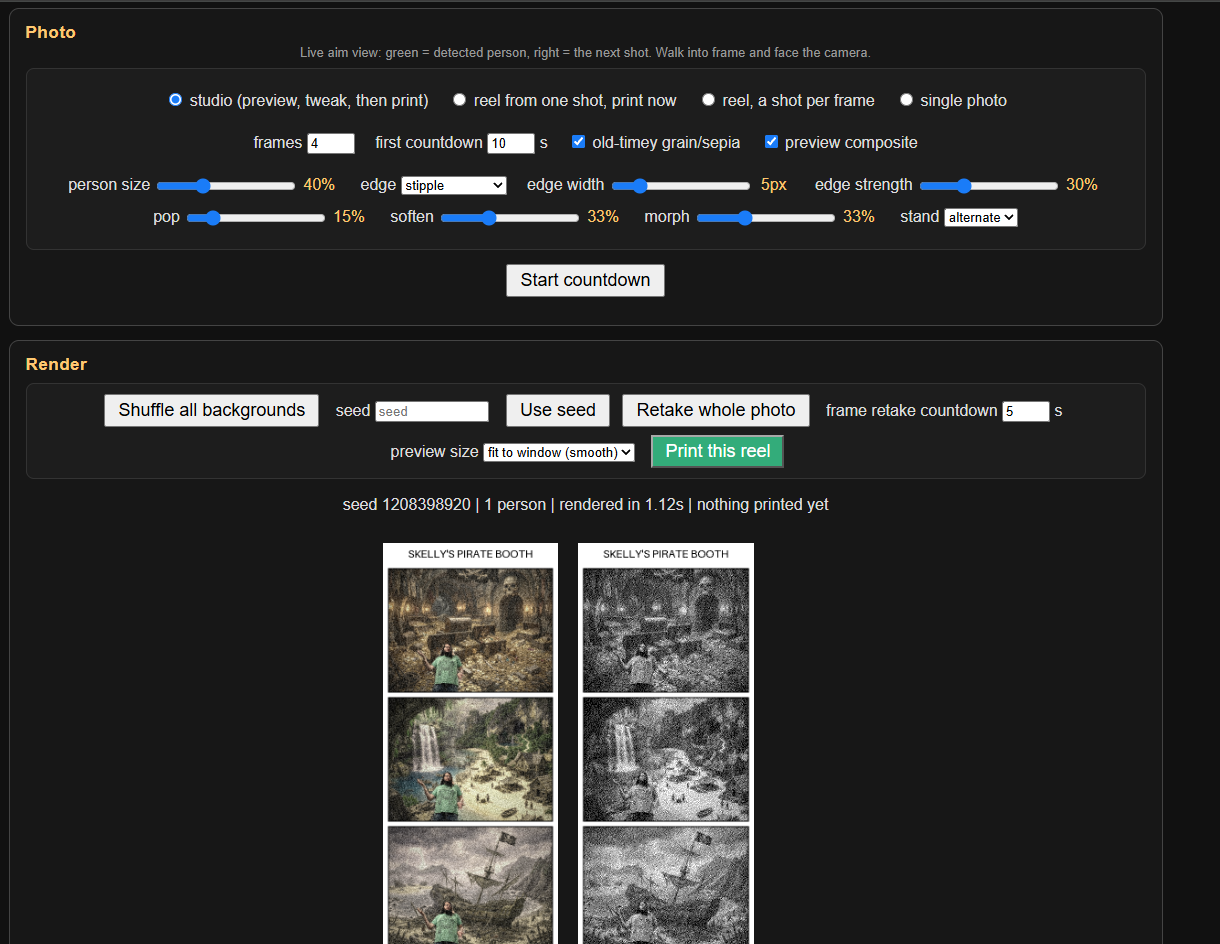
The studio is also how all of the tuning in the previous steps happened. Every default in this post was chosen by looking at the actual print preview with a real person standing in front of the camera, which beat my intuition every single time.
The Voice: A Skelly That Counts Down
A countdown on a web page is fine for me at a keyboard. It is useless for a child standing three feet from a skeleton with no idea there is a page. Last year’s plan called for visual and audio cues, and the skeleton already has a speaker, so the booth now talks. It invites people over, explains itself, fills the wait with banter instead of a timer, counts down out loud and takes the photo on the last word.
Rendering the voice offline
The speech is made ahead of time on device with Piper, the same text to speech engine as last year, using models from the Piper voices collection. A script renders every line from one YAML file into a small mono WAV file, and the board never runs a speech model at all. It just plays files. All 17 lines come to about 85 seconds of audio and under 4 MB.
Getting it out of a small speaker
The speaker is the MAX98357A mono amp from the earlier post, and it has two quirks. Its sound card only accepts stereo, so the player duplicates the mono clip into both channels through ALSA’s plug device, and the amp sums them back to mono. It also has no software volume control, so the player scales the samples itself.
The visitor sequence
One director runs the whole thing as a small state machine, and it can be started from the studio page, a push button, or a motion sensor. A button press skips the invitations, because the person is obviously already here, while motion starts with them.
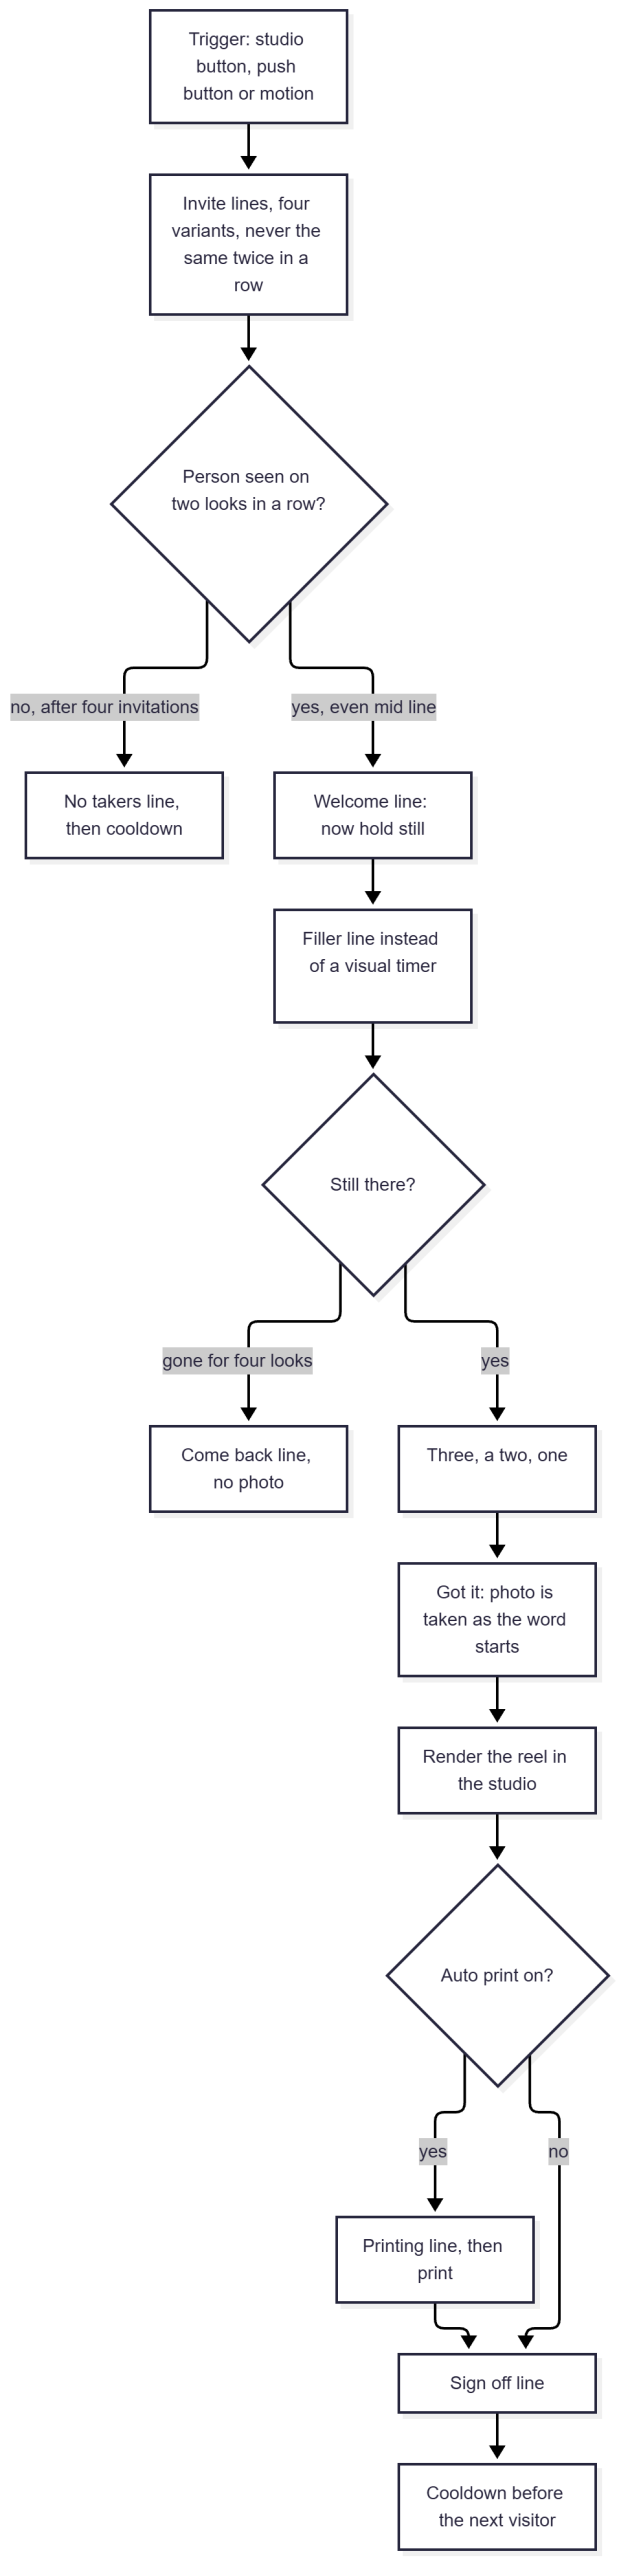
A few design choices came out of thinking about a line of people.
- Invitations are interruptible. The booth looks for a person while it talks, using the same segmentation model that makes the photos, and a person seen on two looks in a row cuts the invitation short. Requiring two looks stops a passing shadow from starting a sequence.
- The camera stays open for the whole sequence. Opening the webcam, letting the exposure settle and closing it for every check would be slow. A sequence opens it once, so presence checks are cheap and the capture lands as the word got it begins, with the exposure already settled.
- Nothing is wasted if the visitor walks off. If the person leaves during the welcome talk, the skeleton calls them back and takes no photo. If the photo itself has nobody in it, the same thing happens.
- Studio first. Printing automatically is an option and it is off by default, so the reel waits in the studio for me to approve it. The welcome line is optional too, because 25 seconds of banter is long when ten kids are waiting.
- One at a time. A sequence cannot start while another is running or during the cooldown, and a stop button works at any point.
The studio has a panel for all of it. I can run the sequence, play any single line to check the sound, change the volume, and watch the state as it moves along. When a sequence takes a photo, the reel appears in the render section like any other capture.
Where the Time Goes, and the Irony That Followed Me Home
Here are the numbers measured on the board.
| Stage | Measured |
|---|---|
| Segmentation, 640×480 | about 55 ms |
| Segmentation, 1280×720 | about 93 ms |
| Segmentation, 1920×1080 | about 179 ms |
| Capture in the studio | about 2 s |
| Re-render a 4 to 6 frame reel after a tweak | about 1.1 to 1.6 s |
| Printing a 4 frame reel (153 mm) | roughly 10 to 15 s at rated speed |
Read that last row twice. Last year the bottleneck was a giant model that could not keep up with ten kids. This year the model finishes in a tenth of a second and the bottleneck is paper moving at 10 to 15 millimeters per second. Ten kids in line is now up to two and a half minutes of waiting. I have replaced a compute problem with a physics problem, and physics does not accept pull requests. The rate limiting item from my plan is no longer optional, it is just a thermal printhead.
Status and What Is Next
The honest state of things is that the pipeline and the studio work well with one adult in front of the camera, the defaults above came from that testing, and several things are still unproven. The GPIO layer has not touched the real pins, but I plan to make the prompt unique and interactive. Likely with a scripted set of timed vocal instructions played over the embedded mono amp speaker and some basic motions.
That is the next step: a live test with one to three people in frame, adults and kids, to see that grouping and sizing behave the way I expect and that everyone can be seen on the print. After that comes the part I am looking forward to least and most: props. Hats add height and shrink the person, a held sword or a drink is exactly the kind of thin object that a person segmentation model drops, and a cape is a cutout problem waiting to happen. I will deal with those as well as I can, and then I will update this post with what happened before publishing it.
The end goal is a proper prop rather than a skeleton with a webcam taped to it. The plan is to build the booth into a vintage style antique camera, which has plenty of room to hide a Radxa, a webcam and a thermal printer, with the lens in the right place and the sticker coming out of a slot.
The architecture notes, the hardware research and the test suite are all in the repository, and the control side builds on Alex Volkov’s original halloweave project. If you build your own, put a real person in front of the camera as early as you can. The skeleton, as I keep rediscovering, is a very patient teacher.