Harvester is a new python based project that attempts to leverage access in order to gather potentially sensitive information. Its designed to either leverage the access of users credentials or the default access granted to a pod via automountServiceAccountToken, which I wrote about recently. The harvester.py script currently primarily targets pod container environment variables, container manifest environment variables, and config map entries utilized as environment variables, to look for potential credentials.
Why Create A Credential Harvester
The default admission controls in many of the Kubernetes implementation apply a read/view policy to newly created users. However custom policies, admissions, and operators have become more common place. What’s more troublesome is the read permissions given to the automountServiceAccountToken by default. Without adjusting or disabling service tokens, compromised containers could effectively read all pod specs in all namespaces. With access to all pod specs, an attacker could potentially gather credentials or other sensitive information. Harvester is a tool that attempts to help automate the review process.
How Kubernetes Harvester Works
The harvester.py script utilizes the automountServiceAccountToken mounted within a given container or the standard user credentials within the Kube config file (~/.kube/config). Then the Kube API server is queried to look for sensitive information within the pod spec of each pod in the following steps.
Use access to request pod specs for all namespaces within the cluster.
Parse all pod specs to map and dedupe container container information
Review each containers environment variables for sensitive values
Review each config map entry, mapped to container environment variables for sensitive values
Attempt to pull each container image and review the manifest environment variables for sensitive values
Attempt to request authentication tokens from the internal metadata API for each of the major cloud provider
Other Resources:
Introduction to Kubernetes – A Free introduction course diving into Kubernetes as a tool for containerized infrastructure. Its a a great place to begin if your just getting started with Kubernetes.
The Linux Foundations Official Course – This is the most robust general knowledge based course I’ve seen. If you want to learn Kubernetes and how to do almost anything with it, get the CKA + CKAD combo package.
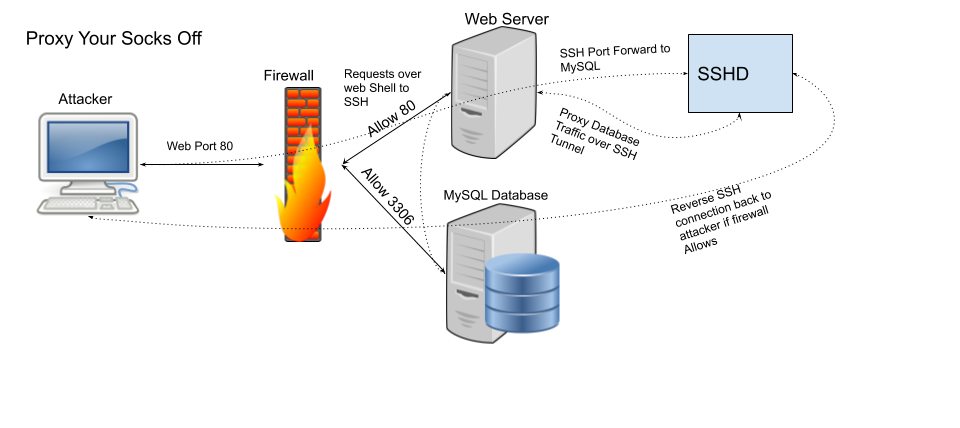
Sometimes during assessments sensitive systems are significantly segmented from other networks. Therefore its very important for penetration testers to know how to proxy your socks off in order to move across network.
Solution
To gain access to other networks, whether it’s the internet or a protected subnet. We can use putty on windows and the native ssh client on Linux to preform port forwarding and create Socks proxies to bypass access controls.
Proxy Caveats
SOCKS proxies only work for TCP traffic and with applications that support using a transparent proxy. Applications that use their own proxy settings, require forward secrecy, or check session integrity likely won’t function correctly.
All ports from 1-1024 require administrative rights to allocate on both windows and Linux systems.
Port 0 is used to represent a randomly generated port number, in both windows and linux systems.
How to Proxy Your Socks Off
Proxy Traffic in Windows
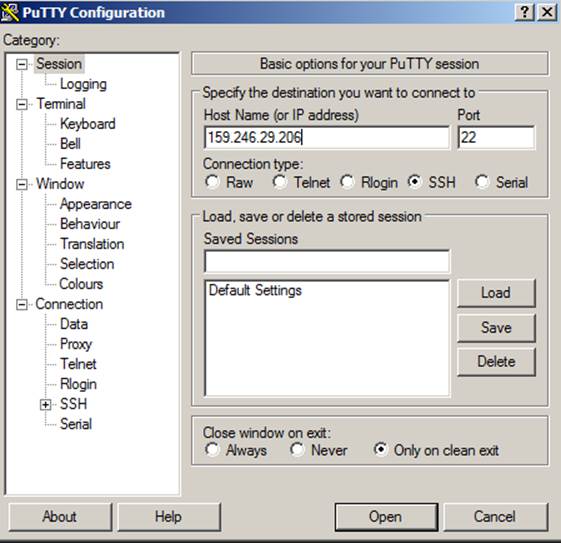
In Windows simply open putty and enter the IP address you want to connect in as the Hostname/IP address.
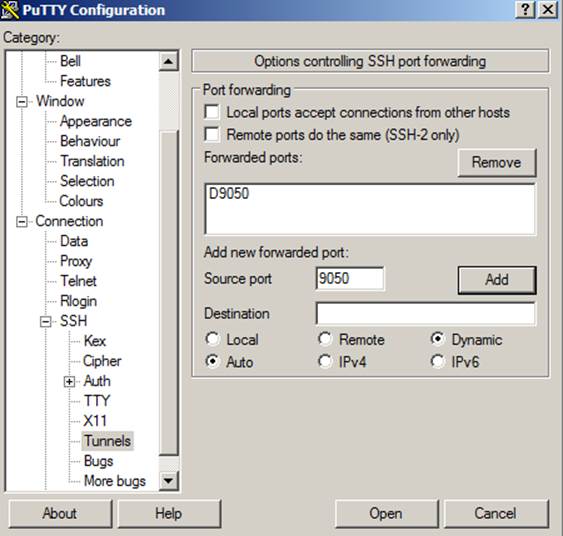
Next we have to tell putty that we want it to open a port on the localhost to be used to forward all traffic to our remote host. To do that, we go to the connections -> SSH -> Tunnels section, add a source port, choose the Dynamic option, and click the add button.
At this point you can click the open button and authenticate as if it were a normal SSH connection. Just be sure to leave the terminal open once authenticated, to ensure traffic is being passed from the local port to the remote host.
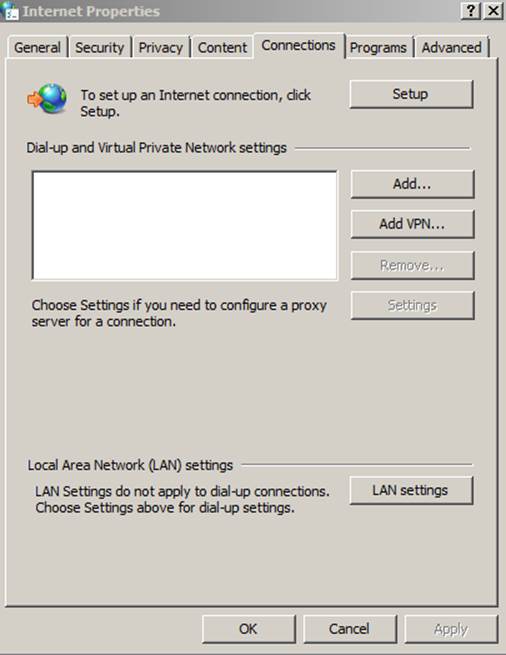
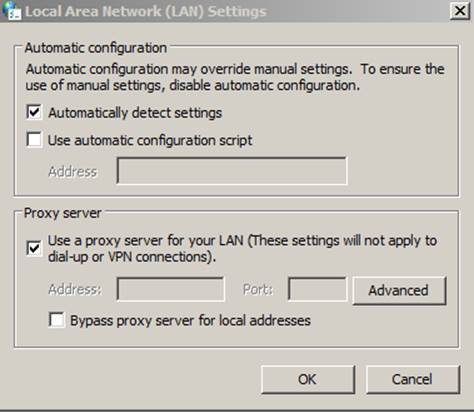
To tell windows to use the socks proxy, open internet options from the control panel or the start menu search. Then go to the connections tab and open LAN Settings.
Once LAN settings opens, select the “use a proxy server for your LAN” check box and click the advanced.
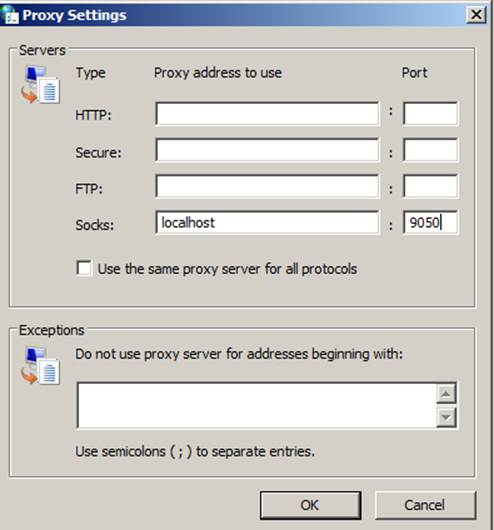
In the Socks box add localhost or 127.0.0.1 and the port you set as dynamic in putty. Then click OK three times to save all the settings.
Proxy Traffic in Linux
If you need to proxy your Kali system, the process is fairly similar. Start by using the ssh client to dynamically forward traffic from a local port. This can be done with a command similar to the following, where 9050 is our dynamic port.
ssh -NfD 9050 root@159.246.29.206
Next we need to tell proxy chains where to send traffic from our programs. This can be set globally be using a command like the following.
To run an application through the socks proxy, simply prepend it with the proxychains command, like the following.
proxychains iceweasel
There is not built in means to setup a system wide socks proxy. However the BadVPN package has a package tun2socks that can tunnel all traffic over a local socks proxy.
Proxy Your Socks Off with Metasploit
Sometimes, while doing an assessment you may even want to run some tools such as nmap or even SQL Management studio (ssms.exe) over an established shell. Metasploit has a post module (auxiliary/server/socks4a) that can be used to create a socks4 proxy on an existing session.
However, to start off we need to tell metasploit how to route traffic to each of our shell’s networks before running the socks proxy. This can either be done manually with the route command or if your session is on a windows host with the autoroute module (post/windows/manage/autoroute).
To add a route manually you can use the built in route command with options similar to the following.
route add 10.0.0.0 255.255.255.0 1
To add routes with autoroute, either use the post module or run autoroute from a meterpreter shell. For the autoroute module (post/windows/manage/autoroute) just set the session ID and run. For autoroute from meterpreter use a command similar to the following.
run autoroute -s 10.0.0.0
Once routes are established within metasploit to your target networks, you can run the socks proxy module (auxiliary/server/socks4a) and note the SRVPORT.
Using Proxychains to Proxy Traffic through Metasploit Meterpreter
Next we need to tell proxychains what port to send traffic to within the global configuration file (/etc/proxychains.conf), just like in the Linux example above. There should be a line like “socks4 127.0.0.1 1080” at the bottom of the file, change the port 1080 to whatever your SRVPORT was in metasploit.
Once the configuration file is updated, proxychains can be used to issue commands through metasploit shell(s). Like with the following nmap example.
proxychains nmap -v -sS 10.0.0.0/24
If we want to make this socks proxy available to a windows host for programs like SQL Server Management Studio, perform a local port forward to the socks port on the Linux system. To do this we can use putty and follow steps similar to those presented above.
Start by creating a local port forward of a local port on our windows system, to the local socks port on the Linux system with putty. Start by allocating a source port for connection on the local system and forward to a destination of 127.0.0.1:1080; where 1080 is your metasploit SRVPORT.
We can then just configure a system wide proxy by adding our forwarded port as the socks port, instead of using a local socks proxy.
Once those settings are changes, we should be able to use the majority of our tools within windows without issue.
Using SSH to Provide Remote System Internet Access via local Socks Proxy
An SSH tunnel can be used to forward traffic from your local system to a port on a remote system. This can be done in Linux by switching the -L option with -R. Or in putty by choosing the Remote option under tunnels instead of Local. For example if you wanted to share your local socks proxy with a remote system to provide internet access, putty can be used with a remote forward like the following.
Using Compromised Linux Webserver to Access Internal Network and Database
It’s also worth noting that SSH port forwarding can be performed on the network socket level and does not require an interactive session be established; only valid authentication is required. For instance, say you wanted to log into a restricted database of a webserver. But you only have access to the webserver account. The webserver user is not allowed to log into the server interactively by default, but that doesn’t mean it can’t authenticate. In many cases SSH can be used as described in my post on SSH for post exploitation to get around limited user shells.
Using Linux Native Tools to Proxy Your Socks Off
Tools natively built-in to windows and linux can also be used to preform port forwarding. Just note that this methodology simply makes a port to port translation and does not manipulate the traffic in any way. Netcat (nc) is found in almost every single Linux distribution and can be used to easily preform port forwarding with commands similar to the following.
First we have to make a named pipe so that any response from the server aren’t dumped to standard out.
mkfifo backpipe
Then we can use a command similar to the following to send traffic from 8080 on the localhost to a remote host on a different port utilizing the named pipe. This could help get around a firewall or help send traffic to another system to be caught by another port translation or process.
Similarly the netsh (commandline windows firewall editor) command in windows can be used to create a local port forward as well. In this cause we can follow the same example and create a port translation from localhost 8080 to example.com on port 80.
Windows 7 and above will likely require administrative privileges to make changes to the windows firewall. But you can likely still utilize the windows version of nc or netcat to redirect traffic all the same.
TLDR; These days when you run into a production Linux or cloud environments, they use public key authentication. Making lateral movement as easy as leveraging pillaged SSH keys.
Level Settings
SSH (Secure Shell) is the primary means of managing Cloud Instances, Linux, Unix, OSX, Networking Devices, Vendor Devices, and even some embedded devices. It’s also worth noting that Microsoft has received glowing reviews and support for its roll out of SSH into current builds, but it is not enabled by default. Generally speaking SSH uses the servers local user base and corresponding passwords to authenticate remote connections. However, SSH can also be configured to use Public Key authentication.
How SSH Public Key Authentication Works
Since SSH is designed to use a RSA or DSA Public (Encryption) key and Private (Decryption) key combinations to encrypt traffic. A user can add a Public key to their authorized keys file, to allow the use of the corresponding Private key for authentication. This allows the user to attempt to establish a secure connection by sending their username and the fingerprint of the Public key to the SSH Server. If a Public key with the given fingerprint is within the requested users authorized keys file, then the SSH server responds with an encrypted challenge. This challenge is encrypted with the users Public key and can only be decrypted with the corresponding Private key. If the challenge is successfully answered with an encrypted respond using the SSH Servers Public key, the client and server are successfully authenticated.
What is the Inherit Problem
These days when you run into a production Linux or Cloud environment, more than likely SSH services are going to use Public Key authentication. The traditional rapid guessing won’t work if only public key authentication is enabled. If a Public key fingerprint is not submitted, then the SSH server will simply terminate the session. So in order to pivot into a high value environment all that’s needed is to locate and begin leveraging pillaged SSH private keys with the proper usernames to gain further access.
How to Pillage SSH Keys
The good news is Private keys are fairly easy to locate on users workstations and development servers. They almost always reside within the default SSH directories.
Linux = /home/<user>/.ssh/
OSX = /Users/<user>/.ssh/
Windows = C:\Users\<user>\.ssh\
As such they can be seamlessly picked up by an SSH client. It’s also worth digging through the home directories of Admin, Developer, and Operation users for .ppk, .key, rsa_id, dsa_id, .p12, .pem, and .pfx files, as they may be private keys.
Using Publicly Disclosed Keys
The even better news is many of the Major product vendors (F5, Cisco, Barracuda, and VMware to name a few) have been getting outted for distributing systems with static Private keys. This means if an admin doesn’t log in, remove the old keys, and manually regenerate new ones, then a shell can be established using publicly disclosed private keys.
The good news is Metasploit has several modules that will make scanning discovered SSH services fairly easy. So all we need to do is feed it the proper data, run, and watch the shells rain in. Metasploit makes preforming private key authentication easy and seamless. All you need to do is give it a list of services, a username, and a private key. If authentication is successful it will even seamlessly establish a shell session for you.
Leveraging Pillaged SSH Keys
First we need a private key file, either one we’ve located from pillaging or a publicly known bad key. For example the publicly disclosed Vagrant (Vagrant preforms cross platform Virtual Machine management) Private key.
The corresponding Public key looks like the following:
ssh-rsa AAAAB3NzaC1yc2EAAAABIwAAAQEA6NF8iallvQVp22WDkTkyrtvp9eWW6A8YVr+kz4TjGYe7gHzIw+niNltGEFHzD8+v1I2YJ6oXevct1YeS0o9HZyN1Q9qgCgzUFtdOKLv6IedplqoPkcmF0aYet2PkEDo3MlTBckFXPITAMzF8dJSIFo9D8HfdOV0IAdx4O7PtixWKn5y2hMNG0zQPyUecp4pzC6kivAIhyfHilFR61RGL+GPXQ2MWZWFYbAGjyiYJnAmCP3NOTd0jMZEnDkbUvxhMmBYSdETk1rRgm+R4LOzFUGaHqHDLKLX+FIPKcF96hrucXzcWyLbIbEgE98OHlnVYCzRdK8jlqm8tehUc9c9WhQ== vagrant insecure public key
The second thing needed is the username of the user who has the public key in their authorized key file. As stated in the note, this can normally be found in the public key note. In the case of the vagrant key, the username is also widely known to be vagrant.
With a Private key and Username combination, the auxiliary/scanner/ssh/ssh_login_pubkey module can be used to scan for systems that the private key works on. A session will be established when authentication is successful. When a session is established Metasploit will also collect basic system information for you, including hostname, kernel version, and group memberships.
Finding the Username for Pillaged SSH Keys
Public keys listed within a user authorized_keys file can have comments after the actual key data. Most SSH key generates take advantage of this comment field, to add the username and hostname when a key is generated.
It’s also worth noting that most SSH clients keep a known hosts file, for integrity purposes, which can be viewed to see which systems the key was used to access recently.
If you find just a Private key file during pillaging, the public key data can be derived form it in most cases. However the username likely won’t be associated with it. When no username is found, a common username file can be passed alongside the key in Metasploit.
Speeding Scans up with sshscan
The Metasploit SSH modules are not threaded safe and running more than one connection at a time could cause a thread to hang or exhaustion of system resources. SSH generally is not considered thread safe, because responses after the authentication process are not formally structured. However there is a SSH scanner written using the native go SSH client, which works very well. Just take care to ensure the command you run, provides a simple, small, and structured output (like id). https://github.com/CroweCybersecurity/go-sshscan
SSH Defense Strategies
When generating a Public and Private key pair, a passphrase can be provided to protect the keys. When a passphrase is setup, the SSH client must prompt for the passphrase every time the private key is used. Thus if a key with a passphrase is discover by am attacker its normally not usable.
Implementing an enterprise key management solution to ensure all systems have their own private keys. This would simply crush the reuse factor and stop lateral movement.
Configuring the SSH Server to require both the public key and the users password for authentication. This will slow scanners to a crawl, as the password prompt would cause the session to hang, once the key authentication has completed.
Have a single Private key for all hosts that provides access to a lowest privilege user. Once a connection is established legitimate users can switch to their respective user accounts. If a key was discovered during an assessment we would have to dig through all the systems hoping for a major system misconfiguration. Hopefully, a needle in a haystack.
Avoid key management all together, by utilizing Certificate Authority (CA) backed system to automatically generate sign key pairs for authorized users. The biggest tech companies already do this and some have even blogged about it in the past.