Introduction
Cloud native applications are transforming the software landscape, offering unprecedented agility and scalability. However, this rapid innovation introduces new security challenges. Traditional vulnerability management approaches often struggle to keep pace with the dynamic nature of containers, microservices, and infrastructure-as-code (IaC). A robust cloud native vulnerability management program requires automation, continuous monitoring, and a deep understanding of the software supply chain. This blog post explores how open source tooling (specifically Trivy, Cyclonedx SBOMs, Dependency Track, and Jenkins) can be integrated into existing development pipelines to gain actionable visibility and better understand cloud native supply chain risk.
The Challenges of Cloud Native Security
Several factors contribute to the complexity of securing cloud native environments:
- Ephemeral Infrastructure: Containers are frequently created and destroyed, making it difficult to maintain a high degree of visibility and consistently measure security posture.
- Microservice Architecture: A larger number of small services increases the potential attack surface and require individual vulnerability assessments.
- Rapid Release Cycles: Frequent deployments demand automated scanning and remediation processes built into the development life cycle.
- Software Supply Chain Risks: Dependencies on third-party libraries and components introduce potential vulnerabilities that are often unknown or difficult to track.
- IaC Security: Misconfigurations in infrastructure code can lead to significant security risk and increased exposure.
Addressing these challenges requires a shift towards DevSecOps, where security is integrated throughout the entire software development lifecycle (SDLC). Automation plays a crucial role in this process, enabling continuous scanning, vulnerability detection, and remediation.
Introducing the Open Source Toolkit
The following open source tools provide a powerful foundation for automating cloud native vulnerability management:
- Trivy: A comprehensive vulnerability scanner designed specifically for containers, images, and IaC files. Trivy is easy to use, fast, and supports various scanning targets including Docker images, Kubernetes manifests, and Terraform configurations.
- CycloneDX SBOMs: A standard format for Bills of Materials including software (SBOMs). An SBOM provides a comprehensive inventory of all components used in a software application, including dependencies, licenses, and vulnerabilities. Cyclonedx is widely adopted and supports various export formats like JSON & XML.
- Dependency Track: A component analysis platform that helps organizations track the security maturity of their applications over time. Dependency Track ingests SBOMs, identifies known vulnerabilities in components, and provides a centralized view of risk exposure. It allows for deep unnesting of dependencies and helps understand the full scope of supply chain risks.
- Jenkins: A popular open source automation server used for continuous integration and continuous delivery (CI/CD). Jenkins can be integrated with Trivy to automate vulnerability scanning and SBOM generation as part of the build pipeline process.
Automating Vulnerability Scanning & SBOM Generation with Trivy
Trivy simplifies the process of identifying vulnerabilities in cloud native applications. It supports various scanners, including those for OS packages, language-specific dependencies, and infrastructure configurations. Generating an SBOM is straightforward using Trivy’s --format cyclonedx option.
Python application packaged as a Docker image
# Build the Docker image (replace my-python-app with your image name)
docker build -t my-python-app:latest .

# Scan the image and output a CycloneDX SBOM
trivy image --scanners vuln --format cyclonedx \
  --output sbom.json my-python-app:latest
The --scanners vuln flag tells Trivy to look for known CVEs in OS packages and Python wheels. The resulting sbom.json contains full list of components, dependencies, and services as entries such as:
{
  "components": [
    {
      "type": "library",
      "name": "flask",
      "version": "2.2.3",
      "purl": "pkg:pypi/flask@2.2.3"
    },
    ...
  ]
}
2. Terraform IaC directory
# Scan a local folder containing .tf files and generate an SBOM
trivy fs --scanners config,iac \
  --format cyclonedx --output tf-sbom.json ./infra/terraform
The fs sub‑command works on plain file systems, while the config,iac scanners look for insecure configurations in Terraform resources (e.g., open security groups or hard‑coded credentials). The generated SBOM lists each module and provider as a component with its version.
Both examples produce JSON output that can be directly uploaded to Dependency‑Track without any conversion step.
Enriching the SBOM with Build Context
A raw SBOM is valuable, but adding metadata (build information, environment, team/owners, business functional/services) makes it far more useful for downstream analysis. The following Groovy snippet shows how you can inject additional properties into the CycloneDX JSON before upload.
def enrichSbom(String sbomPath, Map<String,String> context) {
    def sbom = readJSON file: sbomPath
    // Add a top‑level metadata block if it does not exist
    sbom.metadata = sbom.metadata ?: [:]
    sbom.metadata.properties = sbom.metadata.properties ?: []

    context.each { key, value ->
        sbom.metadata.properties << [name: key, value: value]
    }

    writeJSON file: sbomPath, json: sbom, pretty: 2
}
You can call this method from a Jenkins stage after Trivy finishes scanning:
stage('Enrich SBOM') {
    steps {
        script {
            def addtionalInfo = [
                'git.commit': env.GIT_COMMIT,
                'ci.buildNumber': env.BUILD_NUMBER,
                'project.version': '1.4.2',
                'environment': params.DEPLOY_ENV ?: 'dev',
                'team': 'tech',
                'owner': 'bob',
                'businessfunctional': 'dtc',
                'service': 'sub-app'
            ]
            enrichSbom('sbom.json', addtionalInfo)
        }
    }
}
The resulting sbom.json now contains a metadata.properties array that Dependency‑Track will display alongside each component, enabling you to filter findings directly in the UI.
Uploading SBOMs to OWASP Dependency‑Track from Jenkins
Dependency‑Track offers a simple HTTP(s) API for SBOM ingestion. The following stage uses curl inside a Docker container to post the enriched SBOM and capture the generated UUID for later reference.
stage('Upload SBOM') {
    steps {
        script {
            // Dependency‑Track server URL and API key stored in Jenkins credentials
            def dtUrl = env.DEPENDENCY_TRACK_URL
            def apiKey = credentials('dependency-track-api-key')

            sh """
                docker run --rm -i curlimages/curl:7.88.1 \\
                    -X POST "${dtUrl}/api/v1/bom" \\
                    -H "X-Api-Key: ${apiKey}" \\
                    -H 'Content-Type: application/json' \\
                    --data-binary @sbom.json > upload-response.json
            """

            // Extract the BOM UUID for reporting or tagging
            def response = readJSON file: 'upload-response.json'
            env.BOM_UUID = response.token ?: ''
        }
    }
}
Once uploaded, Dependency‑Track automatically triggers a vulnerability analysis run. You can retrieve the latest risk score with another API call if you want to gate the pipeline:
stage('Check Risk Score') {
    steps {
        script {
            def result = sh(
                script: """
                    docker run --rm -i curlimages/curl:7.88.1 \\
                        -X GET "${dtUrl}/api/v1/bom/${env.BOM_UUID}" \\
                        -H "X-Api-Key: ${apiKey}"
                """,
                returnStdout: true
            ).trim()
            def bomInfo = readJSON text: result
            if (bomInfo.riskScore > 7) {
                error "Risk score ${bomInfo.riskScore} exceeds threshold"
            } else {
                echo "Risk score ${bomInfo.riskScore} is acceptable"
            }
        }
    }
}
With this pattern, any build that pushes a vulnerable component above the defined risk threshold will fail early, preventing insecure images from reaching production.
Full Jenkins Pipeline Example
Below is a concise yet complete declarative pipeline example that ties together all of the steps described so far. It assumes you have a Dockerfile for the Python app and a Terraform directory under infra/terraform.
pipeline {
    agent any

    environment {
        DEPENDENCY_TRACK_URL = 'https://dependencytrack.example.com'
    }

    stages {
        stage('Checkout') {
            steps {
                checkout scm
            }
        }

        stage('Build Docker Image') {
            steps {
                script {
                    sh "docker build -t my-python-app:${env.BUILD_NUMBER} ."
                }
            }
        }

        stage('Trivy Scan & SBOM') {
            steps {
                // Run Trivy in a container to avoid installing it on the agent
                sh """
                    docker run --rm -v \$(pwd):/project \
                        aquasec/trivy image --scanners vuln \\
                        --format cyclonedx \\
                        --output /project/sbom.json \\
                        my-python-app:${env.BUILD_NUMBER}
                """
            }
        }

        stage('Trivy IaC Scan') {
            steps {
                sh """
                    docker run --rm -v \$(pwd)/infra/terraform:/project \
                        aquasec/trivy fs --scanners config,iac \\
                        --format cyclonedx \\
                        --output /project/tf-sbom.json \\
                        /project
                """
            }
        }

        stage('Enrich SBOM') {
            steps {
                script {
                    def context = [
                      'git.commit': env.GIT_COMMIT,
                      'ci.buildNumber': env.BUILD_NUMBER,
                      'project.version': '1.4.2',
                      'environment': params.DEPLOY_ENV ?: 'dev',
                      'team': 'tech',
                      'owner': 'bob',
                      'businessfunctional': 'dtc',
                      'service': 'sub-app'
                    ]
                    enrichSbom('sbom.json', context)
                }
            }
        }

        stage('Upload SBOM') {
            steps {
                script {
                    def apiKey = credentials('dependency-track-api-key')
                    sh """
                        docker run --rm -i curlimages/curl:7.88.1 \\
                            -X POST "${env.DEPENDENCY_TRACK_URL}/api/v1/bom" \\
                            -H "X-Api-Key: ${apiKey}" \\
                            -H 'Content-Type: application/json' \\
                            --data-binary @sbom.json > upload-response.json
                    """
                    def resp = readJSON file: 'upload-response.json'
                    env.BOM_UUID = resp.token ?: ''
                }
            }
        }

        stage('Risk Gate') {
            steps {
                script {
                    def apiKey = credentials('dependency-track-api-key')
                    def result = sh(
                        script: """
                            docker run --rm -i curlimages/curl:7.88.1 \\
                                -X GET "${env.DEPENDENCY_TRACK_URL}/api/v1/bom/${env.BOM_UUID}" \\
                                -H "X-Api-Key: ${apiKey}"
                        """,
                        returnStdout: true
                    ).trim()
                    def bomInfo = readJSON text: result
                    if (bomInfo.riskScore > 7) {
                        error "Risk score ${bomInfo.riskScore} exceeds threshold"
                    } else {
                        echo "Risk score ${bomInfo.riskScore} is within acceptable limits"
                    }
                }
            }
        }
    }

    post {
        always {
            archiveArtifacts artifacts: 'sbom.json, tf-sbom.json', fingerprint: true
        }
        failure {
            mail to: 'sec-team@example.com',
                 subject: "Build ${env.BUILD_NUMBER} failed risk gate",
                 body: "Risk score exceeded policy. See Jenkins job for details."
        }
    }
}
This pipeline demonstrates a repeatable, automated workflow that produces an SBOM for every container and IaC artifact, enriches it with metadata, pushes it to Dependency‑Track, and enforces a risk gate before allowing promotion.
Visualising the SBOM Lifecycle in Dependency‑Track
Below is a diagram that captures the end‑to‑end flow for a Ruby on Rails application. The same steps apply to any language; we illustrate them as separate nodes to keep the visual clear.
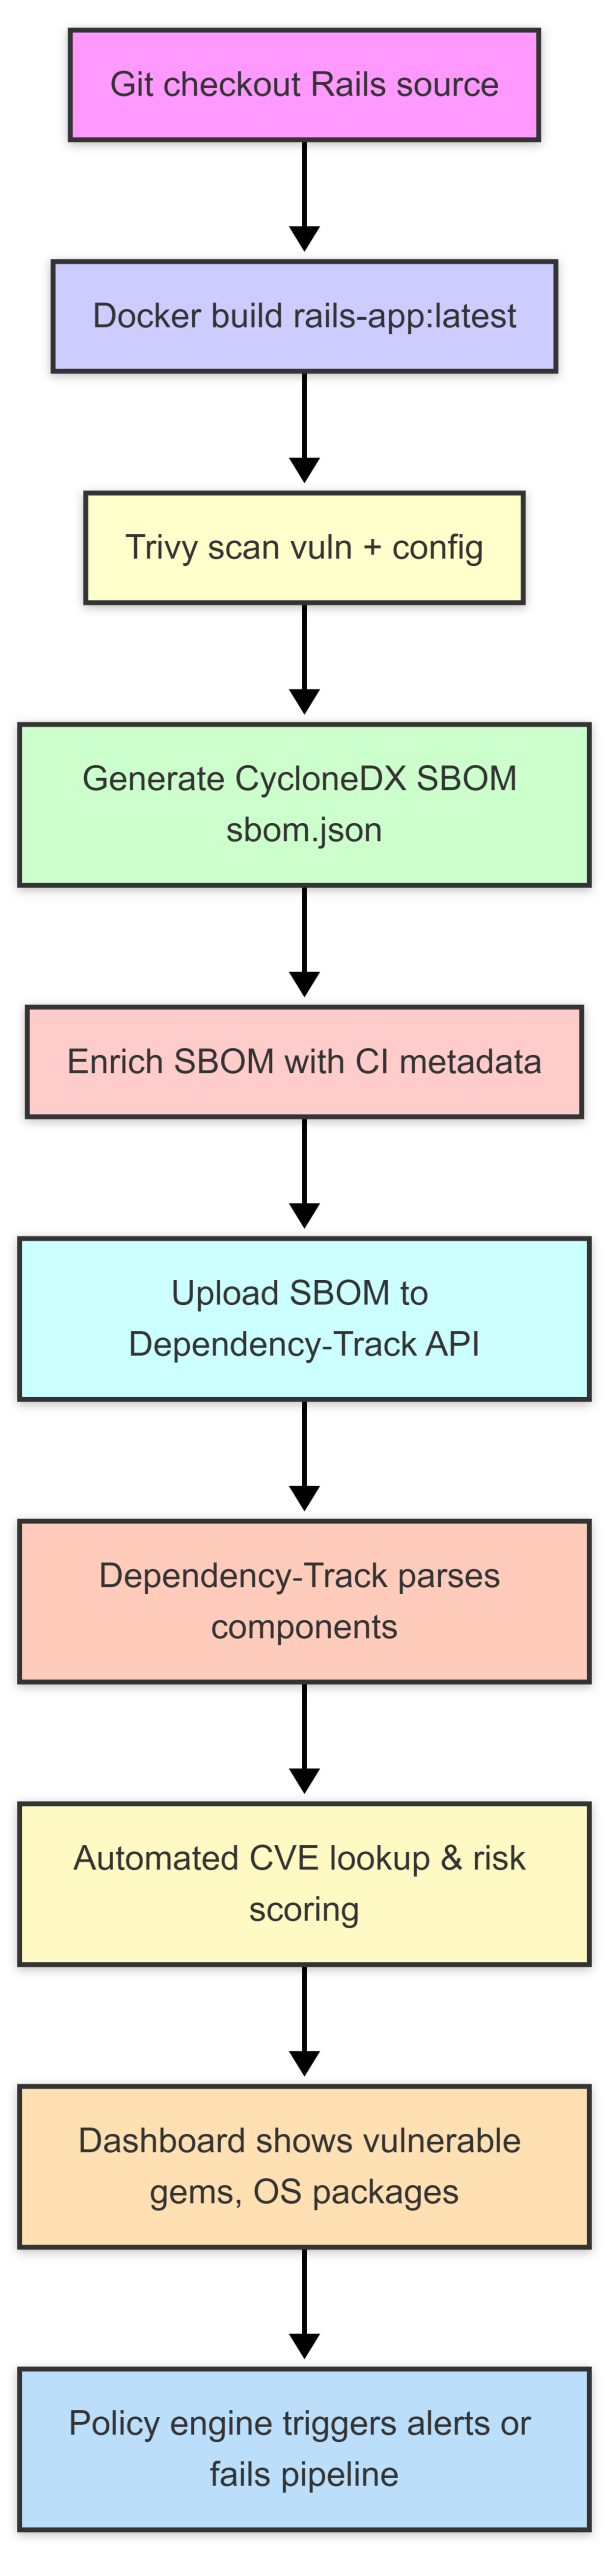
The diagram highlights the generate → upload → process loop that turns raw scan data into actionable findings. When a new vulnerability is disclosed for a gem used by the Rails app, Dependency‑Track automatically updates its database, recomputes the risk score and surfaces the change in the UI. Teams can then create tickets directly from the platform or let Jenkins flag further deployments.
Turning Findings Into Actionable Insight
Scanning alone does not improve security; the real value is derived from how findings are triaged, remediated and measured over time. Here are best practices for extracting actionable insight from the SBOM pipeline described above:
- Prioritise by risk score – Dependency‑Track assigns a numeric risk score based on CVSS severity, exploit maturity and component popularity. Use this score in your Jenkins risk gate to block only high impact issues while allowing low‑risk findings to be addressed in the next sprint.
- Link to ticketing systems – The Dependency‑Track REST API can create tickets automatically (e.g., Jira or GitHub Issues) for each new vulnerability, embedding the component name, version and remediation guidance. This reduces manual effort and ensures nothing falls through the cracks.
- Enforce supply chain policies – Use Dependency‑Track’s policy engine to define rules such as “no vulnerable dependencies in production” or “only approved licenses”. Violations automatically generate alerts that can be consumed by Slack, Teams or PagerDuty.
- Integrate with container registries – Some registries (e.g., Harbor) accept SBOM attachments. Pushing the same
sbom.jsonalongside the image enables downstream consumers to verify the provenance of the artifact before pulling it into their own clusters.
By weaving these practices into your CI/CD flow, you turn a periodic scan into a continuous risk management engine that feeds directly into development velocity and compliance reporting.
Scaling the Approach Across Multiple Teams
Large organisations often have dozens of micro‑services, each with its own language stack and IaC tooling. The open source stack described here scales naturally:
- Trivy runs as a lightweight Docker container on any Jenkins agent regardless of OS, supporting Go, Java, Python, Ruby, Node.js, and more.
- CycloneDX is language‑agnostic; the same JSON schema describes a Rust crate, a Helm chart or an Ansible playbook.
- Dependency‑Track can ingest thousands of SBOMs into a single portfolio, automatically deduplicating components and providing aggregated risk metrics per business unit.
- Jenkins shared libraries allow you to centralise the
enrichSbomanduploadSbomfunctions so every pipeline uses identical logic, reducing drift between teams.
When each team adopts this common pipeline, security leadership gains a unified view of supply chain exposure across the entire organization, while developers continue to work with familiar tools in their own language ecosystems.
Unnesting Dependencies & Understanding Supply Chain Risk
Dependency‑Track takes the CycloneDX SBOM and recursively resolves every dependency. For example, if your Python app pulls in requests==2.25.1, Dependency‑Track will fetch the transitive dependencies of urllib3 and certifi. It then cross‑references each component against public vulnerability databases (NVD, OSV) and license repositories.
Why unnesting matters
A single CVE in a deep dependency can compromise your entire deployment. Traditional scanning often stops at the top level, missing these hidden risks. By fully expanding the tree, Dependency‑Track gives you a complete risk surface.
The platform also provides:
- Vulnerability severity heat maps – Quickly spot critical issues.
- License compliance reports – Avoid legal exposure.
- Historical trend graphs – Measure security maturity over time.
These insights can be fed back into your CI/CD pipeline: for example, fail the build if a new CVE of a certain severity appears, or trigger an alert to the security team.
Conclusion
Automating cloud native vulnerability management is essential for securing modern applications. Open source tooling like Trivy, Cyclonedx SBOMs, Dependency Track, and Jenkins provide a powerful foundation for building secure software pipelines. By integrating these tools into existing development workflows, organizations can gain actionable visibility into risk posture, track dependencies effectively, and proactively address vulnerabilities throughout the SDLC. Embracing DevSecOps principles and leveraging automation is key to navigating the complexities of cloud native security and ensuring the resilience of your applications.