
The dream was simple enough: an AI-powered Halloween skeleton, affectionately dubbed “Skelly,” greeting trick-or-treaters with personalized welcomes based on their costumes. The reality, as often happens in the world of rapid prototyping and ambitious side projects, proved… more complicated. This post details the lessons learned from a somewhat chaotic Halloween night deployment, focusing on the implications inherent in edge AI systems like Skelly, and outlining strategies for a more controlled – and successful – iteration next year. We’ll dive into the design choices, the unexpected challenges, and how leveraging local Vision Language Models (VLMs) can be a powerful tool for privacy-focused applications.
The Initial Vision: A Local AI Halloween Greeter
The core concept revolved around using a Radxa Zero 3W, a connected USB webcam, built-in speaker controlled by a MAX98357A mono amplifier, and the animatronics of a pre-built Halloween skeleton. The plan was to capture images, feed them into an offline VLM like those available through LM Studio (powered by AMD Strix Halo platform), analyze the costumes (with Google gemma-3-27B), and generate a custom greeting delivered via text-to-speech (TTS) using PiperTTS. The original inspiration came from Alex Volkov’s work on Weights & Biases, utilizing a similar setup with Google AI Studio, ElevenLabs, Cartesia, and ChatGPT.
I opted for a fully offline approach to prioritize privacy. Capturing images that include children requires careful consideration, and sending that data to external APIs introduces significant risks. Local processing eliminates those concerns, albeit at the cost of increased complexity in model management and resource requirements.
The Halloween Night Reality: Overwhelmed by the Que
The biggest issue wasn’t technical – it was human. We anticipated a trickle of small groups, perhaps one to three treaters approaching Skelly at a time, uttering a polite “trick or treat.” Instead, we were met with waves of ten-plus children lining up like attendees at a concert. The system simply couldn’t handle the rapid influx.
The manual trigger approach – snapping pictures on demand – quickly became unsustainable. We struggled to process images fast enough before the next wave arrived. Privacy concerns also escalated as we attempted manual intervention, leading us to abandon the effort and join our kids in traditional trick-or-treating. The lack of good reproducible artifacts was a direct consequence of these issues; we were too busy firefighting to collect meaningful data.
Security Considerations: A Deep Dive into Edge AI Risks
This experience highlighted several critical risk considerations for edge AI deployments, particularly those involving physical interaction and potentially sensitive data like images of children:
- Data Capture & Storage: Even with offline processing, the captured images represent a potential privacy breach if compromised. Secure storage is paramount – encryption at rest and in transit (even locally) is essential. Consider minimizing image retention time or implementing automated deletion policies.
- Model Integrity: The VLM itself could be targeted. A malicious actor gaining access to the system could potentially replace the model with one that generates inappropriate responses or exfiltrates data. Model signing and verification are crucial.
- GPIO Control & Physical Access: The Radxa Zero 3W’s GPIO pins, controlling the animatronics, represent a physical attack vector. Unrestricted access to these pins or the network could allow an attacker to manipulate Skelly in unintended ways,
- Network Exposure (Even Offline): While we aimed for complete offline operation, the system still had network connectivity for initial model downloads and updates. This creates a potential entry point for attackers.
Reimagining Skelly: Controlling the Chaos
Next year’s iteration will focus on mitigating these risks through a combination of controlled interactions, robust security measures, and optimized processing. Here’s the plan:
1. Photo Booth Mode: Abandoning the “ambush” approach in favor of a dedicated photo booth setup. A backdrop and clear visual cues will encourage people to interact with Skelly in a more predictable manner.
2. Motion-Triggered Capture: Replacing voice activation with a motion sensor. This provides a consistent trigger mechanism, allowing us to time image capture and processing effectively.
3. Timing & Rate Limiting: Implementing strict timing controls to prevent overwhelming the system. A delay between captures will allow sufficient time for processing and response generation.
4. Visual Indicators & Auditory Cues: Providing clear feedback to users – a flashing light indicating image capture, a cheerful phrase confirming costume recognition, and a countdown timer before the greeting is delivered. This enhances user experience and encourages cooperation.
5. Enhanced GPIO Controls: Restricting access to the GPIO pins using Linux capabilities or mount namespaces. As well as limiting physical access to Skelly is key to reduce tampering.
Leveraging Local VLMs: A Python Example
The power of local VLMs lies in their ability to understand images without relying on external APIs. Here’s a simplified example demonstrating how to capture an image from a USB webcam and prompt Ollama with a costume greeting request using Python:
import cv2
import requests
import json

# Configuration
OLLAMA_API_URL = "http://localhost:11434/api/generate" # Adjust if necessary
MODEL = "gemma-3-27B"  # Or your preferred VLM model
PROMPT_TEMPLATE = "You are an AI assistant controlling a Halloween animatronic. The following is a base64‑encoded JPEG image of a person(s) in a costume.
Identify the costume in one short phrase and then respond with a friendly greeting that references the costume. Use a cheerful tone."

def capture_image(camera_index=0):
    """Captures an image from the specified webcam."""
    cap = cv2.VideoCapture(camera_index)
    if not cap.isOpened():
        raise IOError("Cannot open webcam")
    ret, frame = cap.read()
    if not ret:
        raise IOError("Failed to capture image")
    _, img_encoded = cv2.imencode('.jpg', frame)
    cap.release()
    return img_encoded.tobytes()

def prompt_ollama(image_data):
    """Prompts Ollama with the image data and returns the response."""
    headers = {
        "Content-Type": "application/json"
    }
    payload = {
        "model": MODEL,
        "prompt": PROMPT_TEMPLATE,
        "stream": False # Set to True for streaming responses
    }

    # Encode the image as base64 (Ollama requires this)
    import base64
    image_base64 = base64.b64encode(image_data).decode('utf-8')
    payload["prompt"] += f"\n[Image: {image_base64}]"

    response = requests.post(OLLAMA_API_URL, headers=headers, data=json.dumps(payload))
    response.raise_for_status()  # Raise an exception for bad status codes
    return response.json()['response']


if __name__ == "__main__":
    try:
        image_data = capture_image()
        greeting = prompt_ollama(image_data)
        print("Generated Greeting:", greeting)

    except Exception as e:
        print("Error:", e)
Important Notes:
- This is a simplified example and requires the
cv2(OpenCV) andrequestslibraries. Install them usingpip install opencv-python requests. - Ensure Ollama is running and the specified model (
gemma-3-27B) is downloaded. - The image data is encoded as base64 for compatibility with Ollama’s API. Adjust this if your VLM requires a different format.
- Error handling is minimal; implement more robust error checking in a production environment.
System Flow Diagram: Whisper to Piper via Ollama
Here’s a flow diagram illustrating the complete system architecture:
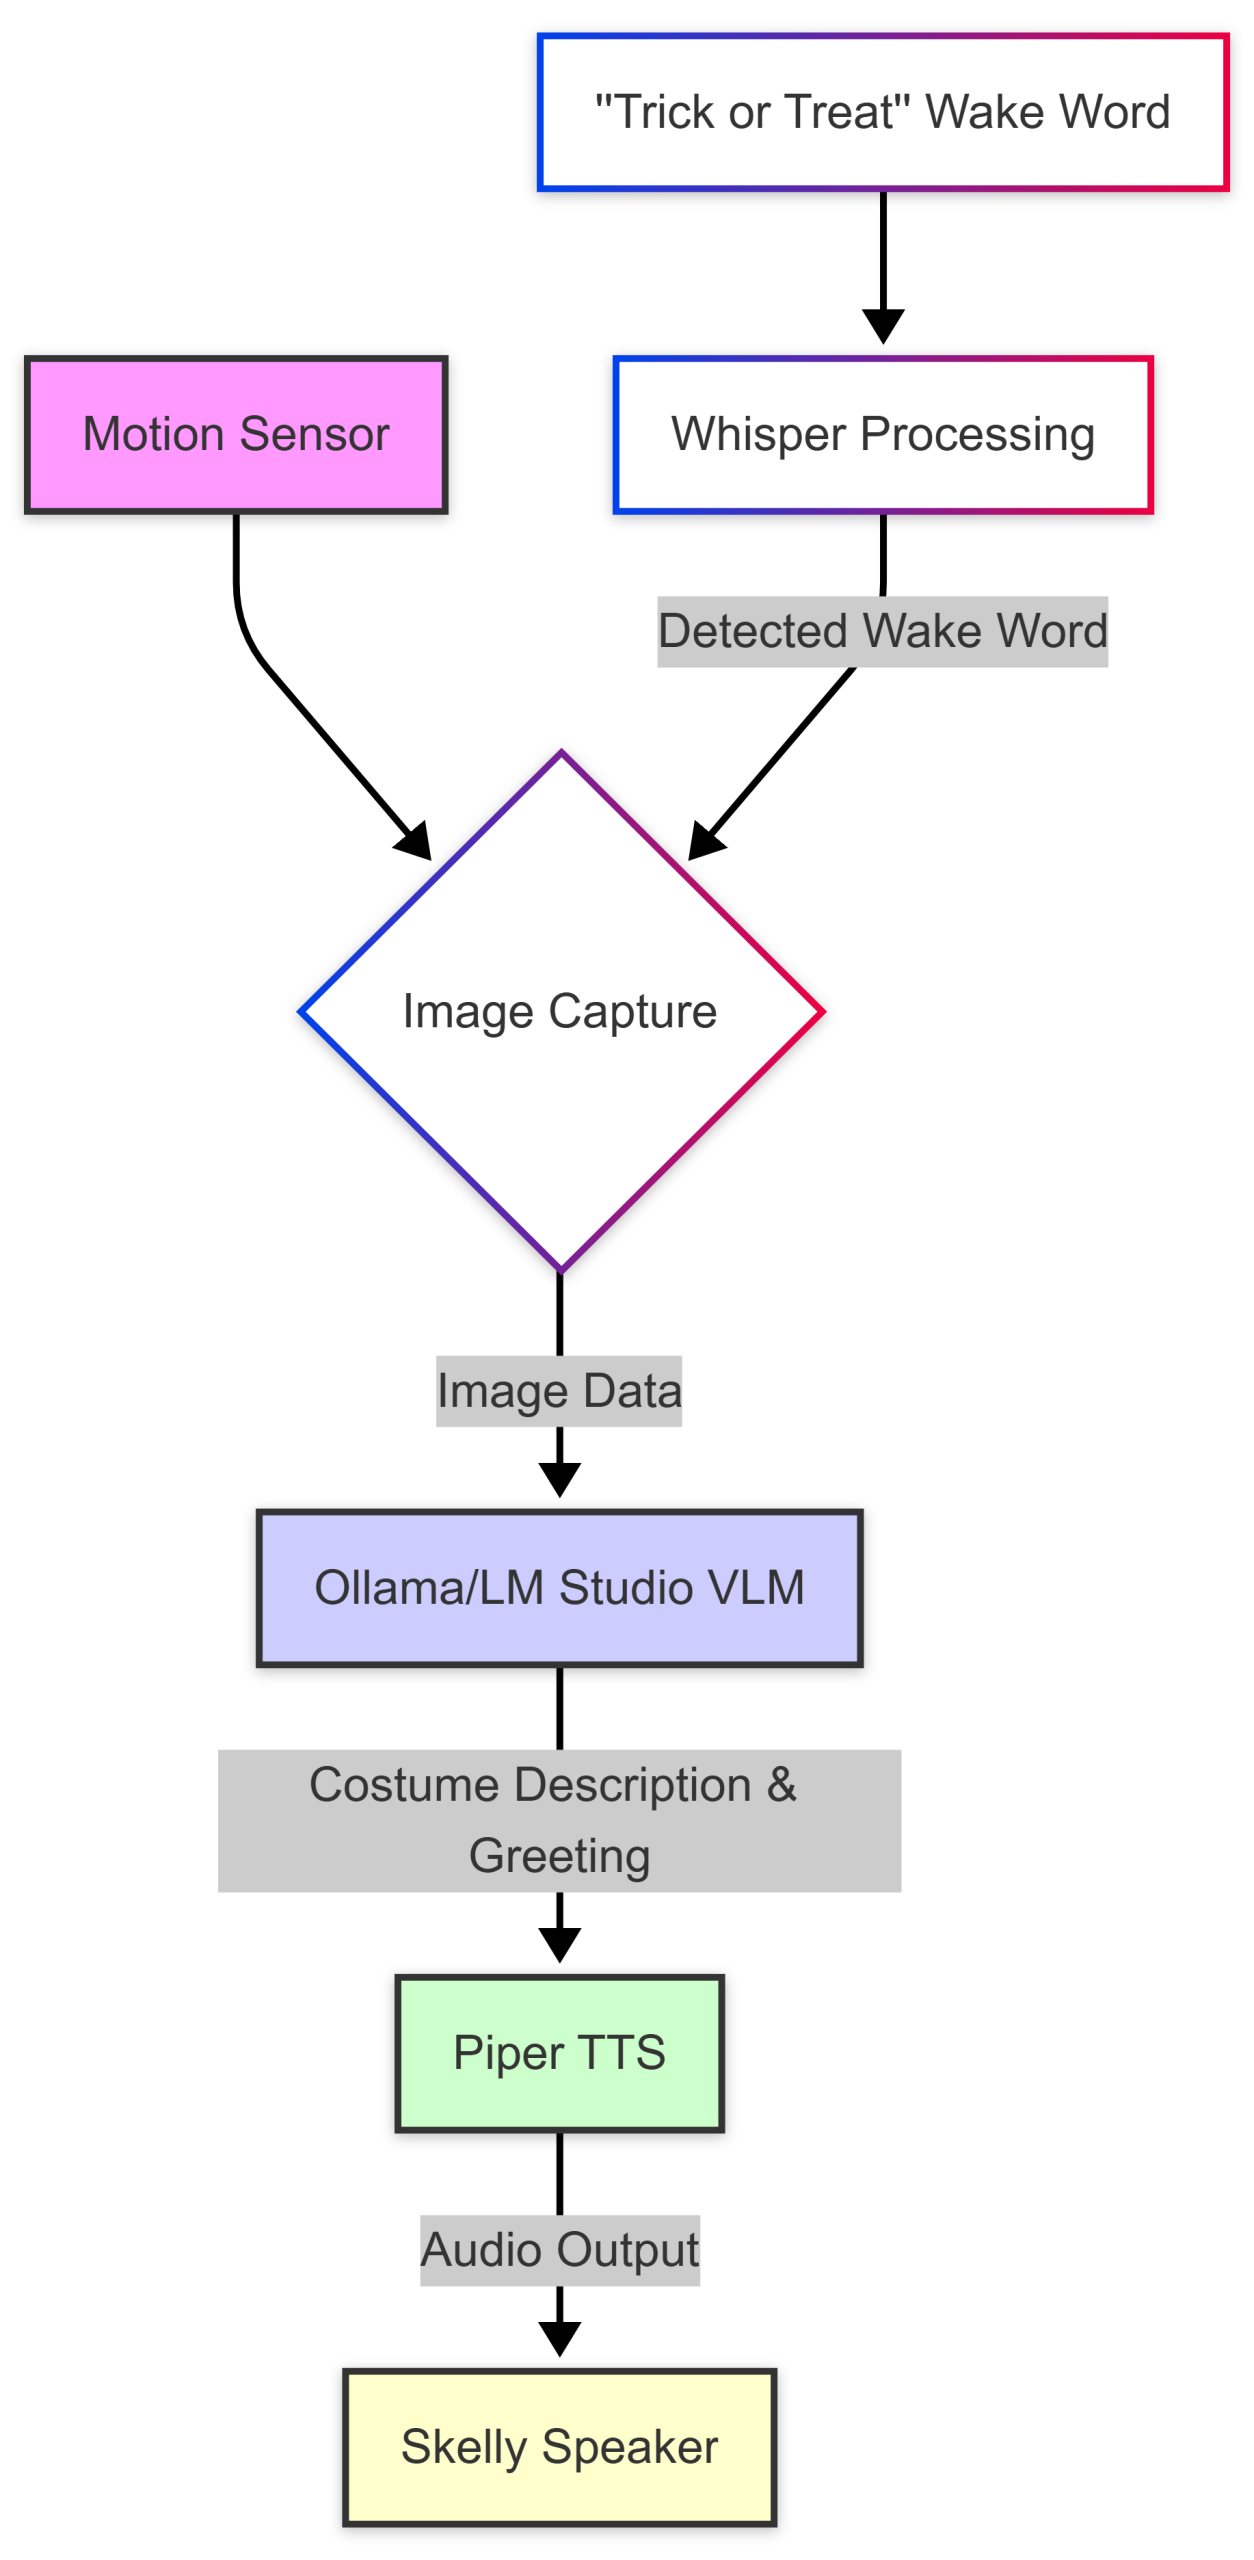
This diagram highlights the key components and data flow: a motion sensor triggers image capture, which is then processed by Ollama to generate a costume description and greeting. Piper TTS converts the text into audio, delivered through Skelly’s speaker. Whisper processing detects the “trick or treat” wake word, initiating the process.
Conclusion: Building Secure & Engaging Edge AI Experiences
The Halloween night debacle served as a valuable learning experience. While the initial vision was ambitious, it lacked the necessary controls and security measures for a real-world deployment. By focusing on controlled interaction, robust security practices, and leveraging the power of local VLMs like those available through Ollama or LM Studio, we can create engaging and privacy-focused edge AI experiences that are both fun and secure. The key is to anticipate potential challenges, prioritize user safety, and build a system that’s resilient against both accidental mishaps and malicious attacks. The future of animatronics powered by local VLM is bright – let’s make sure it’s also safe!