In the evolving world of cybersecurity, identity-based access alone is no longer sufficient. The modern Zero Trust model mandates that access decisions consider not just the user but also the device. A user might be who they claim to be, but what if they’re logging in from a compromised machine or a jailbroken phone?
That’s where a device trust gateway comes in—a simple, scalable method to enforce access controls based on both user identity and device posture. Surprisingly, this doesn’t require complex architecture. In fact, with just a few lines of configuration in common web proxies like NGINX, you can create a robust checkpoint to validate device certificates before allowing application access.
In this post, we’ll explore how to build a simple yet effective device trust gateway using web proxy configurations, why it matters, and how it enhances your Zero Trust posture.
What Is a Device Trust Gateway?
A device trust gateway is a proxy layer that sits in front of applications and checks whether the connecting device presents a valid, cryptographically signed certificate. This certificate—typically issued by a corporate Certificate Authority (CA)—acts as a machine identity, verifying that the device is registered, managed, and secure.
By validating the certificate before allowing a user session to proceed, organizations can enforce stronger controls such as:
- Allowing access only from corporate-managed endpoints
- Blocking jailbroken or unmanaged devices
- Issuing short-lived access tokens only after successful posture checks
This approach complements MFA and SSO. Even if credentials are phished or stolen, an attacker can’t authenticate without access to a trusted device.
How It Works
- Device Enrollment: Devices are provisioned with client certificates from an internal CA.
- Proxy Enforcement: A reverse proxy (like NGINX or Apache) is configured to validate client certificates.
- Access Control: Only clients presenting valid certificates can reach upstream applications or IdPs (Identity Providers).
- Logging and Auditing: All device certificate checks are logged for forensics and compliance.
Why This Matters
In many organizations, devices are a weak link. Remote work, BYOD, and cloud-native services increase the risk of unmanaged or misconfigured endpoints.
By enabling device trust enforcement at the proxy level, you:
- Avoid re-architecting your identity system
- Add a powerful security control with minimal code changes
- Stop attackers who steal credentials but don’t have trusted hardware
The best part? You likely already have the infrastructure to make it happen.
NGINX: Enforcing Client Certificate Validation
NGINX makes it straightforward to enable cleintAuth and client certificate validation.
server {
    listen 443 ssl;
    server_name secure.mycompany.com;

    ssl_certificate /etc/nginx/certs/server.crt;
    ssl_certificate_key /etc/nginx/certs/server.key;
    ssl_client_certificate /etc/nginx/certs/ca.crt; # Your CA Chain
    ssl_verify_client on;# <‑ key line

    location / {
        proxy_pass http://internal-app;
        proxy_set_header X-Client-Cert $ssl_client_cert;
        proxy_set_header X-Client-DN  $ssl_client_s_dn;
    }
}
In this snippet:
- ssl_client_certificate points to the CA that signed your device certificates
- ssl_verify_client on enforces certificate presentation
- The subject DN is passed upstream for audit or additional policy checks
If a device doesn’t present a valid certificate, NGINX terminates the connection.
Note: The client cert can be passed to through the proxy to other backend services using the nginx variable $ssl_client_cert which contains the entire URL encoded client certificate in PEM format.
Optional: Enforce Device Policies
If you want to go beyond “certificate is valid” and enforce per‑device rules, leverage OpenSSL extensions or X.509 Subject Alternative Names (SAN). For example:
# Add a custom extension in the CSR:
openssl req -new -key device-01.key.pem \
    -subj "/CN=device-01.acme.com/O=Acme Devices/C=US" \
    -addext "subjectAltName = @alt_names" \
    -config <(cat /etc/ssl/openssl.cnf <(printf "[alt_names]\nrole=admin\n"))
Then in nginx you can inspect $ssl_client_s_dn or $ssl_client_cert and use map directives to block or allow based on the role.
Apache HTTPD: A Similar ClientAuth Approach
Apache’s mod_ssl module can perform the same function.
<VirtualHost *:443>
    ServerName secure.mycompany.com

    SSLEngine on
    SSLCertificateFile /etc/httpd/certs/server.crt
    SSLCertificateKeyFile /etc/httpd/certs/server.key
    SSLCACertificateFile /etc/httpd/certs/ca.crt
    SSLVerifyClient require

    <Location />
        ProxyPass http://internal-app/
        ProxyPassReverse http://internal-app/
    </Location>
</VirtualHost>
Apache enforces client cert verification with SSLVerifyClient require, ensuring only trusted devices make it through.
Monitoring & Logging
Nginx logs each handshake, including whether client cert verification succeeded. Add a custom log format:
log_format devicelog '$remote_addr - $remote_user [$time_local] '
                     '"$request" $status $body_bytes_sent '
                     'client_cert="$ssl_client_verify" '
                     'cn="$ssl_client_s_dn"';
access_log /var/log/nginx/device_access.log devicelog;
Now you can audit which devices accessed the gateway, detect expired certs, or spot anomalies.
Testing the Gateway
Valid Device – On a client machine, install device-01.cert.pem and device-01.key.pem. Or use curl:
curl -k --cert device-01.cert.pem \
     --key  device-01.key.pem \
     https://proxy.acme.com/
You should get the backend response.
- Invalid Device – Remove or rename the cert/key and try again; you’ll receive a 403.
- Expired Certificate – Tamper with device-01.cert.pem’s validity period or use
openssl x509 -in device-01.cert.pem -noout -datesto verify expiration. The gateway will reject it automatically.
Device Trust Gateway Flow
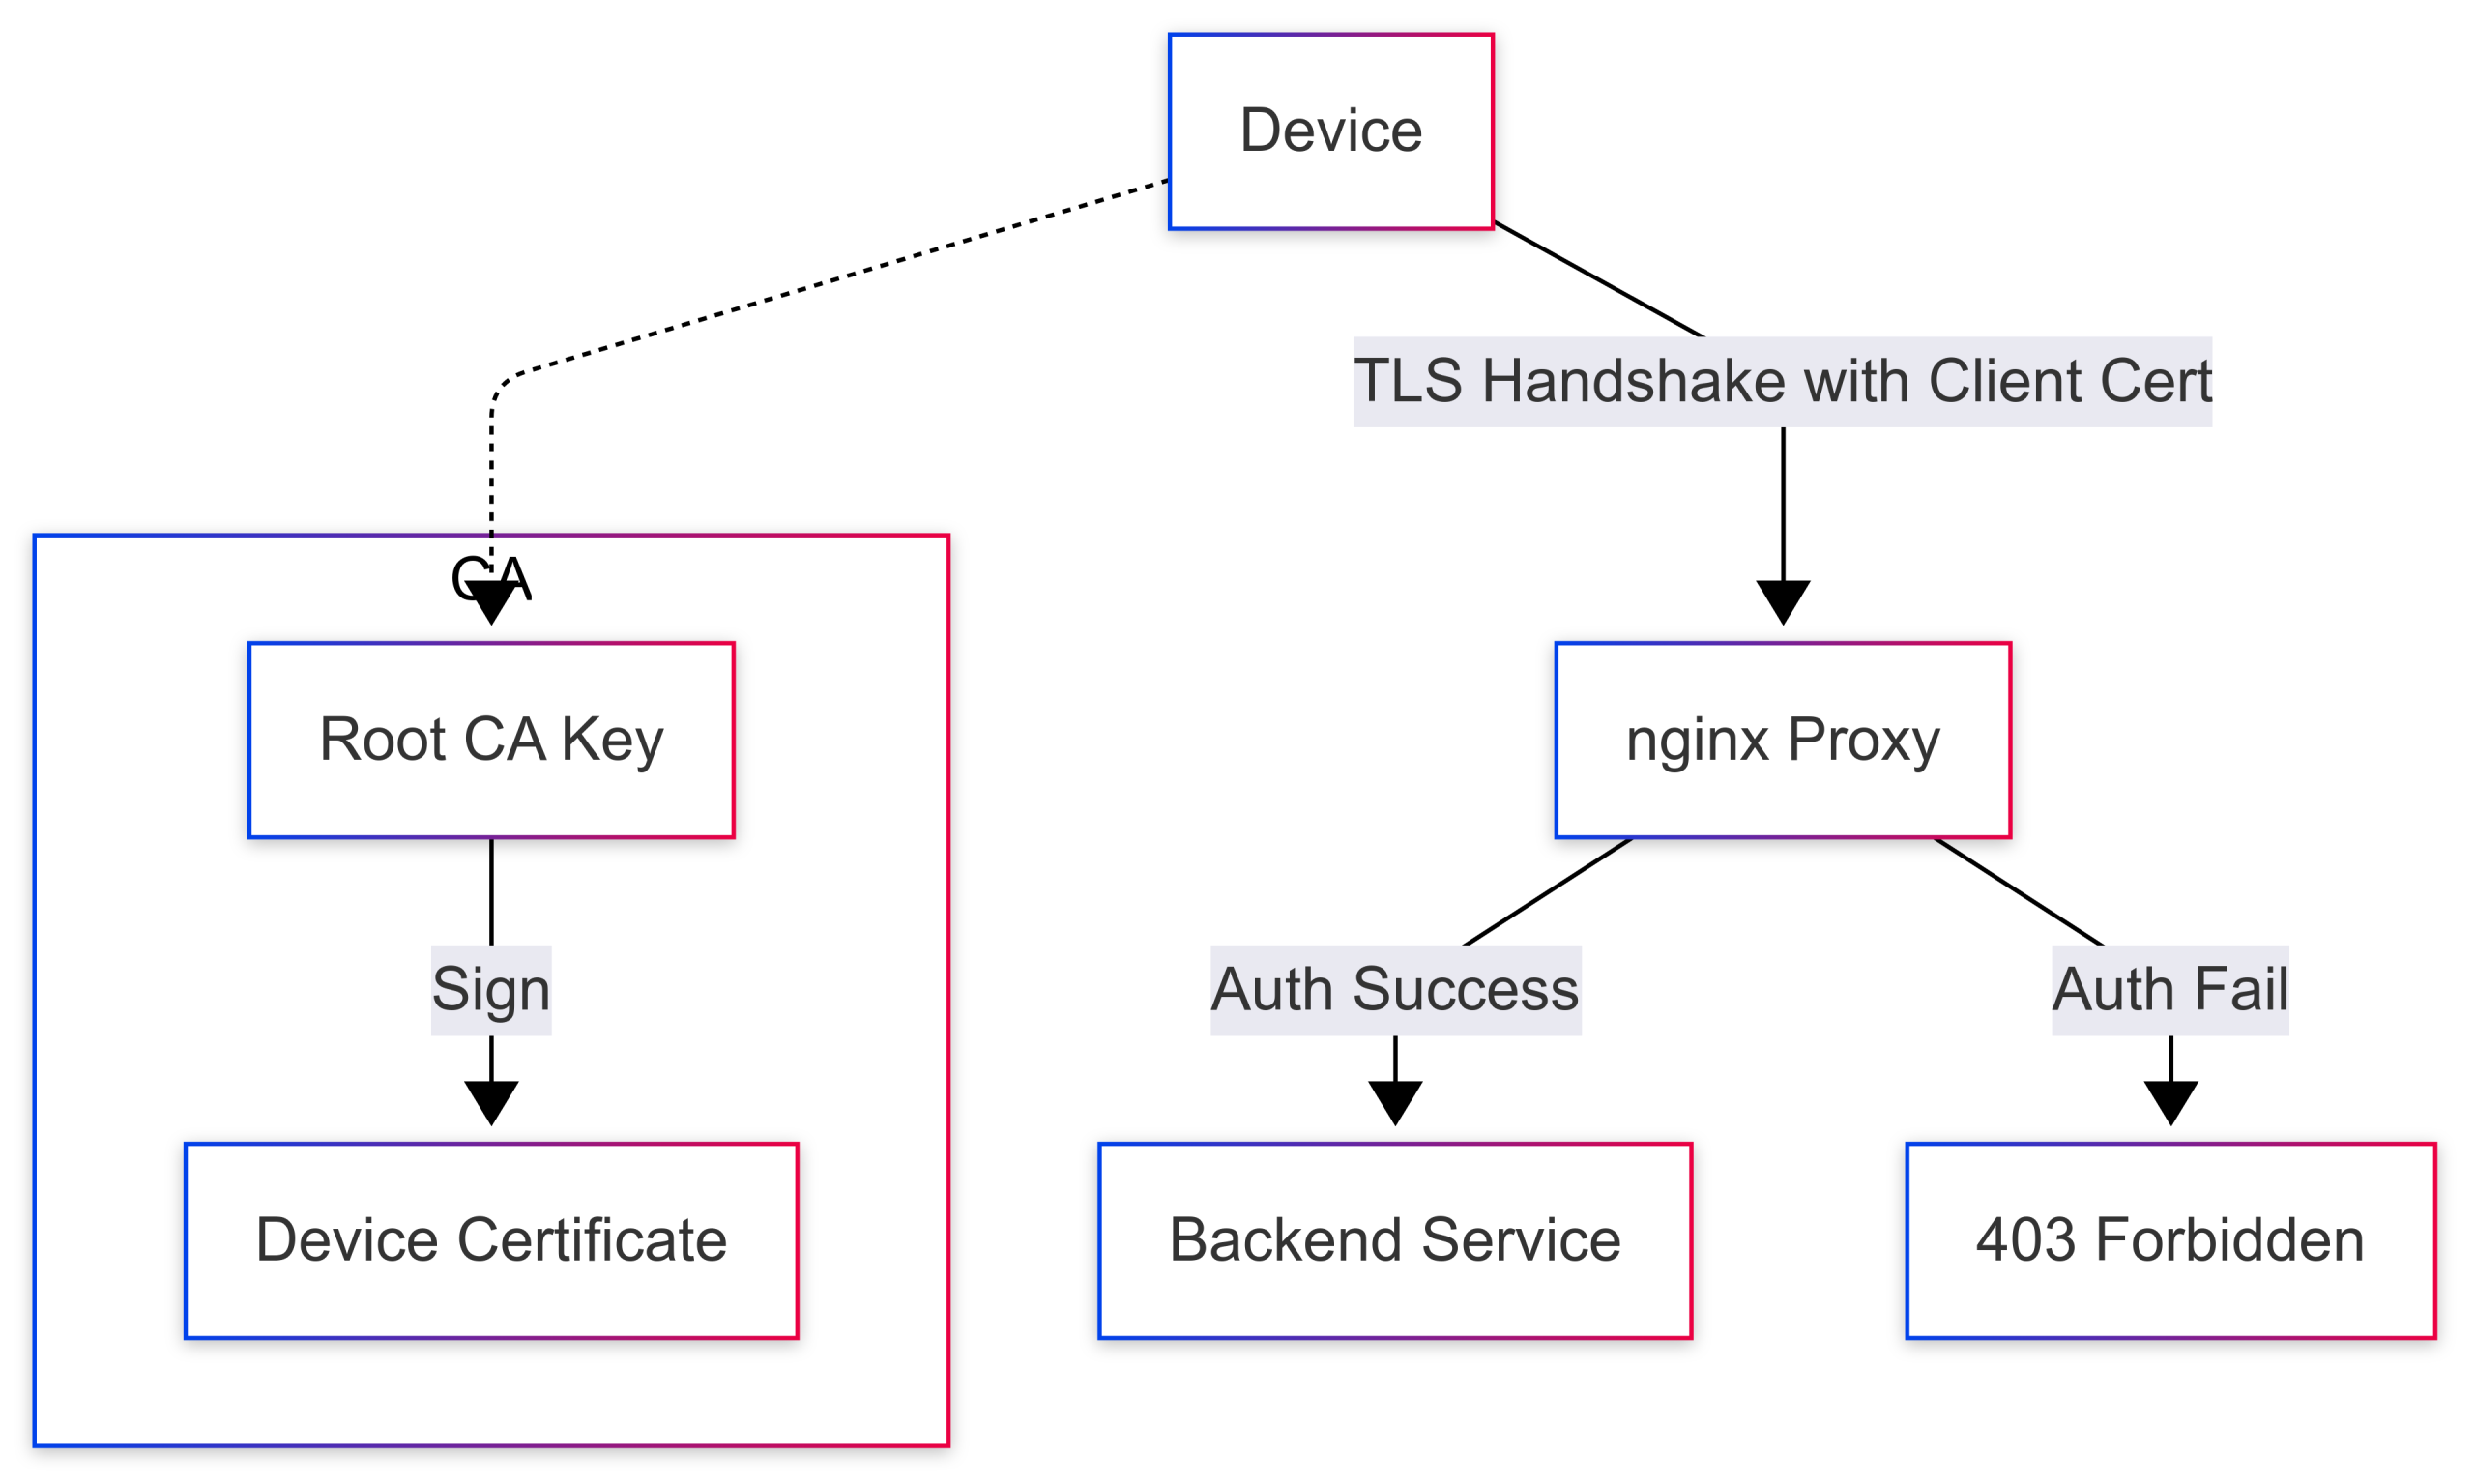
Steps:
- Device connects to proxy and presents client certificate
- Proxy checks cert against trusted CA
- If valid, forwards request to application
- If invalid, terminates connection
Implementation Tips
- Use short-lived device certificates (e.g., 24 hours)
- Automate provisioning with MDM scripts and/or SCEP
- Use headers like X-Client-Cert to enrich identity at the application layer
- Monitor failed certificate handshakes as potential threats
Conclusion
- Fast Implementation – Adding just two lines (ssl_verify_client on + ssl_client_certificate) turns any TLS‑enabled proxy into a device trust gateway.
- Zero‑Trust Foundation – Every device must prove its identity before accessing sensitive resources.
- Scalable – The same CAs can issue thousands of certificates; you can automate provisioning via scripts or PKI tools like step-ca.
Final Thoughts
You don’t need to overhaul your infrastructure to implement device trust. Adding a few lines of proxy configuration can provide a powerful gateway that ensures only secure, trusted devices can access your applications.
In a Zero Trust world, identity is not enough. Trust must be earned—and verified—by the devices themselves.