Introduction
In today’s zero‑trust world, granting access solely based on a user’s password or even an OTP is no longer sufficient. Threat actors are increasingly targeting compromised credentials, and the security community has responded with identity provider empowered device trust, a model that ensures only verified devices can obtain tokens from an identity provider (IdP).
When you combine device trust with TLS client‑certificate authentication, you create a powerful barrier: before any session token is issued for a sensitive application or service, the IdP validates a device‑bound certificate presented by the client. This approach works equally well for on‑premises workloads, cloud native services, and containerized applications.
In this post we’ll walk through how to configure popular IdPs like Keycloak, Authentik, Okta, OneLogin, and Auth0 to require Certificate ClientAuth using device trust certificates. We’ll also discuss best‑practice considerations for certificate issuance, rotation, and revocation.
Why Certificate‑Based Device Trust?
| Benefit | Explanation |
|---|---|
| Strong mutual TLS (mTLS) | The client proves possession of a private key bound to a trusted device, eliminating credential stuffing attacks. |
| Device binding | Certificates are issued per device (or per container/compute) and can be tied to hardware TPMs or secure enclaves, making them hard to steal. |
| Zero‑trust enforcement | Even if a user’s password is compromised, an attacker cannot obtain a token without the correct device certificate. |
| Fine‑grained policy control | IdPs can apply separate authentication policies based on certificate attributes (e.g., OU=Mobile, OU=Workstation). |
| Auditable provenance | Every successful login includes the certificate fingerprint, simplifying forensic investigations. |
Device Trust Certificate Lifecycle
- Enrollment – During first‑boot or via automated provisioning, the device presents its hardware-bound public certificate to an enrollment endpoint (often part of the IdP or Third-party service like ACME Attestation service).
- Provisioning – A trusted CA (internal PKI or managed service) issues a short‑lived X.509 certificate to each device. The private key is bound by the vTPM, HSM, or container runtime.
- Authentication – When a user attempts to access a protected app, the client initiates TLS with client‑certificate request. The presented certificate is validated against Device Trust certificate chain.
- Renewal / Rotation – Before expiry (typically 30–90 days), the device automatically requests a new cert via the provisioner. Old certificates are revoked or marked as expired in the CRL database.
Identify Provider Empowered Device Trust Authentication Flow
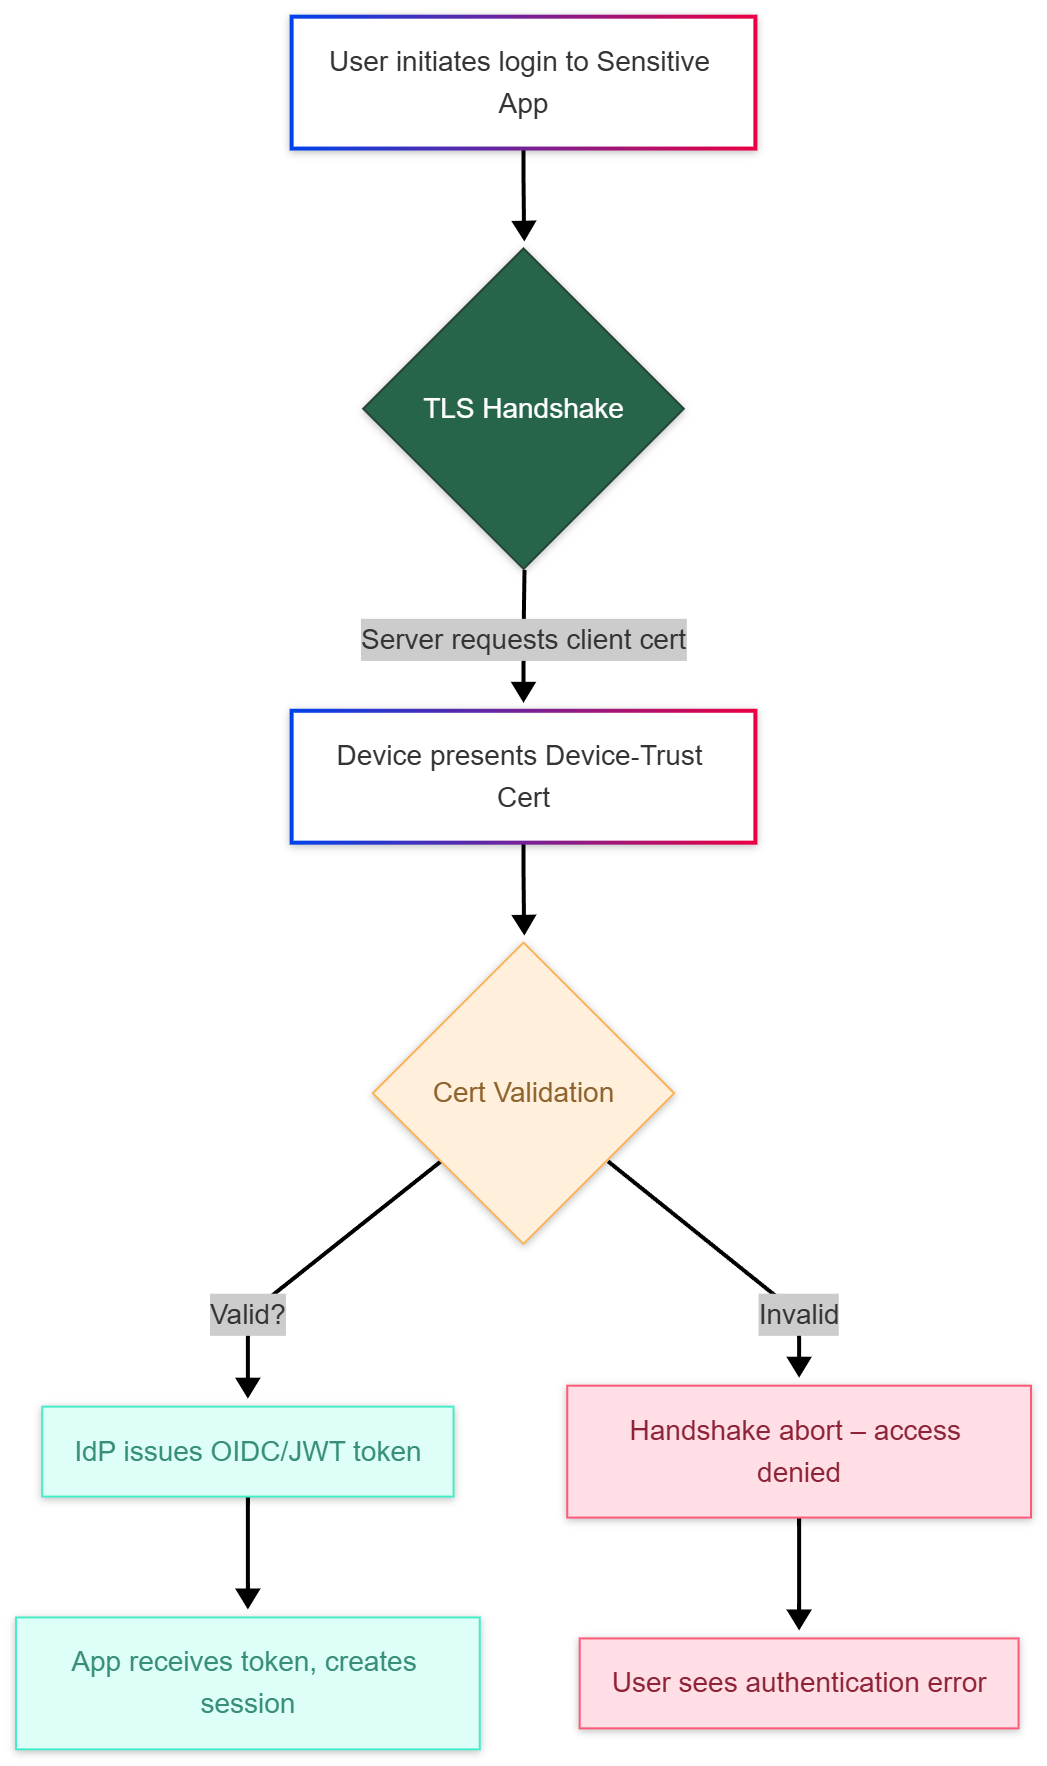
The diagram illustrates that no token is ever issued unless the device presents a valid certificate that matches the IdP’s trusted CA list. This is the essence of an identity provider empowered device trust.
Preparing Your PKI
All IdPs discussed support the use of external CA integration. The steps are similar across platforms:
- Create a dedicated CA hierarchy – Root CA (offline) → Intermediate “Device‑Trust” CA (online).
- Define certificate profile – Include extensions such as
subjectAltNamefor device ID,extendedKeyUsage = clientAuth, and optionallycertificatePoliciesto tag the trust domain. - Deploy an automated provisioning service – For example, cert‑manager in Kubernetes, ACME with device attestation, or a simple SCEP service.
Note: Alternatively you can use smallstep step-ca as outlined in my practical cloud-native guide.
Sample OpenSSL config for the Device‑Trust CA:
[ req ]
distinguished_name = req_distinguished_name
prompt = no

[ req_distinguished_name ]
C  = US
ST = WA
L  = Seattle
O  = AcmeCorp
OU = DeviceTrustCA
CN = device-trust.acme.local

[ v3_intermediate_ca ]
basicConstraints = critical, CA:true, pathlen:0
keyUsage = critical, digitalSignature, cRLSign, keyCertSign
subjectKeyIdentifier = hash
authorityKeyIdentifier = keyid:always,issuer
Use this to generate the intermediate CA and then sign device CSRs with -extensions client_auth:
openssl req -new -nodes -newkey rsa:2048 \
  -keyout device.key -out device.csr \
  -subj "/C=US/ST=WA/L=Seattle/O=AcmeCorp/OU=Workstation/CN=device01"

openssl ca -config openssl.cnf -extensions client_auth \
  -days 30 -notext -md sha256 \
  -in device.csr -out device.crt
Configuring Identity Providers
Below we present the minimal configuration needed to enable Certificate ClientAuth for each IdP. The examples assume you already have a running instance of the IdP and that your PKI’s intermediate certificate is available as device-trust-ca.pem.
Keycloak
Keycloak provides TLS client‑certificate authentication via the X509 Authentication flow.
# keycloak-realm.yaml – add a new authentication flow called "DeviceTrust"
realm: myrealm
authenticationFlows:
  - alias: DeviceTrust
    providerId: basic-flow
    topLevel: true
    builtIn: false
    authenticationExecutions:
      - authenticator: x509-browser-authenticator
        requirement: REQUIRED
        priority: 10
        config:
          # Truststore containing device‑trust CA
          trustStoreFile: /opt/keycloak/conf/device-trust-ca.p12
          trustStorePassword: changeit
          # Map certificate subject DN to user attribute "deviceId"
          principalAttribute: cn
      - authenticator: auth-cookie
        requirement: REQUIRED
priority: 20- Upload the CA – Convert
device-trust-ca.peminto a PKCS‑12 keystore (keytool -importcert). - Create the flow via the Admin Console or import the YAML above.
- Set the flow as default for the desired client (application) under Authentication → Flows.
Now, any request to /auth/realms/myrealm/protocol/openid-connect/auth will trigger a TLS handshake that expects a device‑trust certificate.
For More information about Keycloak clientAuth review the x509 documentation.
Authentik
Authentik’s Certificate provider can be combined with the Device stage.
# authentik.yaml – DeviceTrustProvider definition
providers:
  - name: device-trust-mtls
    kind: cert
    config:
      ca_file: /etc/authentik/certs/device-trust-ca.pem
      allowed_usages:
        - clientAuth
      map_subject_to_user_attribute: "device_id"
stages:
  - name: DeviceTrustStage
    kind: authentication
    flow: default-authentication-flow
    providers:
- device-trust-mtls- Place
device-trust-ca.pemunder/etc/authentik/certs. - Restart Authentik; the stage will now reject any TLS handshake lacking a valid client cert.
For more information about configuring Authentik authentication review the stag flow documentation.
Okta
Okta’s Certificate Authentication is configured via API Access Management.
{
  "type": "CERTIFICATE",
  "name": "DeviceTrustPolicy",
  "settings": {
    "trustedCertificates": [
      { "x5c": ["MIID..."] }   // Base64‑encoded device‑trust CA cert
    ],
    "subjectMatchPattern": "CN=*.device.acme.com"
  }
}
Steps:
- In the Okta Admin Console, navigate to Security → Authenticators → Certificate and add a new authenticator with the above JSON.
- Attach this authenticator to an Authentication Policy that protects your sensitive app (e.g., “Sensitive‑App‑Policy”).
Okta will now enforce mTLS for any request hitting the OIDC /authorize endpoint of that app.
For more information on configuring certificate-based authentication for Okta review the official docs.
OneLogin
OneLogin supports X.509 certificate authentication through its MFA configuration.
<!-- one-login-mfa-config.xml -->
<CertificateAuthenticator>
    <TrustedCA>$CA_Chain_URL</TrustedCA>
    <SubjectRegex>CN=([a-z0-9\-]+)</SubjectRegex>
    <MapToUserAttribute>device_id</MapToUserAttribute>
</CertificateAuthenticator>
Upload the XML via Settings → Security → Multifactor Authentication → Certificate. Then enable this factor for the Security Policy that guards your high‑value applications.
For more information about how Onelogin handles third-party certificate authentication to validate a trusted device, review the official documentation.
Auth0
Auth0 uses Custom Database Connections with a pre‑login hook to verify client certificates.
// auth0-pre-login.js – Deploy as an Action (Pre‑Login)
exports.onExecutePostLogin = async (event, api) => {
  const certHeader = event.request.headers['x-client-cert'];
  if (!certHeader) {
    return api.access.deny('client_certificate_missing');
  }

  // Decode PEM and verify against trusted CA
  const forge = require('node-forge');
  const pki = forge.pki;
  const caPem = `-----BEGIN CERTIFICATE-----
MIID...
-----END CERTIFICATE-----`;
  const caCert = pki.certificateFromPem(caPem);
  const clientCert = pki.certificateFromPem(certHeader);

  // Basic chain validation
  const verified = pki.verifyCertificateChain(pki.createCaStore([caCert]), [clientCert]);
  if (!verified) {
    return api.access.deny('invalid_device_certificate');
  }

  // Optional: map CN to user metadata
  const deviceId = clientCert.subject.getField('CN').value;
  event.user.app_metadata = { ...event.user.app_metadata, device_id: deviceId };
};
Deploy this Action and enable TLS termination with client‑certificate forwarding on your reverse proxy (e.g., Nginx proxy_set_header X-Client-Cert $ssl_client_cert;). Auth0 will reject any login that lacks a valid device‑trust certificate.
For more information about how to use Auth0’s mTLS authentication flow to validate device trust certificates, review their official mTLS docs.
Note: For services that may not directly support your Identity provider or may not be exposed externally, you can utilize a simple nginx proxy to validate a device trust certificate before allowing users to login.
Best Practices for Production Deployments
| Area | Recommendation |
|---|---|
| Certificate Lifetime | Use short lifetimes (30 days) and automate renewal via a provisioner like ACME or SCEP |
| Key Protection | Store private keys in credential manager, KMS, Key Vault, or secrets store. Never write them to disk unencrypted. |
| Revocation | Publish CRLs or use OCSP stapling; IdPs should query the revocation endpoint on each login. |
| Logging & Auditing | Include tls.client.subject_dn and certificate fingerprint in SIEM logs. Enable audit‑log retention for at least 90 days. |
| Fail‑Open vs Fail‑Close | Default to fail‑close: if the client cert cannot be validated, deny access. |
| Device Inventory | Keep a synchronized inventory service (e.g., CMDB) that tracks active device fingerprints; automate de‑provisioning when devices leave the fleet. |
Testing & Validation
- OpenSSL verification – From a client machine with the device cert:
   openssl s_client -connect idp.acme.local:443 \
     -cert device.crt -key device.key -CAfile device-trust-ca.pem
You should see Verify return code: 0 (ok) and the TLS handshake succeed.
- Token request – Use
curlwith the client cert:
   curl -k https://idp.acme.local/auth/realms/myrealm/protocol/openid-connect/token \
     -E device.crt --key device.key \
     -d "grant_type=client_credentials&client_id=myapp"
If the certificate is invalid or missing, the response will be 401 Unauthorized.
- Audit log check – In Keycloak’s admin console go to Events → Config and enable Login events. Verify that each successful login entry contains
client_certificate_fingerprint.
Common Pitfalls & How to Avoid Them
| Symptom | Root Cause | Fix |
|---|---|---|
| Handshake fails with “unknown ca” | Device‑trust CA not added to truststore or wrong file format (PEM vs PKCS12) | Convert to PKCS12 and import correctly. |
| Token issued despite missing cert | Reverse proxy terminates TLS before forwarding to IdP, losing client‑cert header | Enable proxy_ssl_verify and forward X-Client-Cert or use end‑to‑end mTLS (no TLS termination at proxy). |
| Frequent revocation failures | CRL/OCSP endpoint unreachable from IdP and user device | Host a OCSP responder or cache CRLs; ensure network connectivity. |
| Certificate renewal breaks sessions | Applications cache the old cert and do not reload new files | Use cronjob or sidecar containers that check the certificate and automate renewal |
Conclusion
By integrating device‑bound certificates with your identity provider, you transform authentication from a just a 2 factor authentication model and combine it into a robust multi factor with verifiable trust paradigm. The configurations shown for Keycloak, Authentik, Okta, OneLogin, and Auth0 prove that enabling Certificate ClientAuth is straightforward, often just a few lines of YAML or JSON plus the import of a trusted CA.
When you adopt this pattern:
- Security posture improves dramatically – compromised passwords no longer grant access.
- Compliance becomes easier – many regulations (e.g., NIST 800‑63B, PCI DSS) encourage strong mutual authentication.
- Operational overhead stays low – automated short‑lived cert issuance and rotation eliminate manual key management.
If you’re looking to future‑proof your applications against credential‑theft attacks, make the shift today: empower your identity provider with device trust and let mTLS do the heavy lifting.