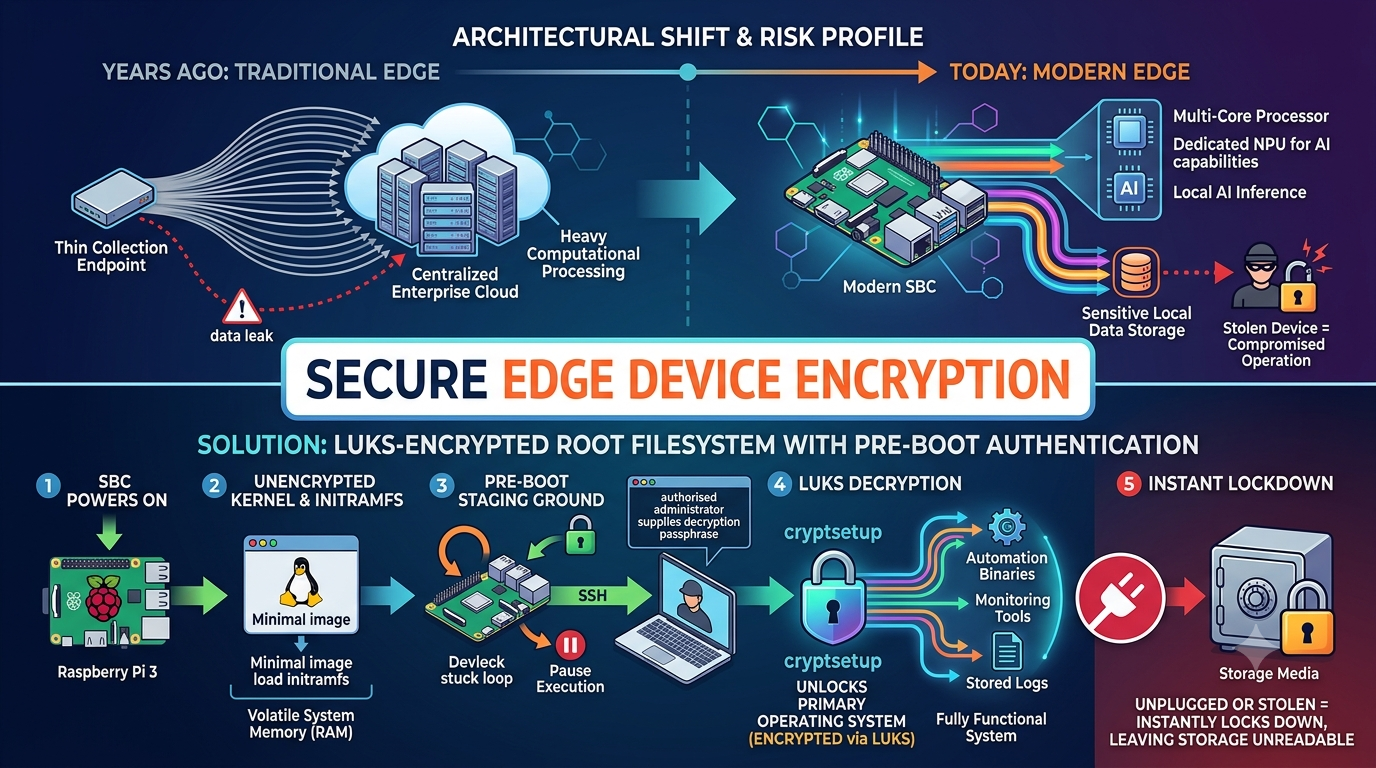
The architectural layout of edge and Internet of Things (IoT) engineering has shifted fundamentally over the last decade. Years ago, traditional edge deployments operated strictly as thin collection endpoints. Their primary purpose was to ingest basic telemetry from localized sensors and pipe that raw data stream back to centralized enterprise cloud databases for heavy computational processing. The security profile of these early devices was relatively straightforward, focused mostly on protecting transmission vectors and preventing network interception.
Today, the landscape is entirely different. Modern single board computers (SBCs) boast massive hardware capabilities, featuring multi-core processors and often dedicated Neural Processing Units (NPUs) for local AI inference. These engineering advancements allow low profile hardware stacks to host fully autonomous microservices directly on device. Instead of streaming raw video or telemetry, a modern edge deployment can run dense computer vision layers, localized database systems, and heavy machine learning workloads locally at the source.
While this localized processing capability offers massive advantages in latency, bandwidth conservation, and operational resilience, it significantly compounds the overall risk profile. Because these advanced systems handle complete monitoring services autonomously, they process and retain highly on potentially sensitive data, localized operational logs, and proprietary intellectual property within their local non-volatile storage. If one of these small, field-deployed devices falls into the wrong hands, the entire integrity of your localized operation and enterprise infrastructure could be laid bare.
The Physical Threat Model: Why Software Security Alone Fails
When an enterprise places a powerful computational asset in an unmonitored physical space, the traditional cloud processing security model is completely insufficient. In a standard cloud or hardened data center environment, physical access is guarded by biometric gates, security personnel, and strict environment isolation. On the edge, your device might be mounted to a utility pole, housed in a remote outdoor enclosure, or placed inside a client retail space. In these scenarios, an attacker has total physical access to the machine.
Without robust data-at-rest protection, an adversary who physically steals or tampers with an edge device can simply extract the flash memory, whether it is a MicroSD card, an eMMC module, or an NVMe drive. By mounting that storage medium into a another workstation, they can easily clone the entire system filesystem, extract hardcoded information, inspect proprietary software binaries, or harvest accumulated data.
To achieve a defense-in-depth posture, the security engineering community must look back at proven cryptographic architectures. A highly resilient alternative is full disk encryption where the system partition remains mathematically sealed until a human operator or verified automation pipeline provides the cryptographic key directly into the volatile memory of the device during the boot phase.
The Initial RAM Filesystem (initramfs) Unlock Architecture
The foundational design for securing headless, remote deployments traces its roots back to the early days of advanced penetration testing and field-deployable implants. During the 2013 era of specialized network assessment platforms, security teams frequently utilized devices like the PwnPlug to gain entry into target infrastructures. The only problem was they were very expensive, where not readily available for purchase, and in many cased they were not always returned; even during controlled assesments.
To overcome these resource constraints and operation gaps, we designed custom operating system structures leveraging low-cost platforms like the Raspberry Pi 3 running a fully LUKS-encrypted root filesystem. The core mechanism behind this architecture relies on separating the boot phase into two distinct environments: an unencrypted pre-boot staging ground and an encrypted primary system partition.
This pre-boot phase is managed by the Initial RAM Filesystem, commonly known as an initramfs. The initramfs is a minimal root filesystem embedded within the kernel image or loaded alongside it during initial boot. When the SBC powers on, the bootloader initializes the processor, loads the unencrypted kernel, and unpacks the initramfs into volatile system memory (RAM).
Instead of completing the standard system initialization, the initramfs pauses execution. It instantiates a minimal network interface driver stack and launches a lightweight, memory-resident Secure Shell (SSH) daemon, traditionally utilizing the open-source Dropbear software suite. The device then sits in a secure holding pattern. The entire primary operating system, along with its automation binaries, monitoring tools, and stored logs, remains completely encrypted via the Linux Unified Key Setup (LUKS) encryption format scheme. The device only proceeds with a full boot once an authorized administrator connects to the pre-boot SSH listener and supplies the correct decryption passphrase into the system kernel via the cryptsetup subsystem. Because this entire initial stack resides completely within volatile memory, if the device is unplugged, power-cycled, or stolen, it instantly locks itself down, leaving the storage media completely unreadable to an adversary.
Overcoming NAT and Firewalls with Reverse SSH Tunnels
While the pre-boot initramfs architecture provides exceptional local data protection, implementing it across real-world edge deployments introduces a massive network engineering challenge. Most edge devices are deployed behind complex remote network infrastructures. They may sit behind restrictive corporate firewalls, or multi-tiered network address translation (NAT) systems. Consequently, assigning a predictable, inbound IP address to the edge device is rarely an option, rendering standard inbound SSH connections impossible.
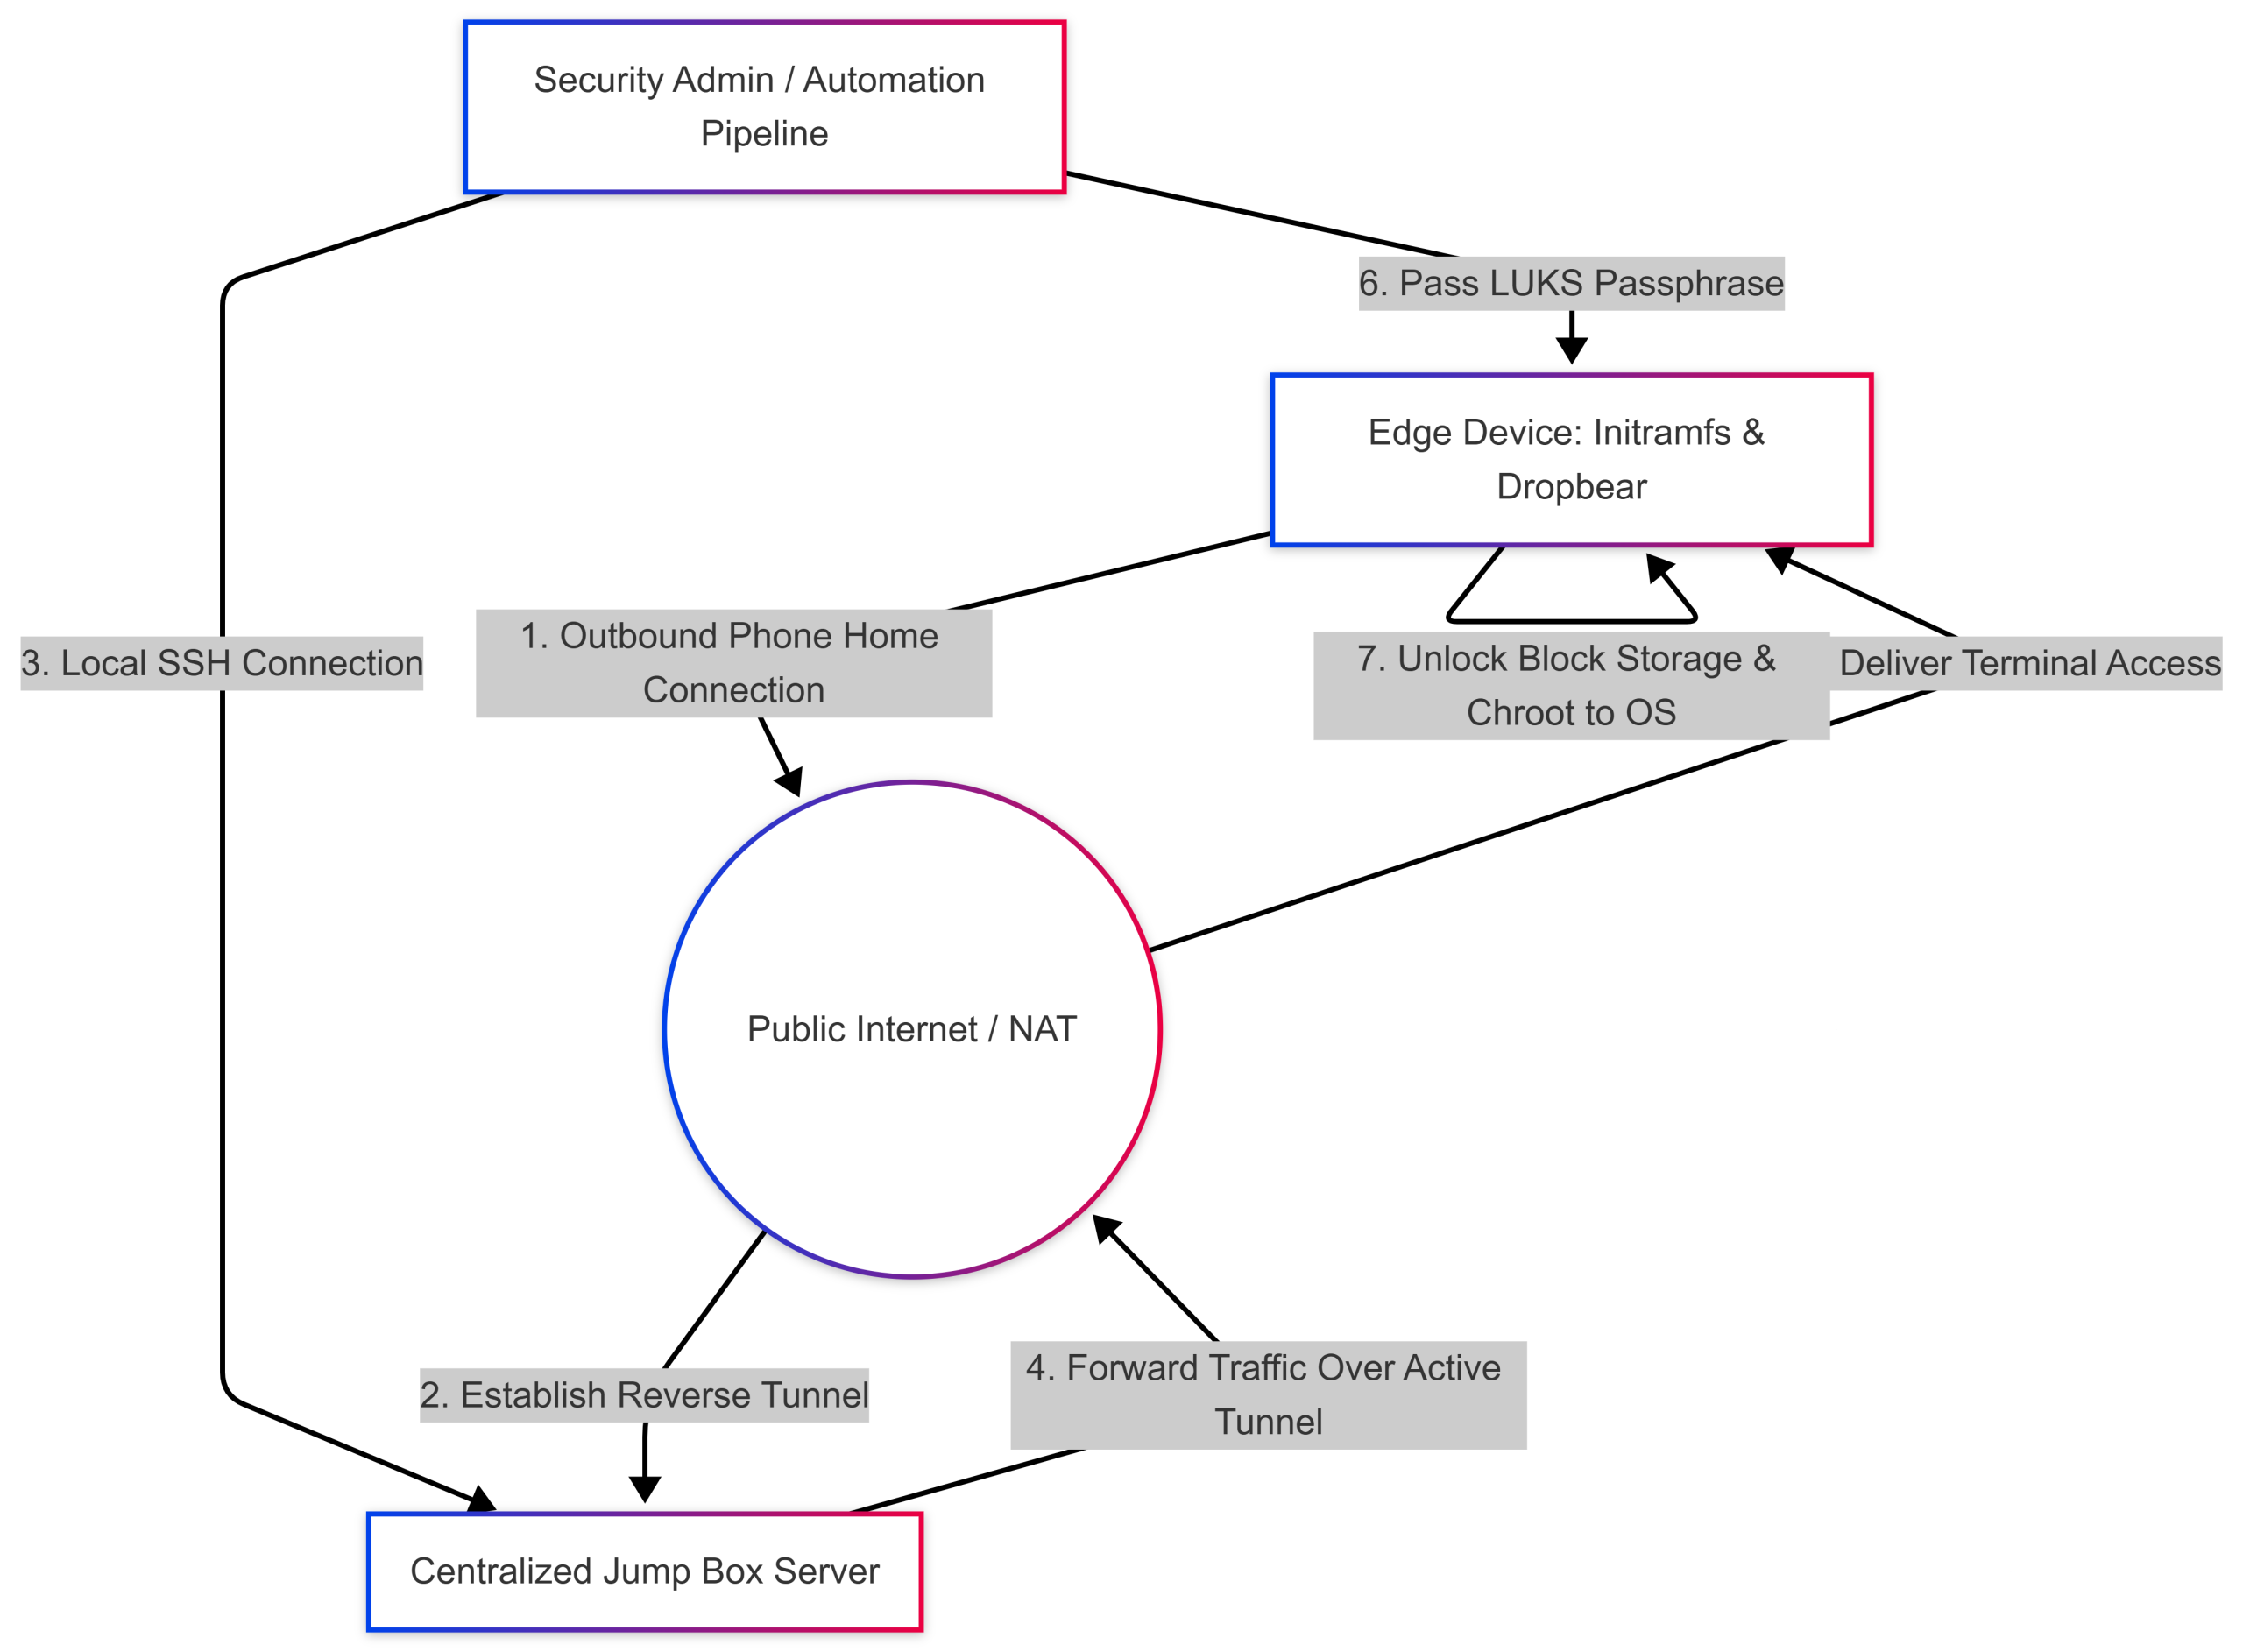
To circumvent these network boundaries, the system design must invert the traditional connection vector. Instead of forcing the security administrator to connect directly to the edge device, the edge device is programmed to initiate an outbound connection back to a controlled, publicly accessible server known as a jump box or command endpoint. This approach leverages automated phone home scripts executed directly within the pre-boot environment.
By utilizing Dropbear client configurations within the initramfs, the edge device establishes an outbound SSH connection to the jump box. Crucially, this connection specifies a reverse port forwarding directive. When the edge device connects, it instructs the jump box to open a specific loopback port on its local interface. Any traffic sent to that designated port on the jump box is securely routed back through the established, encrypted SSH tunnel and delivered directly to the pre-boot Dropbear daemon running in the edge device’s RAM.
Once this reverse tunnel is established, a centralized automation platform or a security engineer can log into the jump box, target the designated local port, and seamlessly interact with the edge device’s pre-boot environment. This setup allows the administrator to issue the necessary decryption commands, unlocking the primary system partition, likely without requiring any network changes.
To better visualize this end-to-end communication and decryption workflow, examine the architecture layout below:
Step-by-Step Implementation: LUKS Encryption on a Modern SBC
To implement this security architecture on a modern platform like the Raspberry Pi 5 or Radxa Dragon Q6A, you must manually structure the block storage and build a custom initramfs. While standard installations default to automated partition expansion, this process requires isolating the boot loader configuration and wrap-encrypting the main root partition.
IMPORTANT: This involves DESTORYING the main root partition so ensure you backup the files so your work is not lost.
Step 1: Initialize the Target Disk Layout
For this walkthrough, we assume you are working from a Linux workstation with the target device storage attached as an external block device such as a Micro SD located at /dev/sda and the latest stable R2 image for the Radxa Dragon Q6A. You could also simply complete the steps on your target SBC as long as you have secondary storage like a USB flash drive with enough space hold a copy of your image and/or OS files.
Begin by downloading the official server or lite operating system image from the Raspberry Pi official portal or Radxa Docs. Write the raw image to your storage media, then use a partitioning utility to restructure the layout. Then include the original image file on secondary store like a USB flash drive.
Once the target device is booted or on a Linux workstation you can mount and modify the official image similar to the Encrypted Pi Guide. Start By installing the needed packs and include both binfmt-support qemu-user-static if your not working from an system with the same architecture.
apt update
apt install -y parted kpartx cryptsetup-bin rsync
Frist and foremost back up and/or keep your original image!
mkdir -p /mnt/usb
mount /dev/sda1 /mnt/usb # sda1 is my usb. check lsblk output
cd /mnt/usb
cp radxa-dragon-q6a_noble_gnome_r2.output_512.img dragon.img
Next increase the size of your target image file by at least 1G to allow space for all of the additional files that will be required.
dd if=/dev/zero bs=1G count=1 >> dragon.img
parted dragon.img resizepart 3 100% # may be partition 2, check lsblk
Next mount the new image as a loopback with kpartx so we can write to it.
kpartx -a dragon.imgWipe any existing data on the target root partition, and initialize the LUKS container using the official Cryptsetup utility:
sudo cryptsetup luksFormat --type luks2 --cipher aes-xts-plain64 --key-size 512 --hash sha512 /dev/mapper/loop0p3
You will be prompted to enter a strong, master decryption passphrase. This is the key that must be supplied later via the reverse SSH session to authorize system boots.
Note: If you have an older SBC or less then 4GB of RAM add
--pbkdf pbkdf2to utilize the older style key function, to save on system resources.
Step 2: Format and Populate the Encrypted File System
With the LUKS container initialized, open the encrypted partition to map it as a virtual device mapper endpoint:
sudo cryptsetup luksOpen /dev/mapper/loop0p3 sbc_cryptNext, format the mapped virtual partition with a native Linux filesystem, such as Ext4, and mount it to a temporary staging area on your workstation:
sudo mkfs.ext4 /dev/mapper/sbc_crypt
sudo mkdir -p /mnt/target_root
sudo mount /dev/mapper/sbc_crypt /mnt/target_root
Next we can mount the orginal image file as read-only with kpartx and copy all of the OS files over with rsync.
kpartx -ar radxa-dragon-q6a_noble_gnome_r2.output_512.img
mkdir -p /mnt/original/
mount /dev/mapper/loop1p3 /mnt/original/
rsync --archive --hard-links --acls --xattrs --one-file-system --numeric-ids --info="progress2" /mnt/original/* /mnt/target_root/
Now, mount the unencrypted boot firmware partition into its appropriate sub-directory and extract your baseline system root files into the /mnt/target_root directory:
sudo mkdir -p /mnt/target_root/boot/efi
sudo mount /dev/mapper/loop0p2 /mnt/target_root/boot/efi
Step 3: Configure the Target System Crypttab and Fstab
To ensure the kernel knows how to map the underlying hardware interfaces upon boot, you must establish proper tracking definitions.
Frist, chroot into your target root directory or edit the files directly.
sudo mount -o bind /dev /mnt/target_root/dev
sudo mount -o bind /dev/pts /mnt/target_root/dev/pts
sudo mount -t proc none /mnt/target_root/proc
sudo mount -t sysfs none /mnt/target_root/sys
sudo mount -o bind /run /mnt/target_root/run

LANG=C chroot /mnt/target_root/ /bin/bash
Next determine the universally unique identifier (UUID) of the raw encrypted block layer using blkid | grep crypto_LUKS.
Open the target system’s encryption table configuration at /etc/crypttab and append the following mapping entry:
sbc_crypt UUID=paste-your-raw-sdb2-uuid-here none luks,initramfsThen, adjust the primary filesystem mounting table file at /mnt/target_root/etc/fstab. You must comment out any old references to the raw root partition and map the virtual device mapper path as the root partition endpoint:
UUID=XXXX-XXXX /config vfat defaults,x-systemd.automount,fmask=0077,dmask=0077 0 2
UUID=XXXX-XXXX /boot/efi vfat defaults,x-systemd.automount,fmask=0077,dmask=0077 0 2
/dev/mapper/sbc_crypt / ext4 defaults,noatime 0 1
Step 4: Provision the Pre-Boot Initramfs Infrastructure
Enter a chroot environment on your staging workstation to configure the inner packages of the target operating system. Once inside the jail, install the essential packages required to build an identity-aware initial RAM filesystem:
echo "nameserver 8.8.8.8" > /etc/resolv.conf # we need to configure DNS we are in chroot
apt-get update
apt-get install -y cryptsetup-initramfs dropbear-initramfs
The system will automatically install the Dropbear SSH official page daemon source binaries specifically compiled to run inside an initramfs environment.
To configure network connectivity during the pre-boot phase, you must supply static parameters or authorize DHCP within the kernel configuration files. Open /mnt/target_root/etc/initramfs-tools/initramfs.conf and specify the network layout or leave it to default to standard DHCP configuration on the primary onboard Ethernet interface (eth0).
Step 5: Inject Administrative SSH Authentication Keys
To authenticate against the pre-boot environment without a password, you must place your management workstation’s public key inside the dedicated Dropbear configuration directory. Do not place this inside the standard user home directory, as that partition remains fully encrypted during this phase.
Open or create the file at /etc/dropbear/initramfs/authorized_keys and paste your public key string (e.g., an Ed25519 or RSA key signature). Ensure the permissions are locked down tightly:
echo "/REDACTED/" > /etc/dropbear/initramfs/authorized_keys
chmod 0600 /etc/dropbear/initramfs/authorized_keys
Step 6: Add Hook for Reverse Tunneling
In order to allow our dropbear busybox environment to be able to reverse tunnel outbound to our jump box later, we need to add a hook to initramfs-tools so it includes the dbclient and an ssh private key. Its also possible to build out a custom watch drop script and hook it into the initramfs for better control over the connection like this reverse tunnel setup example.
To do his we need to first generate a unique ssh key pair and write the private key to initramfs-tools directory.
mkdir -p /etc/initramfs-tools/root/key
dropbearkey -f /etc/initramfs-tools/root/key/id_rsa -t rsa -s 2048
Copy down he outputted public key portion as it will be needed to set up authorized user file for the edge tunnel user latter.
Important: This key should be consider exposed once deployed, as its written to unencrypted storage! Make sure to follow steps similar to those outlined later to harden your jumbox/tunnel user.
Next we can add dbclient with initramfs-tools by creating a new hook sudo nano /etc/initramfs-tools/hooks/add_dbclient:
#!/bin/sh
PREREQ="dropbear"
prereqs() { echo "$PREREQ"; }
case "$1" in
prereqs) prereqs; exit 0 ;;
esac

. /usr/share/initramfs-tools/hook-functions

# Copy the dbclient binary and any required shared libraries
copy_exec /usr/bin/dbclient /bin
# Then manually create the ssh dir and copy the private key to use with dbclient
SSH_DIR="${DESTDIR}/root/.ssh/"
mkdir -p $SSH_DIR
cp /etc/initramfs-tools/root/key/id_rsa $SSH_DIR
Once the hook exists we need to make sure the executable bit is set before its run later by update-initramfs.
sudo chmod +x /etc/initramfs-tools/hooks/add_dbclientStep 7: Update Kernel Boot Commands and Recompile
You must explicitly instruct the Linux kernel to pause during boot, load the device mapper, and initialize network drivers. Open the primary kernel boot parameters file located at /etc/kernel/cmdline for Radxa Dragon Q6A or /boot/firmware/cmdline.txt on Raspberry Pi 5.
Modify the command string so that the root= directive targets your mapped device, and inject the cryptdevice= parameter immediately following it. The resulting line must look similar to this single line of options:
# For Radxa Dragon Q6A we modify the line to look like the following
root=/dev/mapper/sbc_crypt cryptdevice=UUID=your-raw-sdb2-uuid:sbc_crypt console=ttyMSM0,115200n8 quiet splash loglevel=4 rw earlycon consoleblank=0 console=tty1 coherent_pool=2M irqchip.gicv3_pseudo_nmi=0 cgroup_enable=cpuset cgroup_memory=1 cgroup_enable=memory swapaccount=1 kasan=off

# Fort Raspberry Pi 4/5 it will look like the following
console=serial0,115200 console=tty1 root=/dev/mapper/sbc_crypt cryptdevice=UUID=your-raw-sdb2-uuid:sbc_crypt ip=dhcp rootfstype=ext4 rootwait
Next we are going to update the timeout for cryptsetup root unlock as it defaults to 10 seconds and that’s likely not long enough for a manual connection or automation.
sed -i 's/^TIMEOUT=.*/TIMEOUT=1000/g' /usr/share/cryptsetup/initramfs/bin/cryptroot-unlockFinally, generate the custom initramfs image by executing the update utility within your chroot environment or using configuration hooks targeting the external image:
update-initramfs -u -k allUnmount the filesystems cleanly, close the cryptsetup container, and insert the storage media into your SBC. When the device powers on, it will initialize the kernel, drop into an initramfs state, spin up the network interface via DHCP, and wait for an authorized SSH session to arrive.
exit
umount /mnt/target_root/boot/efi
umount /mnt/target_root/sys
umount /mnt/target_root/proc
umount /mnt/target_root/dev/pts
umount /mnt/target_root/dev
umount /mnt/target_root/run
umount /mnt/target_root
cryptsetup close sbc_crypt
kpartx -d dragon.img
cd && umount /mnt/usb
Hardening the Supporting Infrastructure: Restricting the Jump Box
Bringing an unmonitored, physically exposed edge device into your enterprise infrastructure via an outbound tunnel introduces a dangerous reverse lateral movement vector. If an adversary captures the device in the field, desolders the storage, or exploits a local software container, they could potentially compromise the persistent SSH private keys stored within the early boot system runtime.
If that edge device has unrestricted access to your centralized jump box, a compromised key would allow an attacker to establish an interactive terminal shell on your server. From there, they could pivot into your core enterprise network, scan confidential assets, or run arbitrary commands. To mitigate this threat, you must implement strict least-privilege configurations on the jump box to ensure that the user account assigned to the edge device is restricted entirely to port forwarding.
System-Wide Hardening via sshd_config
The most secure approach to isolate the edge device’s connection is configuring a conditional match configuration block within the primary OpenSSH server configuration file on your jump box. This system-wide enforcement ensures that even if an edge client attempts to request an interactive shell session, the server instantly drops the connection.
Open the OpenSSH daemon configuration file with administrative privileges:
sudo nano /etc/ssh/sshd_configNavigate to the very bottom of the file and append a dedicated configuration block targeting the specific user account assigned to your edge devices:
Match User edge_tunnel_user
    AllowTcpForwarding yes
    X11Forwarding no
    AllowAgentForwarding no
    PermitTunnel no
    ForceCommand echo "This operational account is restricted to port forwarding only."
Let us review the security purpose behind each directive enforced in this block:
- Match User: Isolates the policy rules so they apply exclusively to the designated connection account without impacting standard system administrators.
- AllowTcpForwarding yes: Explicitly enables the specific TCP tunneling capabilities required to route the remote LUKS decryption traffic back across the network.
- X11Forwarding no: Disables graphical user interface application forwarding, eliminating potential exploitation of underlying display server vulnerabilities.
- AllowAgentForwarding no: Disables SSH authentication agent sharing, preventing a compromised edge device from accessing or utilizing keys resident on the administrator’s local workstation.
- PermitTunnel no: Disables the creation of full OSI Layer 2 or Layer 3 virtual private network (TUN/TAP) routing devices, ensuring the client cannot route unencrypted IP packets directly into the jump box network subsystem.
- ForceCommand: Overrides any client-requested terminal execution commands, outputting a static notice and terminating the session immediately if an interactive login is attempted.
To reinforce this configuration and prevent command execution if the ForceCommand boundary is somehow bypassed, alter the user shell configuration within the jump box operating system to a non-interactive shell endpoint:
sudo usermod -s /usr/sbin/nologin edge_tunnel_userAlways validate your OpenSSH daemon syntax configuration for layout errors prior to cycling the application lifecycle:
sudo sshd -t
sudo systemctl restart ssh
Key-Specific Isolation via Authorized Keys
If your operational architecture requires applying these exact restrictions to a specific SSH deployment key rather than an entire system user account, you can prefix the policy options directly into the user’s key tracking file.
Open the targeted account’s deployment validation file:
sudo mkdir ~edge_tunnel_user/.ssh
sudo nano ~edge_tunnel_user/.ssh/authorized_keys
Prepend the explicit restriction string directly before the key type statement at the beginning of the line, ensuring it is separated from the cryptographic hash signature by a standard space character:
restrict,port-forwarding,command="/usr/sbin/nologin" ssh-ed25519 AAAABBBBCCCC... edge_device_01The restrict option automatically turns off all advanced capabilities, including shell, proxy, and agent forwarding. The port-forwarding flag explicitly re-opens the specific TCP tunneling mechanism, while the command= parameter overrides any inbound execution requests to ensure the session remains non-interactive. Alternatively you could leverage the command= parameter to force execution of a script as an automation trigger.
The Execution Phase: Remote Decryption and Jailing the OS
When the hardened edge device completes its pre-boot sequence in the field, its internal scripts initiates the outbound phone-home sequence to the jump box. Because the jump box account is heavily restricted, the edge device must use the -N flag during connection initialization. This tells the local SSH client to establish only the cryptographic port forward tunnel without requesting a remote interactive shell, preventing the jump box from dropping the connection.
The edge device establishes the reverse tunnel using a syntax similar to the following command string:
dbclient -N -R 8333:localhost:22 edge_tunnel_user@jump-box-ip -i /root/.ssh/id_rsa -f -yNote: For some distributions like Radxa OS you will need to bring the loopback device up with
ifconfig lo upin order for your ssh connections on the jump box to make it back from the initramfs network.
This maps port 8333 on the jump box directly back to the pre-boot Dropbear SSH listener running inside the edge device’s RAM.
To authorize a boot, the administrator or an automated provisioning script connects to the jump box via a normal terminal client, targets the loopback port, and passes the LUKS passphrase to the edge device. This workflow mirrors classic deployment architectures where administrators manually opened mapped block layers post-connection:
ssh root@localhost -p 8333 -i edge_device_01.keyUpon authenticating to the Dropbear prompt, the administrator executes the cryptsetup unlock sequence to unlock the root partition to continue the boot sequence:
cryptroot-unlockThe initialization process then transitions from the volatile initramfs environment into your fully encrypted production workspace, launching your local monitoring processes and edge AI workloads. If an unauthorized individual cuts the power or disconnects the network cable, the memory-resident cryptographic keys evaporate instantly. The device drops back into its completely encrypted, locked state, ensuring your data remains protected from physical exposure.
Deep Dive Resources and Technical Reference Specifications
To deepen your understanding of these core cryptographic subsystems and remote execution environments, review the official project tracking sites and community deployment manuals:
- Review the architectural standards and format specifications on the official Cryptsetup GitLab repository, which serves as the primary home page for Linux block-layer encryption development.
- Explore the feature set and compilation flags of the Dropbear SSH official page to optimize memory utilization within embedded initramfs environments.
- Read the comprehensive, community-reviewed Kali Linux documentation for full-disk encryption deployment workflows on early and modern Raspberry Pi architectures.
- For creating custom scripts and hooks within the initramfs take a look at the official initramfs docs and one of the maintainer examples.
- Review deployment guidelines and core configuration strategies listed in the Debian Initramfs documentation Wiki to debug pre-boot filesystem initialization failures.