Problem
Sometimes during assessments sensitive systems are significantly segmented from other networks. Therefore its very important for penetration testers to know how to proxy your socks off in order to move across network.
Solution
To gain access to other networks, whether it’s the internet or a protected subnet. We can use putty on windows and the native ssh client on Linux to preform port forwarding and create Socks proxies to bypass access controls.
Proxy Caveats
SOCKS proxies only work for TCP traffic and with applications that support using a transparent proxy. Applications that use their own proxy settings, require forward secrecy, or check session integrity likely won’t function correctly.
All ports from 1-1024 require administrative rights to allocate on both windows and Linux systems.
Port 0 is used to represent a randomly generated port number, in both windows and linux systems.
How to Proxy Your Socks Off
Proxy Traffic in Windows
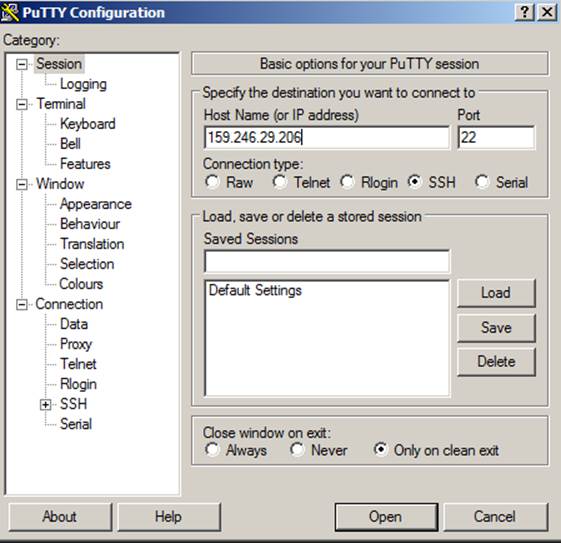
In Windows simply open putty and enter the IP address you want to connect in as the Hostname/IP address.
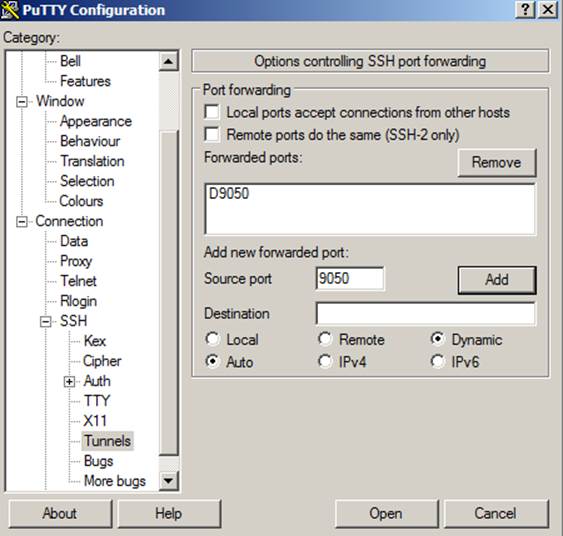
Next we have to tell putty that we want it to open a port on the localhost to be used to forward all traffic to our remote host. To do that, we go to the connections -> SSH -> Tunnels section, add a source port, choose the Dynamic option, and click the add button.
At this point you can click the open button and authenticate as if it were a normal SSH connection. Just be sure to leave the terminal open once authenticated, to ensure traffic is being passed from the local port to the remote host.
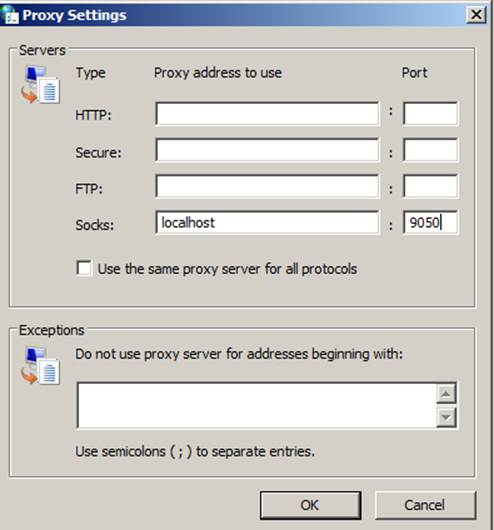
To tell windows to use the socks proxy, open internet options from the control panel or the start menu search. Then go to the connections tab and open LAN Settings.
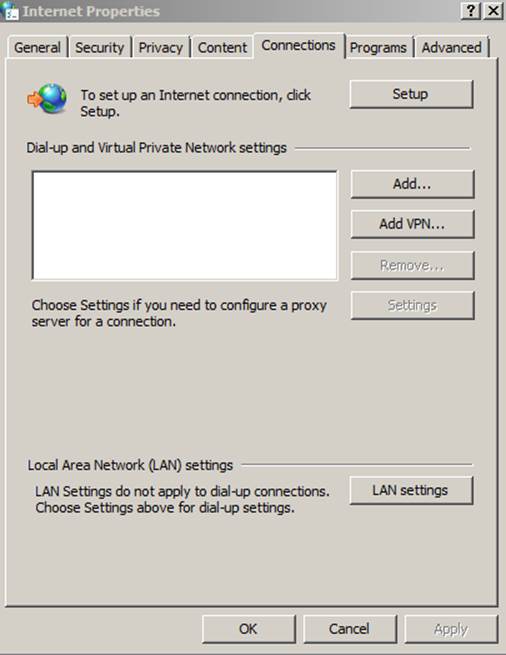
Once LAN settings opens, select the “use a proxy server for your LAN” check box and click the advanced.
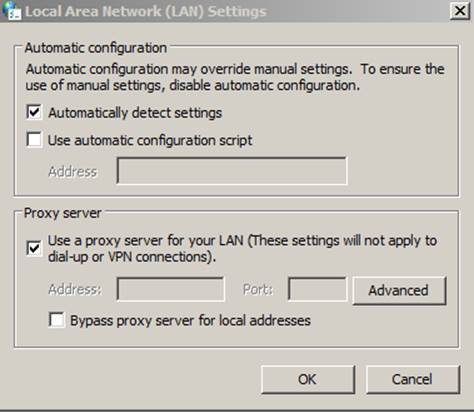
In the Socks box add localhost or 127.0.0.1 and the port you set as dynamic in putty. Then click OK three times to save all the settings.

Proxy Traffic in Linux
If you need to proxy your Kali system, the process is fairly similar. Start by using the ssh client to dynamically forward traffic from a local port. This can be done with a command similar to the following, where 9050 is our dynamic port.
ssh -NfD 9050 root@159.246.29.206Next we need to tell proxy chains where to send traffic from our programs. This can be set globally be using a command like the following.
echo "socks4\t127.0.0.1\t9050" >> /etc/proxychains.confTo run an application through the socks proxy, simply prepend it with the proxychains command, like the following.
proxychains iceweaselThere is not built in means to setup a system wide socks proxy. However the BadVPN package has a package tun2socks that can tunnel all traffic over a local socks proxy.
Proxy Your Socks Off with Metasploit
Sometimes, while doing an assessment you may even want to run some tools such as nmap or even SQL Management studio (ssms.exe) over an established shell. Metasploit has a post module (auxiliary/server/socks4a) that can be used to create a socks4 proxy on an existing session.
However, to start off we need to tell metasploit how to route traffic to each of our shell’s networks before running the socks proxy. This can either be done manually with the route command or if your session is on a windows host with the autoroute module (post/windows/manage/autoroute).
To add a route manually you can use the built in route command with options similar to the following.
route add 10.0.0.0 255.255.255.0 1To add routes with autoroute, either use the post module or run autoroute from a meterpreter shell. For the autoroute module (post/windows/manage/autoroute) just set the session ID and run. For autoroute from meterpreter use a command similar to the following.
run autoroute -s 10.0.0.0Once routes are established within metasploit to your target networks, you can run the socks proxy module (auxiliary/server/socks4a) and note the SRVPORT.
Using Proxychains to Proxy Traffic through Metasploit Meterpreter
Next we need to tell proxychains what port to send traffic to within the global configuration file (/etc/proxychains.conf), just like in the Linux example above. There should be a line like “socks4 127.0.0.1 1080” at the bottom of the file, change the port 1080 to whatever your SRVPORT was in metasploit.
Once the configuration file is updated, proxychains can be used to issue commands through metasploit shell(s). Like with the following nmap example.
proxychains nmap -v -sS 10.0.0.0/24If we want to make this socks proxy available to a windows host for programs like SQL Server Management Studio, perform a local port forward to the socks port on the Linux system. To do this we can use putty and follow steps similar to those presented above.
Start by creating a local port forward of a local port on our windows system, to the local socks port on the Linux system with putty. Start by allocating a source port for connection on the local system and forward to a destination of 127.0.0.1:1080; where 1080 is your metasploit SRVPORT.

We can then just configure a system wide proxy by adding our forwarded port as the socks port, instead of using a local socks proxy.
Once those settings are changes, we should be able to use the majority of our tools within windows without issue.
Using SSH to Provide Remote System Internet Access via local Socks Proxy
An SSH tunnel can be used to forward traffic from your local system to a port on a remote system. This can be done in Linux by switching the -L option with -R. Or in putty by choosing the Remote option under tunnels instead of Local. For example if you wanted to share your local socks proxy with a remote system to provide internet access, putty can be used with a remote forward like the following.

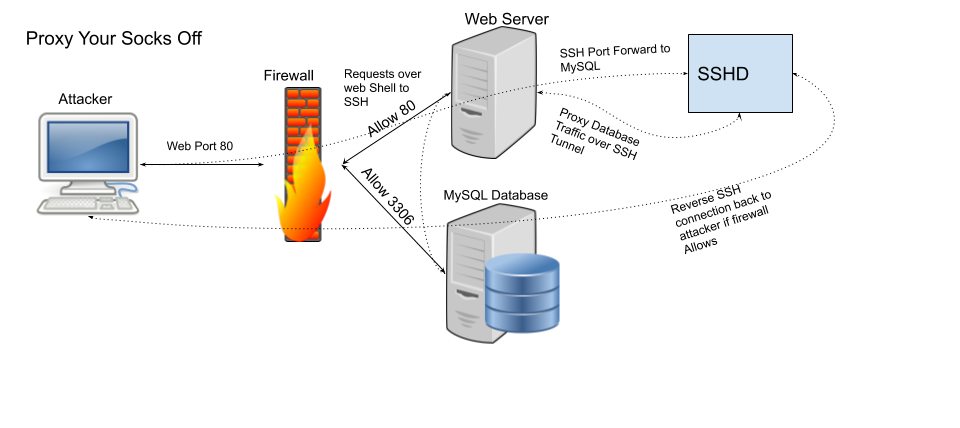
Using Compromised Linux Webserver to Access Internal Network and Database
It’s also worth noting that SSH port forwarding can be performed on the network socket level and does not require an interactive session be established; only valid authentication is required. For instance, say you wanted to log into a restricted database of a webserver. But you only have access to the webserver account. The webserver user is not allowed to log into the server interactively by default, but that doesn’t mean it can’t authenticate. In many cases SSH can be used as described in my post on SSH for post exploitation to get around limited user shells.
Using Linux Native Tools to Proxy Your Socks Off
Tools natively built-in to windows and linux can also be used to preform port forwarding. Just note that this methodology simply makes a port to port translation and does not manipulate the traffic in any way. Netcat (nc) is found in almost every single Linux distribution and can be used to easily preform port forwarding with commands similar to the following.
First we have to make a named pipe so that any response from the server aren’t dumped to standard out.
mkfifo backpipeThen we can use a command similar to the following to send traffic from 8080 on the localhost to a remote host on a different port utilizing the named pipe. This could help get around a firewall or help send traffic to another system to be caught by another port translation or process.
nc -l 8080 0<backpipe | nc example.com 80 1>backpipeSimilarly the netsh (commandline windows firewall editor) command in windows can be used to create a local port forward as well. In this cause we can follow the same example and create a port translation from localhost 8080 to example.com on port 80.
netsh interface portproxy add v4tov4 listenport=8080 listenaddress=127.0.0.1 connectport=80 connectaddress=example.comWindows 7 and above will likely require administrative privileges to make changes to the windows firewall. But you can likely still utilize the windows version of nc or netcat to redirect traffic all the same.