A few months ago I published a walkthrough on building a certificate based device trust system using step-ca as a SCEP provider in front of Google Cloud Certificate Authority Service (CAS). That post proved the design worked. It did not make the design easily repeatable.
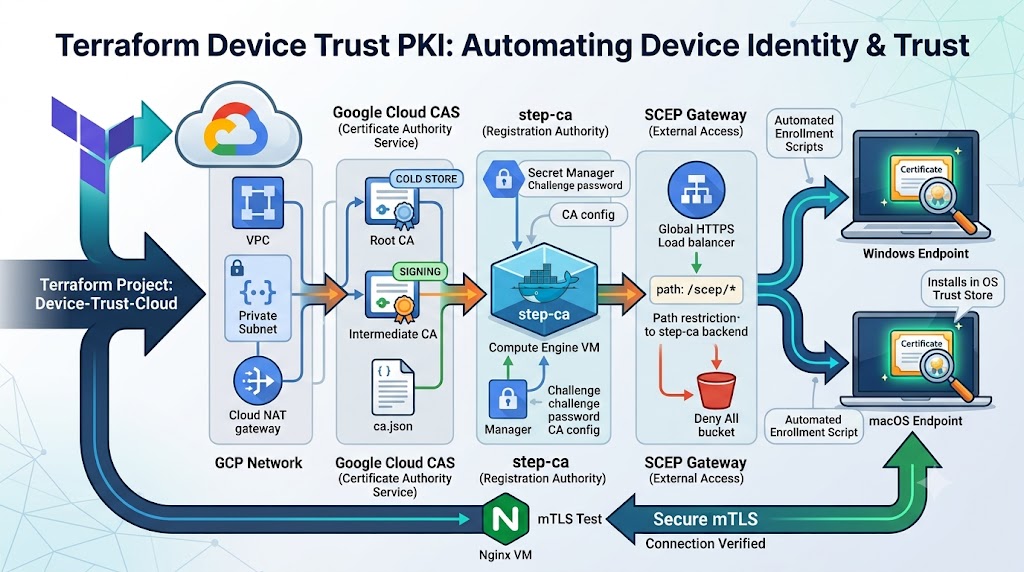
This post covers what came out of fixing that problem: Device-Trust-Cloud, a Terraform project that builds the entire hierarchy, deploys step-ca as a hardened Compute Engine service, fronts it with a path restricted SCEP gateway, and ships enrollment scripts for both Windows and macOS that install the resulting certificate into the operating system’s own trust store. I will walk through the architecture, deploy it from scratch, enroll a device on both platforms, and verify the whole chain works against a real mTLS Device Trust gateway.
Why Device Identity Still Gets Skipped
My earlier post on certificate based device trust, made the case that most zero trust programs stop at the user. Passwords get rotated, MFA gets enforced, conditional access policies get tuned against IP ranges and user risk scores, and the device itself is still just trusted because it showed up with a valid session token. A compromised laptop with a legitimate user logged in, provided a valid session token sails through every one of those checks; even often from personal/unmanaged devices.
A device certificate closes that gap. It is issued by a CA you control, it cannot be copied out of the key store without real effort, and it gives you a durable, auditable identity for the endpoint itself, independent of whatever the user is doing. The hard part was never the concept. It was building and maintaining the Public Key Infrastructure (PKI) behind it without turning it into a full time job.
From a Manual Build to a Reusable Blueprint
My original GCP buildout post laid out the actual architecture: step-ca running as the Registration Authority and policy engine, Google Cloud CAS holding the private keys and doing the actual signing, and a SCEP provisioner in front so ordinary endpoints and MDM agents could enroll without needing a step-ca specific client. That post walked through creating the service account, initializing step-ca with CloudCAS as its backend, generating and signing the intermediate CA, running step-ca under a dedicated non-root user, and configuring the SCEP provisioner by hand.
Every one of those steps work. None of them are things you want to repeat from memory or during a disaster recovery drill. The Terraform project takes that exact design and encodes it as infrastructure as code: the same CloudCAS backed step-ca, the same SCEP provisioner, but built through terraform apply and torn down through terraform destroy with nothing left behind to clean up by hand.
What the Terraform Project Actually Builds
The repository is organized as a root module wiring together a set of purpose built child modules. Each one maps to a distinct piece of the architecture from the original post.
Network provisions an isolated VPC, a single subnet, and a Cloud NAT gateway so the step-ca VM can reach the internet (for OS packages and container images) without ever holding a public IP address of its own.
root_ca and intermediate_ca stand up the two tier CA hierarchy inside Google Cloud CAS: a self signed root with a long lifetime kept as cold as possible, and a subordinate intermediate that does the actual day to day signing. ca_pool and certificate_template define the CA pool the intermediate lives in and the issuance policy applied to every certificate that comes out of it.
stepca_container is the Registration Authority itself: a Compute Engine VM, no public IP, running step-ca in Docker with a templated ca.json that points at the CloudCAS intermediate ca and defines a SCEP provisioner named device-trust-scep. The provisioner challenge password and the CA configuration are stored in Secret Manager rather than baked into the image or the startup script.
scep_gateway is the piece that did not exist as a discrete component in the original manual build. It is a global HTTPS load balancer configured to forward only the /scep/* path to the step-ca backend, with everything else on that IP routed to a deny all backend bucket. The step-ca VM itself never gets a public IP, only this narrow, purpose built entry point does.
mtls_test_gateway is a small nginx VM that exists purely to prove a device trust certificate actually works, which is the subject of its own section below.
The Full Architecture
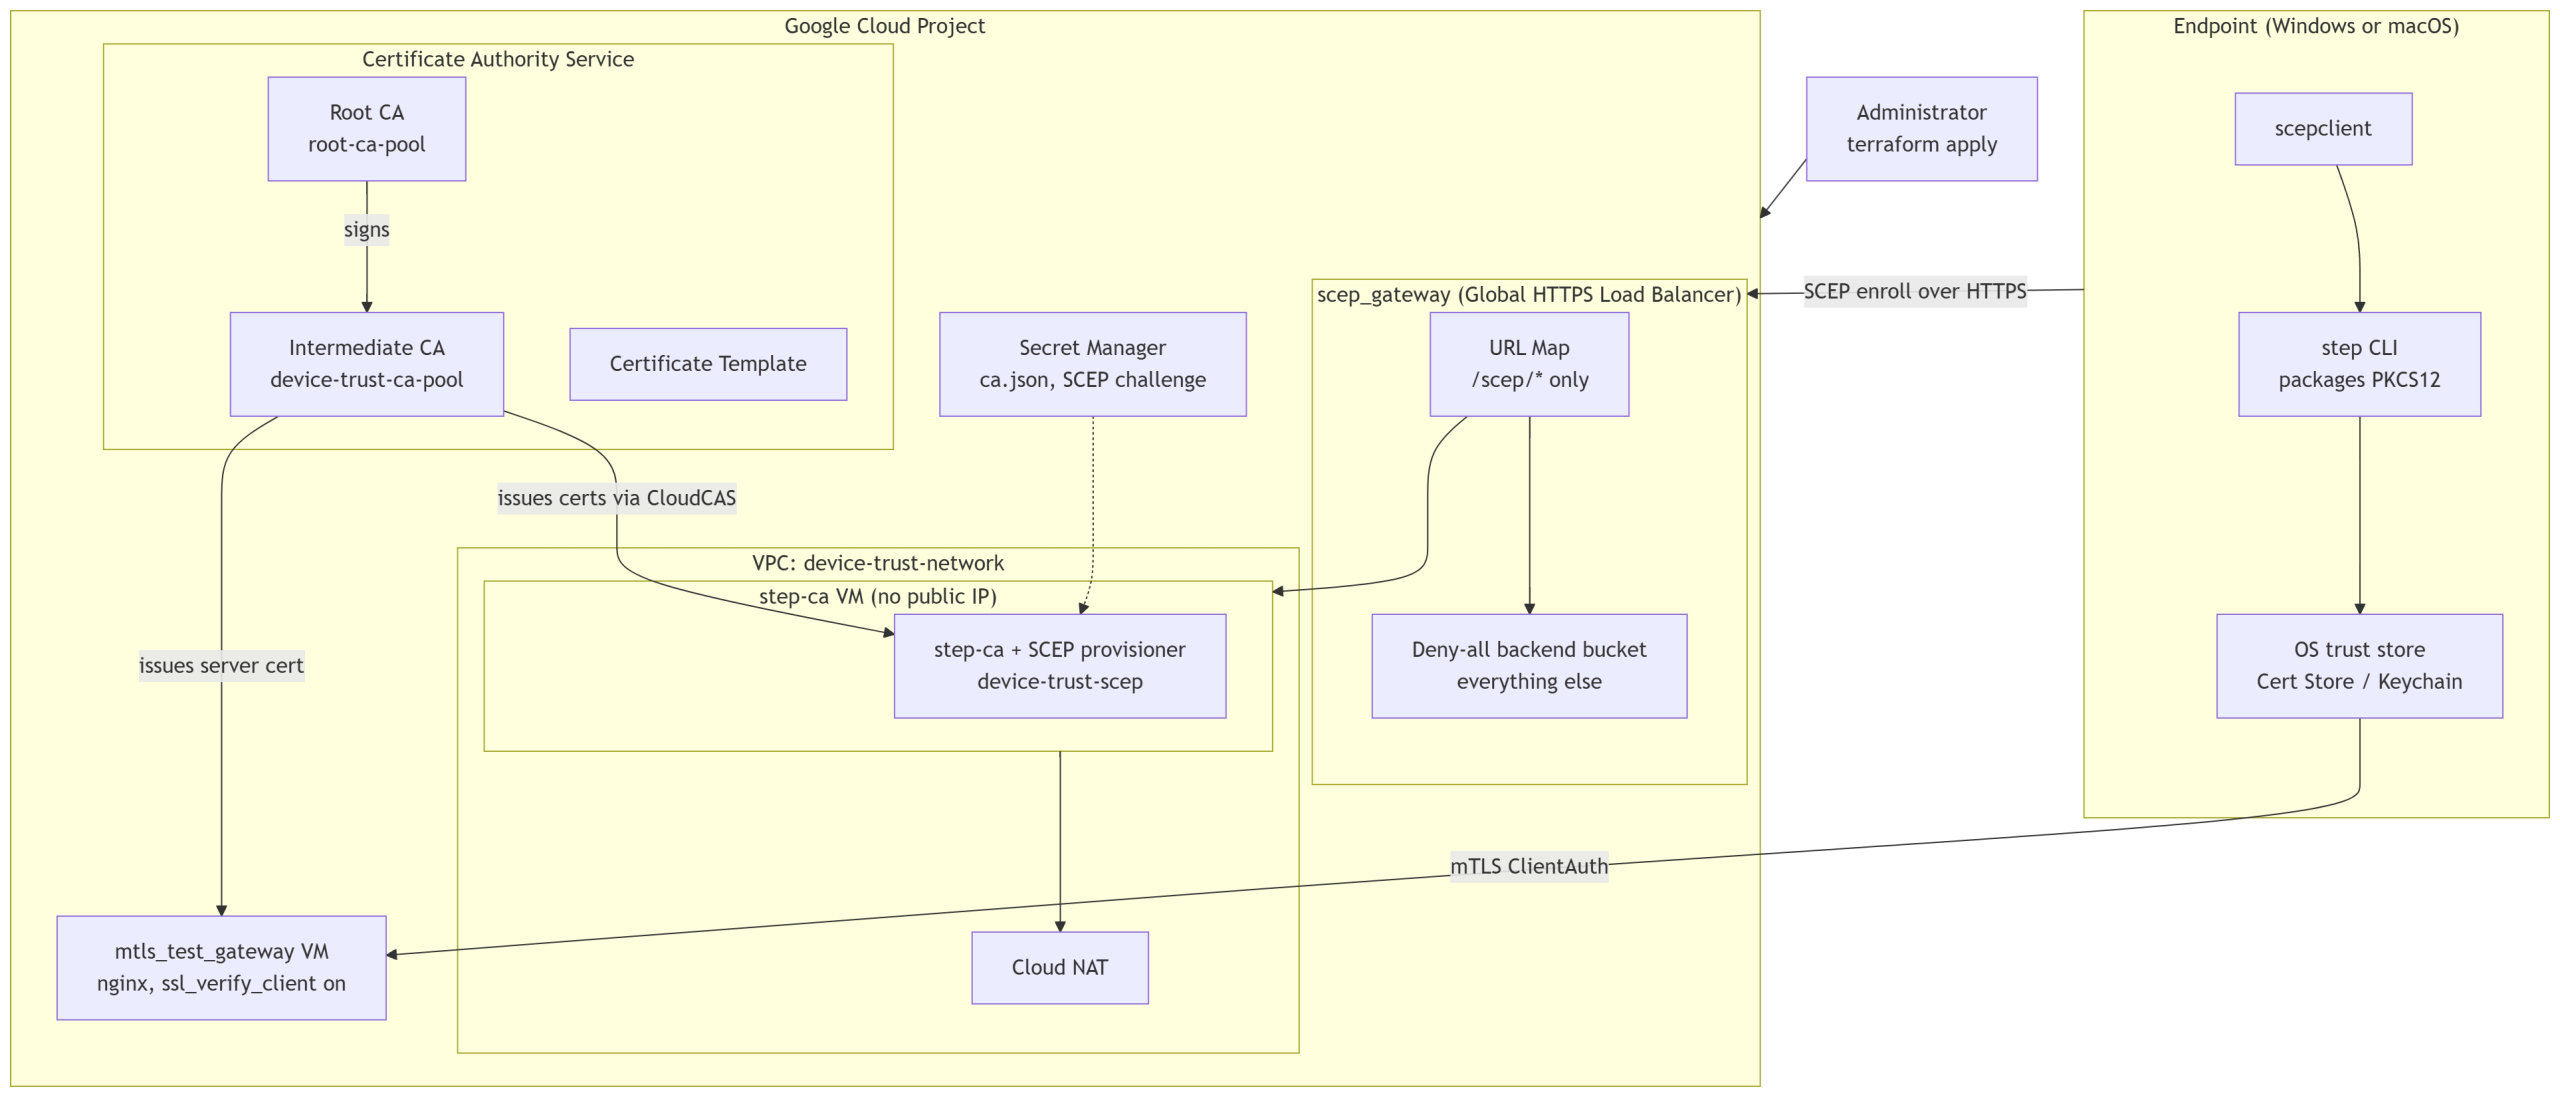
Two things are worth noticing in that diagram. First, the step-ca VM itself is never directly reachable. Every enrollment request, from a Windows laptop, a Mac, or an MDM’s SCEP client, goes through the path restricted load balancer, and anything that is not a SCEP operation gets a deny all response instead of a step-ca error message that could leak information about the backend. Second, the intermediate CA issues two very different kinds of certificates from the same pool: short lived device certificates for endpoints, and a server certificate for the mTLS test gateway itself, both governed by the same certificate template.
Deploying From Scratch
Deploying the whole thing is a terraform apply away, assuming you have a GCP project with billing enabled and the gcloud CLI already authenticated against it.
1. Clone the repository and set your project.
git clone https://github.com/sleventyeleven/Device-Trust-Cloud.git
cd Device-Trust-Cloud
Set project_id in a terraform.tfvars file (it is git ignored by default, which matters since it can end up holding project specific values you do not want committed):
project_id = "your-gcp-project-id"
2. Initialize, plan, and apply.
terraform init
terraform plan
terraform apply
Terraform will enable the required APIs (compute, privateca, dns, iam, secretmanager, storage), build the network, stand up both CA tiers, deploy the step-ca VM, wire the SCEP gateway load balancer, and build the mTLS test gateway. On a clean project this takes roughly ten to fifteen minutes, mostly waiting on the CA pool and the global load balancer’s anycast IP to finish propagating.
3. Pull the values you will need for enrollment.
terraform output -raw scep_endpoint_url
terraform output -raw scep_challenge_password
terraform output -raw root_ca_certificate > root-ca.crt
terraform output -raw mtls_gateway_url
4. Verify the SCEP gateway is actually serving certificates.
This is the verification step worth running before you touch a single endpoint. GetCACert is the same operation any SCEP client calls first, and it is a plain, unauthenticated HTTPS request, so it is the fastest way to prove the whole chain from the load balancer down to step-ca down to CloudCAS is actually wired together correctly:
curl -sk -o getcacert.der -w "HTTP_STATUS=%{http_code}\n" \
  "$(terraform output -raw scep_endpoint_url)?operation=GetCACert"

openssl pkcs7 -inform DER -in getcacert.der -print_certs -noout
A 200 status and a printed root plus intermediate certificate chain means the CA hierarchy, the step-ca VM, and the load balancer are all healthy. If that curl hangs or returns status 000 immediately after a fresh apply, give the global forwarding rule a few extra minutes. Anycast IPs on a brand new HTTPS load balancer are not always instantly reachable everywhere, even though every underlying resource reports as created.
5. Verify the mTLS gateway correctly rejects an unauthenticated request.
curl -sk -o /dev/null -w "HTTP_STATUS=%{http_code}\n" "$(terraform output -raw mtls_gateway_url)"
You should get back a 400, meaning nginx is enforcing ssl_verify_client on and refusing the connection outright because no client certificate was presented. That is the correct failure mode, and it is what makes the successful enrollment below meaningful: if this endpoint accepted the connection with no certificate, the whole device trust exercise would be theater.
Enrolling a Windows Endpoint
install-windows.ps1 downloads scepclient & step-ca cli, requests the device certificate over SCEP, packages it into a PKCS12 file using the step CLI, and imports it into the current user’s certificate store with the private key marked non-exportable. Run it from an elevated PowerShell session:
terraform output -raw root_ca_certificate > root-ca.crt

.\install-windows.ps1 `
  -ScepServerUrl "https://$(terraform output -raw scep_gateway_ip)" `
  -Provisioner "device-trust-scep" `
  -Challenge "$(terraform output -raw scep_challenge_password)" `
  -Country "US" `
  -Organization "DeviceTrust" `
  -Ou "DeviceTrust" `
  -RootCaFile ".\root-ca.crt" `
  -MtlsGatewayUrl "$(terraform output -raw mtls_gateway_url)" `
  -KeyProtection "Delete"
The script auto derives the intermediate CA from step-ca’s own GetCACert response, so you do not need to distribute a second file for it. -KeyProtection is the one flag worth understanding before your first run: Delete (the default) removes the loose private key file after import, which is the closest thing to true non-exportability (which would require hardware backed private keys from a TPM/HSM) this script offers, at the cost of forcing a full re-enrollment (a brand new key, a brand new certificate, a new signing operation against CloudCAS) on every renewal. RestrictPermissions keeps the key file in place with its ACL locked down to SYSTEM and Administrators, allowing the same key to be reused on renewal, which is materially cheaper against CAS’s per-certificate billing if you expect frequent renewals. The script ends by making an authenticated request against the mTLS gateway using the certificate it just installed and printing a plain PASS or FAIL, so you know immediately whether the enrollment actually produced something usable rather than just a file on disk.
Enrolling a macOS Endpoint
install-macos.sh follows the same shape but installs into the invoking user’s login keychain instead of the Windows certificate store, since that is what Safari and Chrome consult for a TLS ClientAuth challenge on macOS:
export SCEP_SERVER_URL="https://$(terraform output -raw scep_gateway_ip)"
export SCEP_PROVISIONER="device-trust-scep"
export SCEP_CHALLENGE="$(terraform output -raw scep_challenge_password)"
export CERT_COUNTRY="US"
export CERT_ORGANIZATION="DeviceTrust"
export CERT_OU="DeviceTrust"
export ROOT_CA_FILE_SRC="./root-ca.crt"
export MTLS_GATEWAY_URL="$(terraform output -raw mtls_gateway_url)"

chmod +x install-macos.sh
sudo -E ./install-macos.sh
sudo -E, not plain sudo, matters here. The script needs root to write into /usr/local/bin, but plain sudo resets the environment by default and silently drops every exported variable, falling back to placeholder defaults with no error at all. Everything keychain related still runs as your own user under the hood, because root has its own login keychain of its own as well as a system-wide keychain, and step-ca’s own TLS verification of the SCEP gateway consults whichever keychain belongs to the calling process.
Expect to be prompted for your password or Touch ID during this run. That is not a bug, it is macOS enforcing interactive authentication on any process that modifies a keychain, and there is no fully unattended path around it short of distributing the certificate through an MDM profile, which just moves the same interactive consent step earlier. On a renewal, the script also cleans up the previous device certificate from the keychain automatically, identified by SHA-256 hash rather than by name, so you do not end up with duplicate entries confusing the certificate picker the next time a browser prompts for one.
The Gateway That Proves It Actually Works
Our earlier post on building a simple device trust gateway made the point that verifying a device certificate at the edge does not require rearchitecting your identity stack. Two directives in an nginx config, ssl_client_certificate pointing at your CA chain and ssl_verify_client on, are enough to turn a reverse proxy into a control that blocks any connection that cannot present a certificate chained to a CA you trust.
modules/mtls_test_gateway is exactly that config, deployed as its own small VM so it can carry a public IP without touching the hardening already applied to the step-ca instance. It exists specifically so “the enrollment worked” and “the certificate is actually usable for ClientAuth” are two separately provable facts rather than one assumption resting on the other:
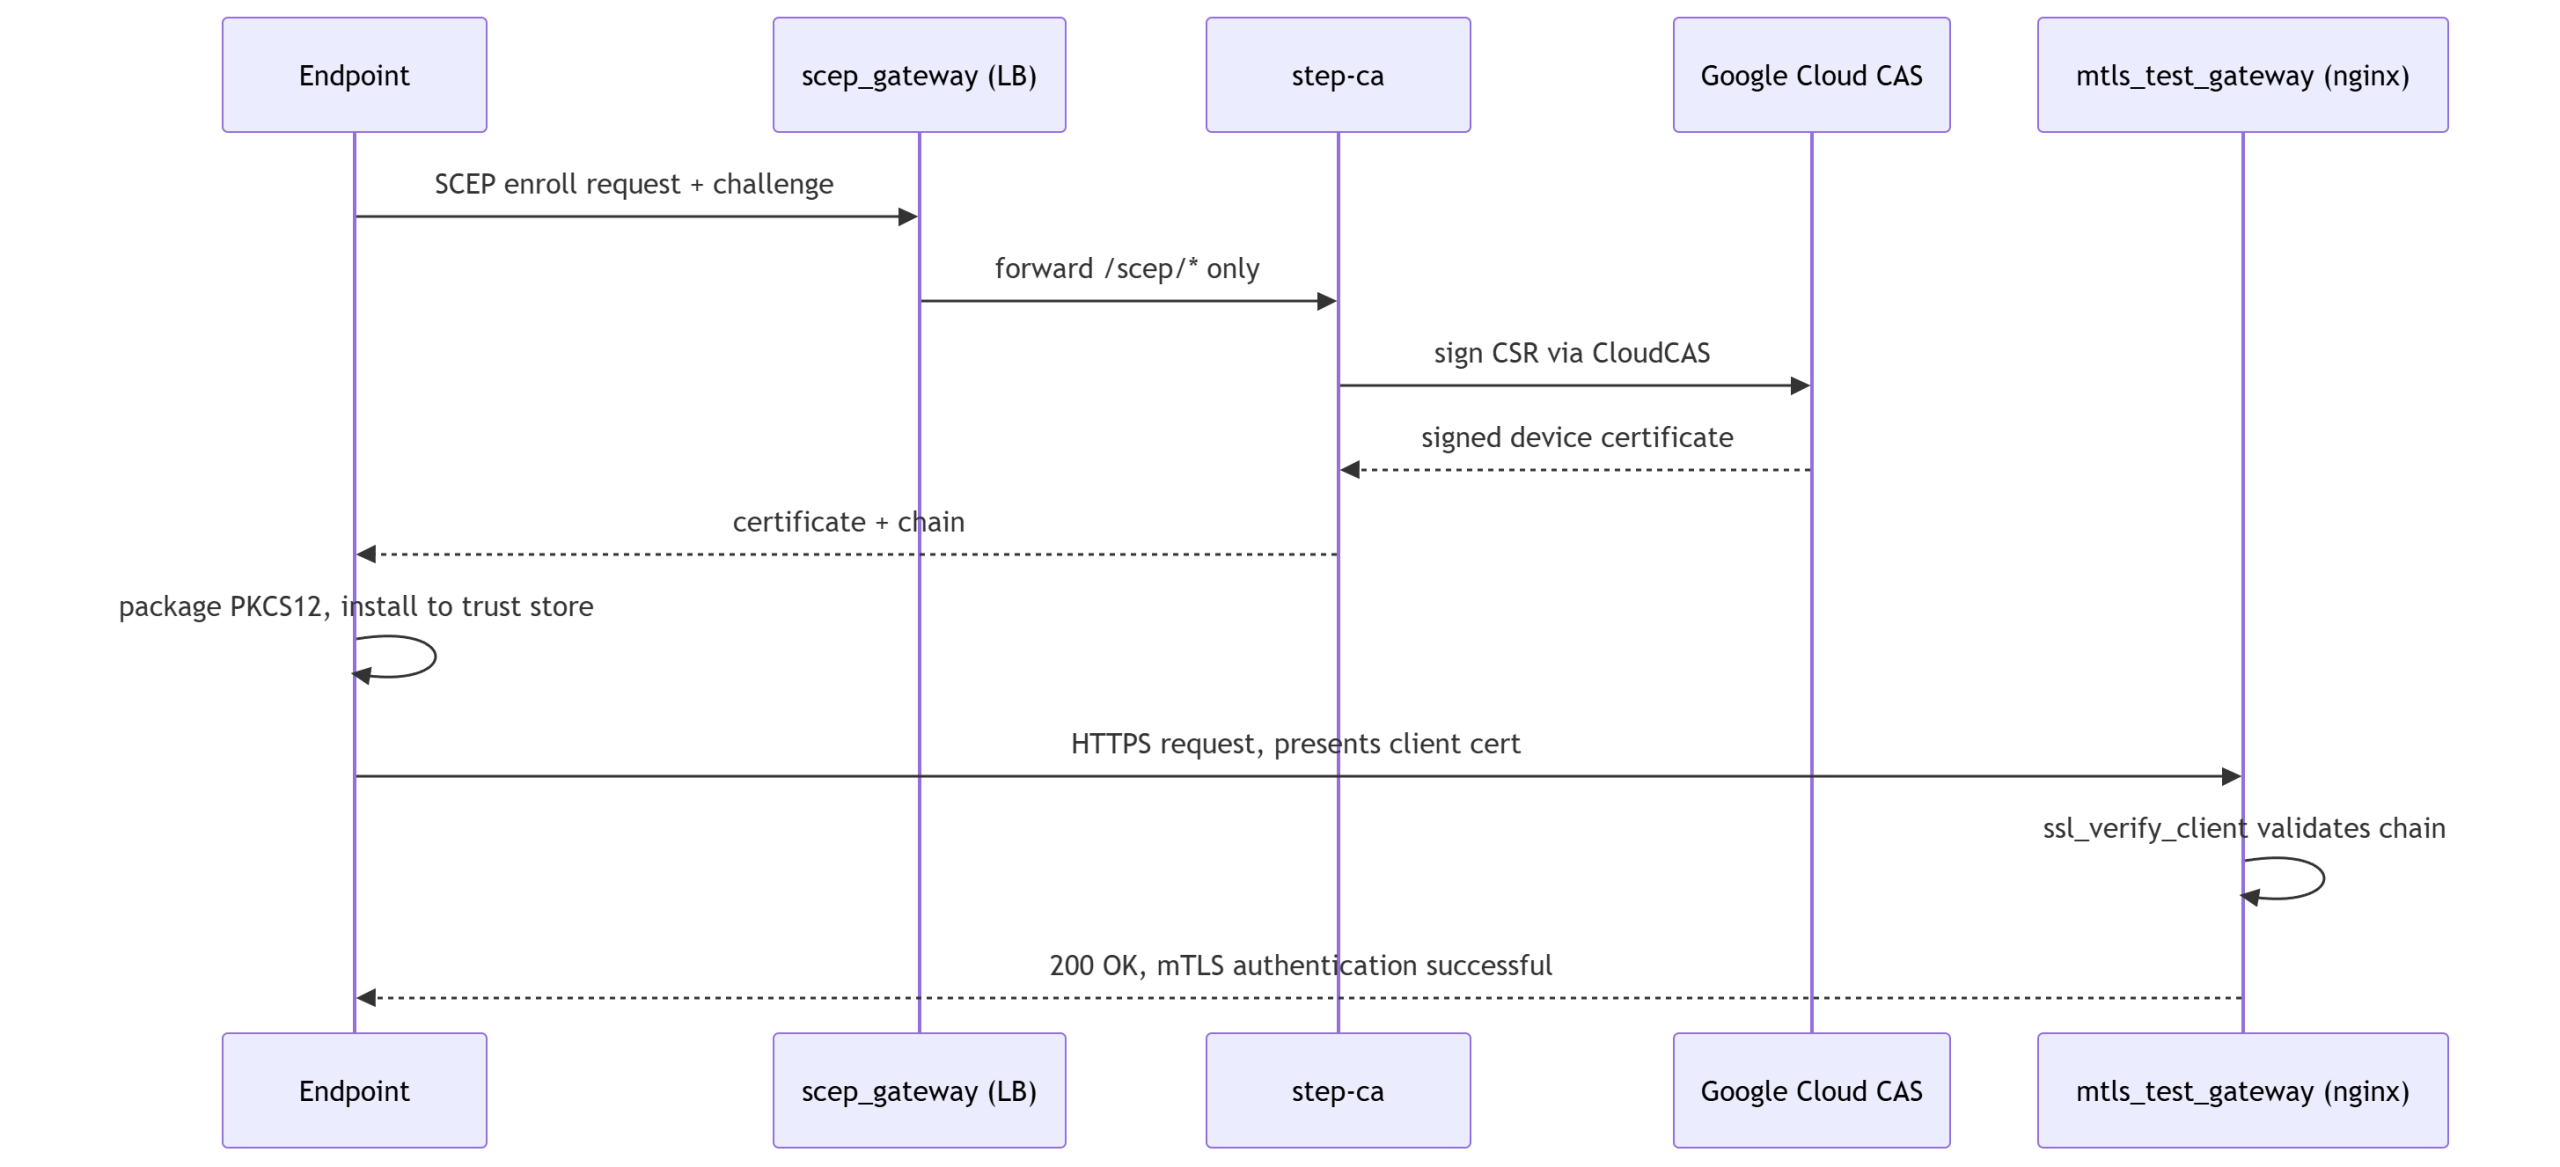
When that last request comes back with a 200 and the device’s subject DN echoed in the response body, you have end to end proof: a certificate was issued by your CA, installed into the OS’s own trust store, and accepted by an independent service that only trusts your CA chain. That is the actual deliverable of device trust, not the certificate sitting in a folder.
A Few Things Worth Knowing Before You Rely On This
A handful of details came out of running this repeatedly against real infrastructure rather than reading it as a design document.
To run this terraform blueprint, in order to create an isolated Enterprise grade PKI within GCP CAS, as described will cost at minimum ~$500 a month plus $0.50 per issued device certificate. There are potential cost optimizations that can be made based on your specific needs, but I would budget for at least $1,000 dollars a month starting out with your first few hundred devices.
CA lifetimes on google_privateca_certificate_authority are immutable once created. If you want to change root_ca_lifetime or intermediate_ca_lifetime after the fact, Terraform has to force a full recreation of that CA, which means a full PKI reset. Decide those values deliberately before your first apply rather than after.
Google Cloud CAS permanently reserves CA pool, CA, and certificate template IDs even after they are deleted. If you destroy and rebuild this project in the same GCP project, you need new name suffixes for anything you previously created, not just a clean terraform apply.
Mac has a reliance on and heavy security around its keychains used to store certificates used for clientAuth. Because of this certificate installs and trust require not just sudo or administrative privilege, but interactive authentication to unlock the keychain. This can lead to a wonky user experience, popups, ghosted artifacts, and overall odd user experience if automation is not well tested on new version of macOS. I make a best effort to coverage everything we experienced during testing, but users beware.
Where This Goes From Here
The manual build from our step-ca and Google Cloud CAS post proved the architecture. The device trust gateway post proved that verifying the resulting certificate at the edge is genuinely simple. This Terraform project ties both of those together into something you can stand up, tear down, and hand to a teammate without a page of aging knowledge attached to it.
Next, I many look into adding the ability to deploy to AWS with or without AWS Private CA Connector for SCEP as opposed to using smallstep step-ca. As well as further exploring automation of Device Trust empowered identify providers via conditional access policy, especially Keycloak as its cloud native and open source.
Full source, module documentation, the complete Known Limitations and Troubleshooting sections, and both install scripts are in the Device-Trust-Cloud repository. If you are building on step-ca directly, the official step-ca documentation and the Google Cloud CAS documentation are the two references I used the most while building this, alongside the micromdm/scep project that both install scripts depend on for the actual SCEP client. And if the whole premise here still sounds abstract, go back and read why certificate based device trust matters in the first place. Everything in this post exists to make that argument’s conclusion something you can deploy in an afternoon instead of a design review.