Device Trust is rapidly becoming a cornerstone of modern security strategies, particularly within software development lifecycles. By ensuring that code changes are initiated from trusted devices, organizations can significantly reduce the risk of supply chain attacks and unauthorized modifications. However, a critical vulnerability often overlooked lies in the potential for users to bypass these controls using Personal Access Tokens (PATs). This blog post will delve into how attackers can leverage PATs to subvert Device Trust mechanisms, and more importantly, how you can harden Device Trust with token permissions through robust management practices.
Why PATs Are a Threat to Device Trust
| Aspect | Traditional Device Trust (Web UI) | PAT‑Based Access |
|---|---|---|
| Authentication point | Browser session tied to SSO and device compliance checks | Direct API call with static secret |
| Visibility | UI logs, conditional access policies | API audit logs only; may be ignored |
| Revocation latency | Immediate when device is non‑compliant | Requires token rotation or explicit revocation |
| Scope granularity | Often coarse (read/write) per repository | Fine‑grained scopes (e.g., pull_request:write, repo:status) |
A PAT can be generated with any combination of scopes that the user’s role permits. When a developer creates a token for automation, they may inadvertently grant more privileges than needed, especially if the organization does not enforce fine‑grained tokens and approvals. The result is a secret that can be used from any machine, managed or unmanaged, effectively sidestepping Device Trust enforcement.
Real‑World Consequence
Imagine an attacker who gains access to a developer’s laptop after it is stolen. They locate the file ~/.git-credentials (or a credential helper store) and extract a PAT that includes pull_request:write. Using this token they can:
- Pull the latest code from any repository.
- Approve a malicious pull request without ever opening the controlled web UI.
- Merge the PR, causing malicious code to flow into production pipelines.
Because the action occurs via the API, the organization’s monitoring solution sees no violation, no unmanaged device attempted to open the GitHub website. The only evidence is an audit‑log entry that a token performed the operation, which may be missed if logging and alerting are not tuned for PAT usage.
Attack Flow: Bypassing Device Trust with PATs
Let’s illustrate how an attacker might exploit this vulnerability using a GitHub example. This flow can be adapted to other platforms like GitLab, Azure DevOps, etc., but the core principles remain consistent.

Explanation:
- Attacker Obtains Compromised PAT: This could happen through phishing, malware, credential stuffing, or insecure storage practices by the user.
- GitHub API Access: The attacker uses the stolen PAT to authenticate with the GitHub API.
- Forge Pull Request: The attacker creates a pull request containing malicious code changes.
- Approve Pull Request (Bypass Device Trust): Using the API, the attacker approves the pull request without going through the standard Device Trust verification process. This is the critical bypass step.
- Merge Changes to Main Branch: The approved pull request is merged into the main branch, potentially introducing malicious code into production.
The “Device Trust Workflow” subgraph shows the intended secure path. Notice how the attacker completely circumvents this path by leveraging the PAT directly against the API.
Leveraging gh cli and the GitHub API with PATs
Attackers or savvy users don’t need sophisticated tools to exploit PATs. The readily available gh cli (GitHub Command Line Interface) or simple scripting using curl can be used effectively.
Approving a Pull Request with gh cli:
Assuming you have the PAT stored in an environment variable GITHUB_TOKEN:
# Export the stolen token into an environment variable (or store it in ~/.config/gh/config.yml)
export GH_TOKEN=ghp_XXXXXXXXXXXXXXXXXXXXXXXXXXXX

# Authenticate gh with the token (no interactive login required)
gh auth status  # verifies that the token is valid

# List open pull requests for a target repository
gh pr list --repo AcmeCorp/webapp --state open

# Approve and merge a specific PR (ID = 42)
gh pr review 42 --repo AcmeCorp/webapp --approve --body "Looks good to me!"
gh pr merge 42 --repo AcmeCorp/webapp --merge
All of these actions are performed via the GitHub API behind the scenes. These simple commands bypass any Device Trust checks that would normally be required when approving a pull request through the web interface.
Approving a Pull Request with curl:
# Variables
TOKEN="ghp_XXXXXXXXXXXXXXXXXXXXXXXXXXXX"
OWNER="AcmeCorp"
REPO="webapp"
PR_NUMBER=42

# Submit an approval review
curl -X POST \
  -H "Authorization: token $TOKEN" \
  -H "Accept: application/vnd.github+json" \
  https://api.github.com/repos/$OWNER/$REPO/pulls/$PR_NUMBER/reviews \
  -d '{"event":"APPROVE"}'

# Merge the pull request
curl -X PUT \
  -H "Authorization: token $TOKEN" \
  -H "Accept: application/vnd.github+json" \
  https://api.github.com/repos/$OWNER/$REPO/pulls/$PR_NUMBER/merge \
  -d '{"merge_method":"squash"}'
If the token includes pull_request:write permission scope, both calls succeed, and the attacker has merged malicious code without ever interacting with the controlled web flow.
Hardening Device Trust: Token Management Strategies
The key to mitigating this risk lies in proactive token management and granular permission control. Here’s a breakdown of strategies you can implement:
Disable PATs Where Possible:
This is the most secure approach, but often impractical for organizations heavily reliant on automation or legacy integrations. However, actively identify and eliminate unnecessary PAT usage. Encourage users to migrate to more secure authentication methods like GitHub Apps where feasible.
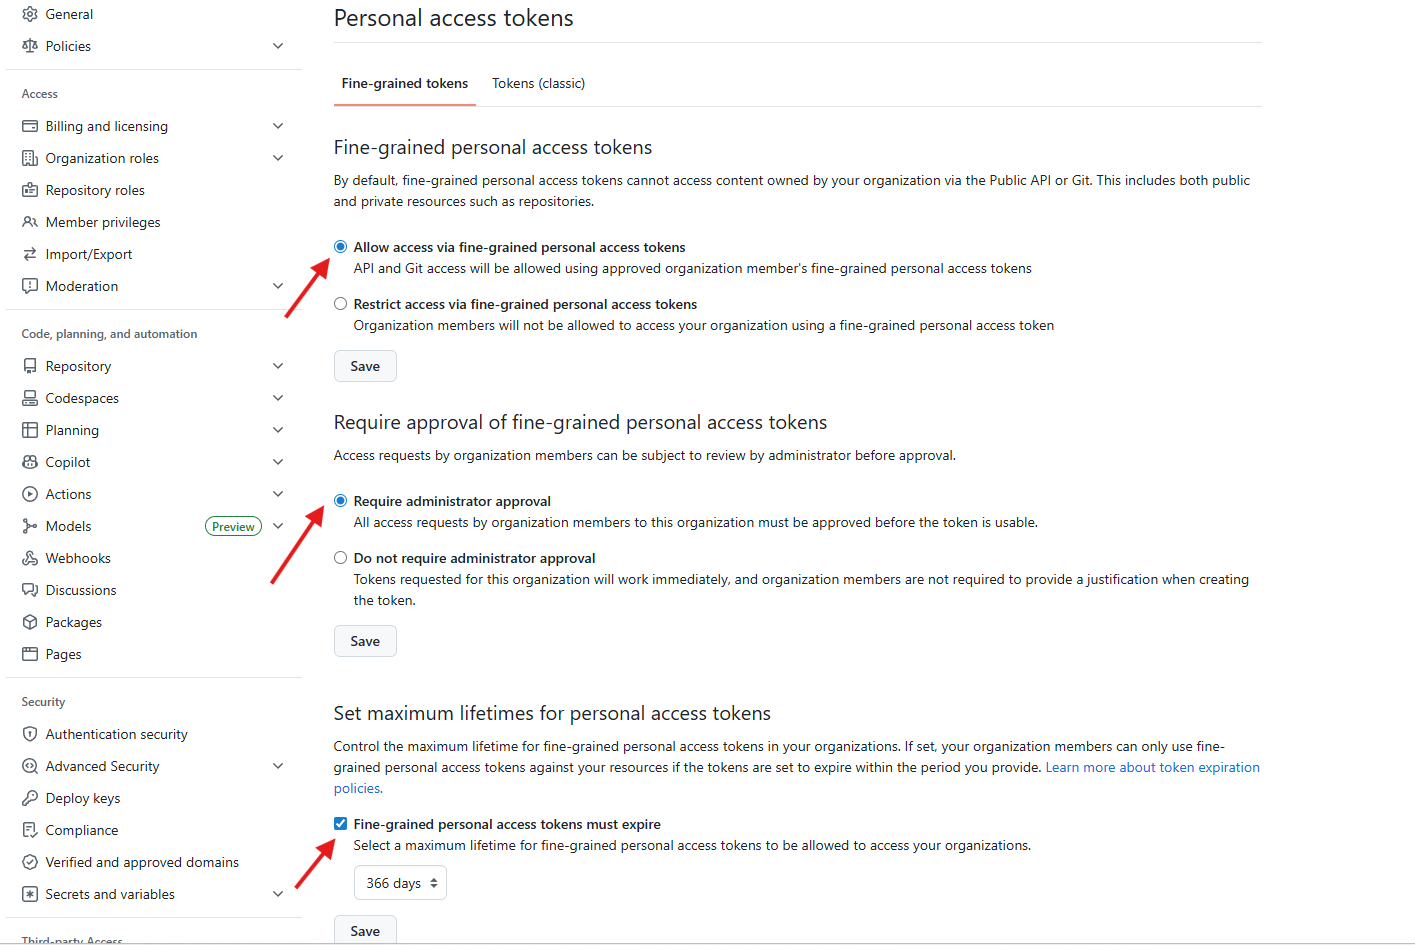
GitHub now offers Fine-Grained Personal Access Tokens (FG-PATs) which allow you to scope permissions down to specific repositories and even individual resources within those repositories. This is a significant improvement over classic PATs, but still requires careful management.
Implement Organization-Level Policies:
GitHub provides features for managing PAT usage at the organization level:
- Require FG-PATs: Enforce the use of Fine-Grained Personal Access Tokens instead of classic PATs.
- Restrict Token Creation: Limit who can create PATs within the organization. Consider restricting creation to specific teams or administrators.
- Require Administrator approval: Requires an Administrators to approve the token and scope before being usable.
- Token Expiration Policies: Set a maximum expiration time for all PATs. Shorter lifespans reduce the window of opportunity for attackers if a token is compromised.
- IP Allowlisting (GitHub Enterprise): Restrict PAT usage to specific IP address ranges, limiting access from known and trusted networks.
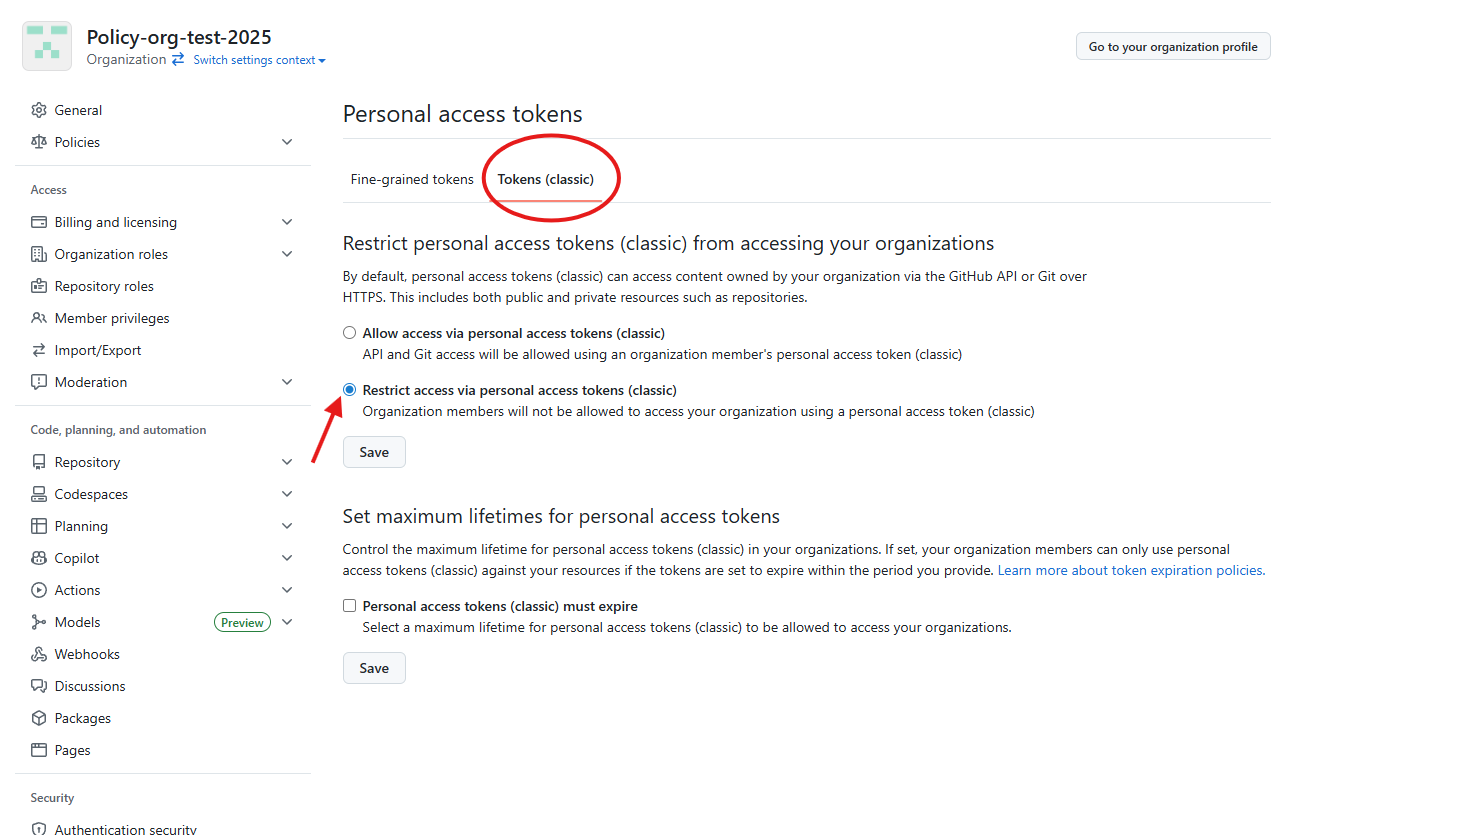
GitHub introduced Fine‑grained personal access tokens (FGPATs) that let administrators define which repositories a token can access and what actions it may perform. To require FGPATs, enable the “Restrict access via personal access tokens (classic)” option in Organization Settings → Personal Access Tokens → Settings → Tokens (classic)
Focus on Repository-Level Scopes and Require Approval :
In addition to restricting the use of classic Personal Access Tokens, try to utilize Github apps and/or Oauth for access as they offer a far more robust set of configuration and controls for autonomous workloads. If still need to leverage Fine-Grain Personal access tokens, limit them to a target set of repo(s), require administrator approval, and set a maximum expiration date to limit exposure.
This provides more granular control over permissions and allows for active review/approval:
- Restrict
pull_request:writePermission: Thepull_request:writepermission is particularly dangerous as it allows users to approve pull requests without Device Trust verification. Consider removing this permission from PATs unless absolutely necessary. - Least Privilege Principle: Grant only the minimum permissions required for each PAT. Avoid broad “repo” scope access whenever possible. FG-PATs make this much easier.
- Code Owners Review: Enforce code owner reviews on all pull requests, even those approved via API. This adds an extra layer of security and helps detect malicious changes.
Token Auditing and Monitoring:
- Regularly Review PAT Usage: Identify unused or overly permissive tokens.
- Monitor API Activity: Look for suspicious activity, such as unexpected pull request approvals or changes made outside of normal working hours. GitHub provides audit logs that can be integrated with SIEM systems.
- Automated Scanning: Use tools to scan code repositories and identify hardcoded PATs.
User Education:
Educate developers about the risks associated with PATs and best practices for secure token management, including:
- Never commit PATs to source control.
- Use strong passwords and multi-factor authentication.
- Rotate tokens regularly.
- Report any suspected compromise immediately.
Conclusion
Device Trust is a vital security component, but it’s not a silver bullet. Attackers will always seek the path of least resistance, and PATs represent a significant vulnerability if left unmanaged. By implementing robust token management strategies – including disabling unnecessary PATs, enforcing granular permissions, and actively monitoring API activity – you can harden Device Trust with token permissions and significantly reduce your risk of supply chain attacks. Remember that security is a layered approach; combining Device Trust with strong token controls provides the most comprehensive protection for your software development lifecycle.